
Because of its flexibility and extensibility, VS Code is used by millions of people worldwide. This post covers the basics of VS Code–from installation to Zen!
Installation
Installation of VS Code is beyond easy. Head over to the download page and you will find versions for Windows, Linux, and macOS, and plenty of hardware platforms. It's quite universal at this point.
The standard Windows and macOS installations are beyond simple, so I won't show those here. However, there are also advanced options for installation including .zip and CLI that you might require in your environment or within an automated installation. Those are listed below the main OS categories.
In addition, you might use (or consider using) third-party package managers in macOS and Windows such as HomeBrew and Chocolatey respectively.
If so, here are installation options for those:
- macOS (HomeBrew) —
brew --cask visual-studio-code - Windows (Chocolatey) —
choco install vscode
Linux is also easy and once downloaded, the program can be installed from the desktop with a variety of GUI-based tools. However, being a command line guy, I can't help but type commands in Linux! For example, to install it from the command line on my Debian Linux system I use the following command:
sudo dpkg -i code_<version>_<platform>.deb
or, on Fedora:
sudo rpm -i code_<version>_<platform>.rpm
Once it is installed it can be run by typing code in the terminal, or by clicking whatever "lowly" icon you can find on your desktop!
◘ For the latest (and potentially unstable) version of VS Code, check out the "Insiders" version.
◘ Also, you can code directly within your browser with vscode.dev.
Basic Setup
When you double-click the icon (a strange mix of a fish and infinity symbol) or type code, you suddenly find yourself in the land of coding. First-timers will see a Welcome page similar to this:
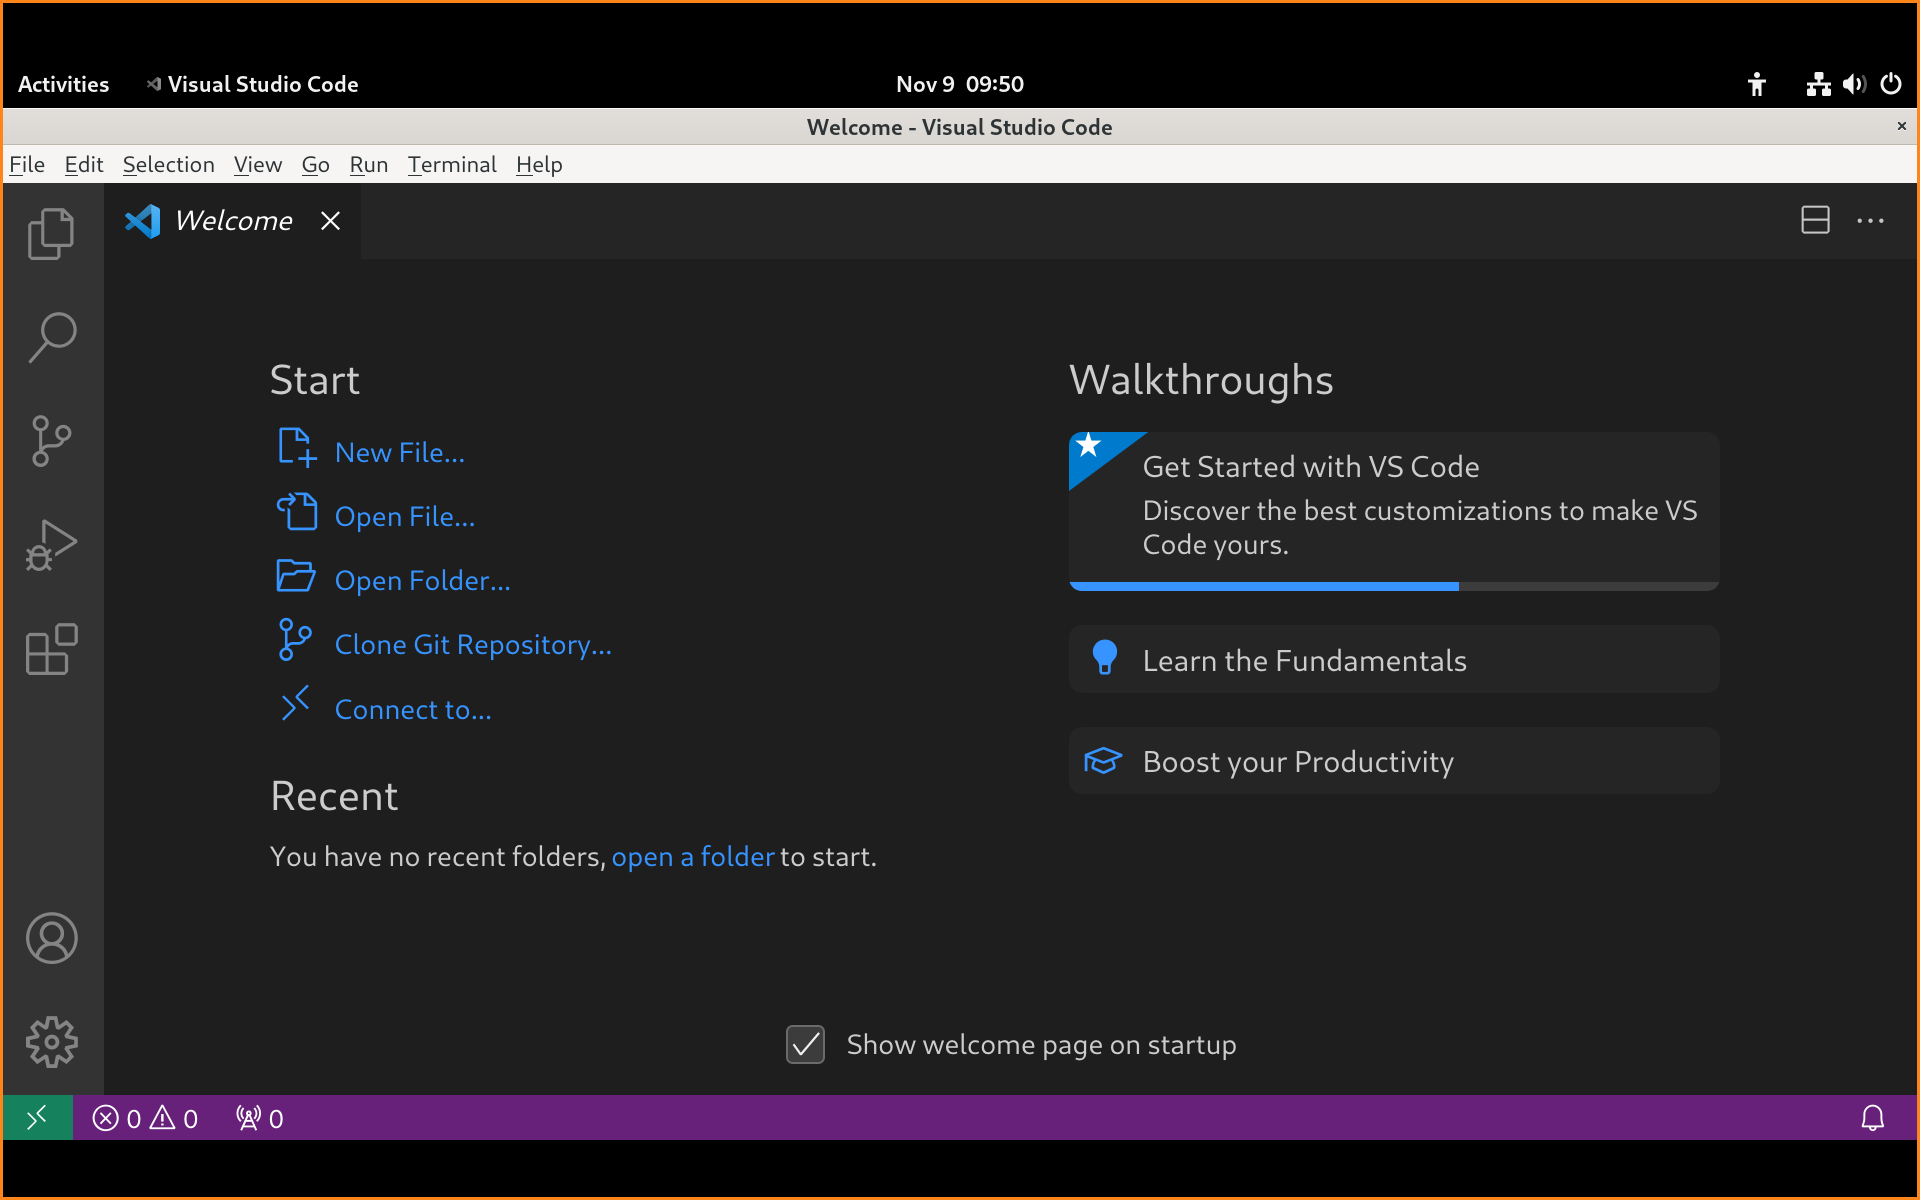
At this point, you can start coding immediately with a new file, open a pre-existing file or folder, clone a repository, or connect to another system, container, or codespace.
For this demonstration, I created a directory in my home folder called code. We'll use that by clicking on "Open Folder...", and selecting the code directory. That should show the "CODE" directory in the Open Editors section to the left.
Now you have a lot of options to create a new file. Here are a few:
- Click the New File... link to start coding
- Go to the menu bar, then File > New File
- Press
Ctrl + NorCtrl + Alt + N - Hover on the "CODE" directory to the left and click the first icon for "New File".
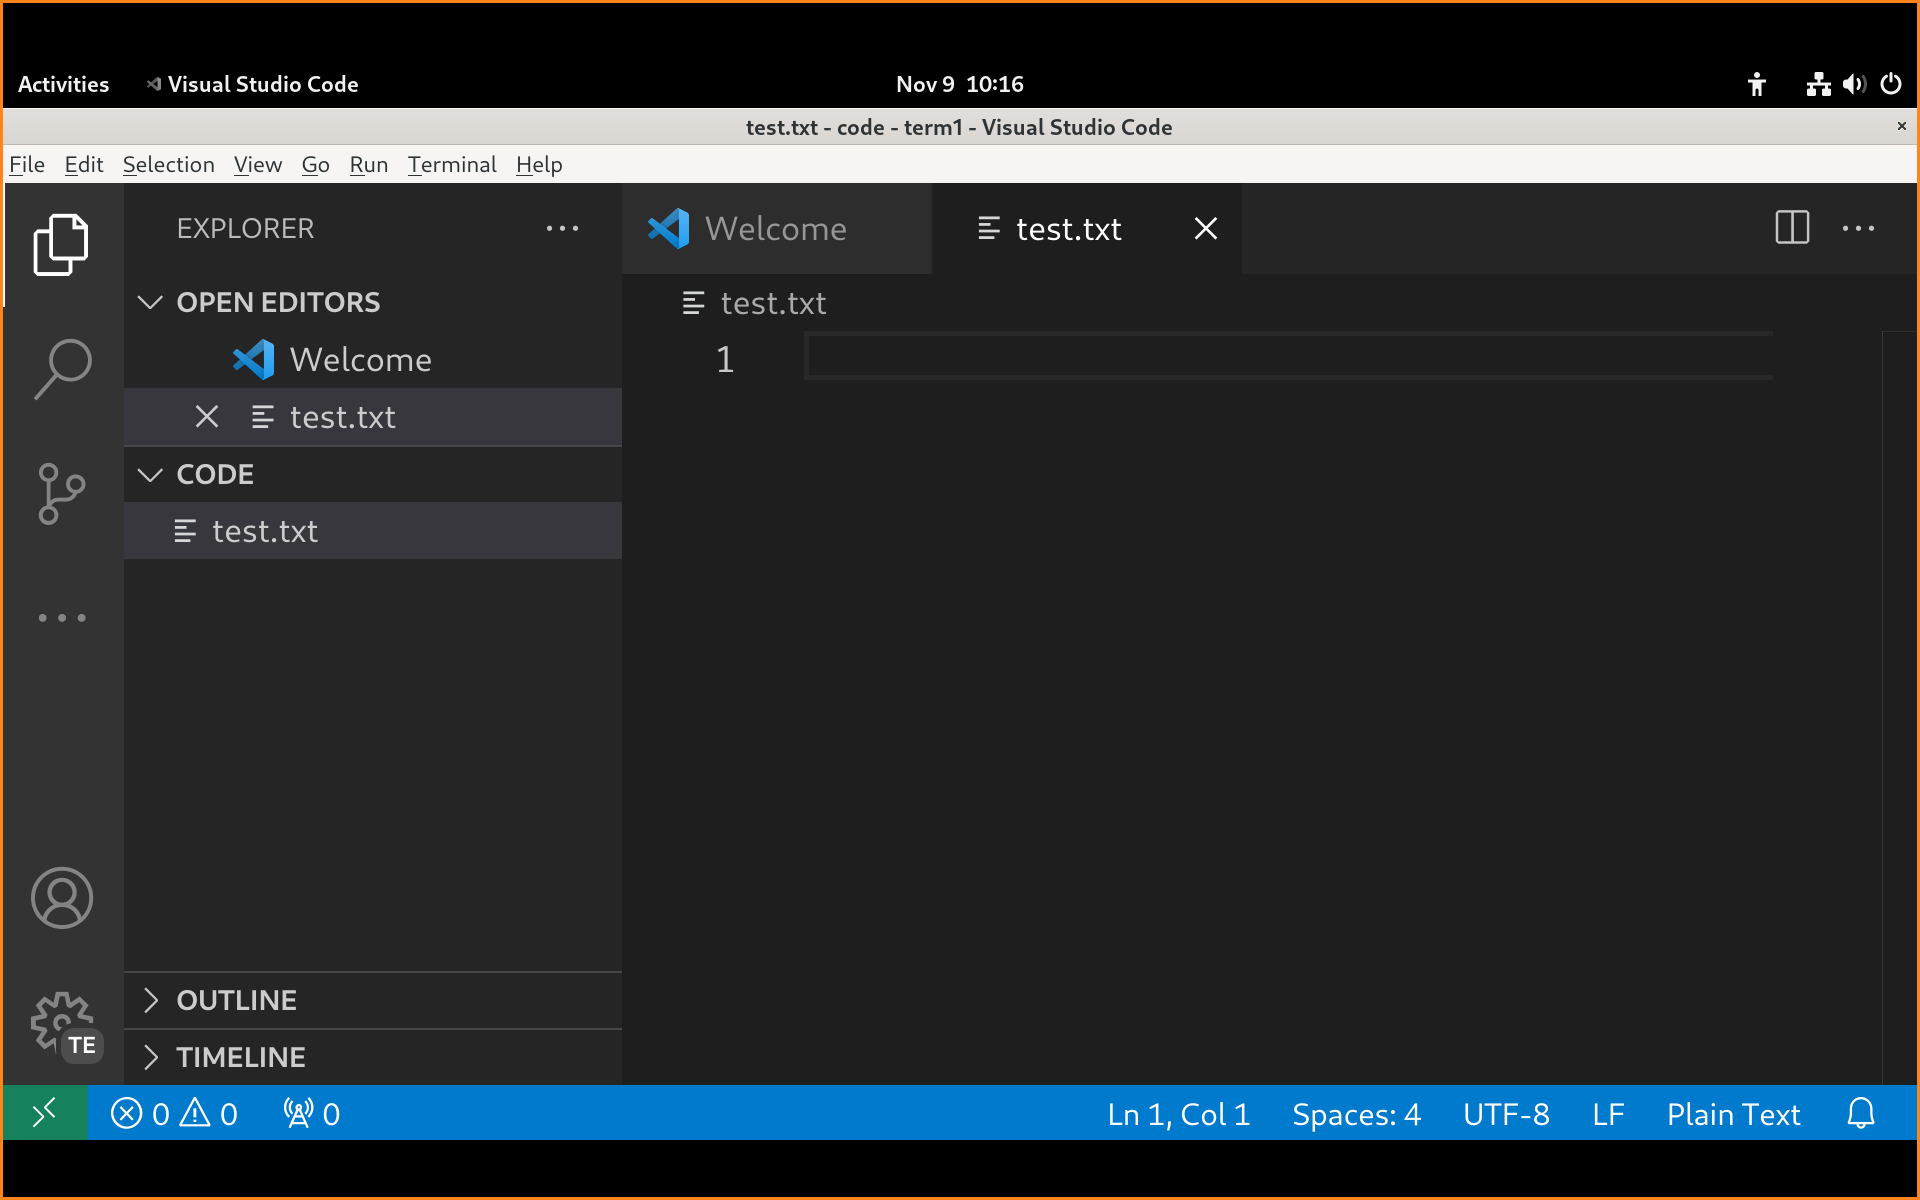
Let's do that last one. I'm going to name my file "test.txt".
Once done, the VS Code window should look something like this:
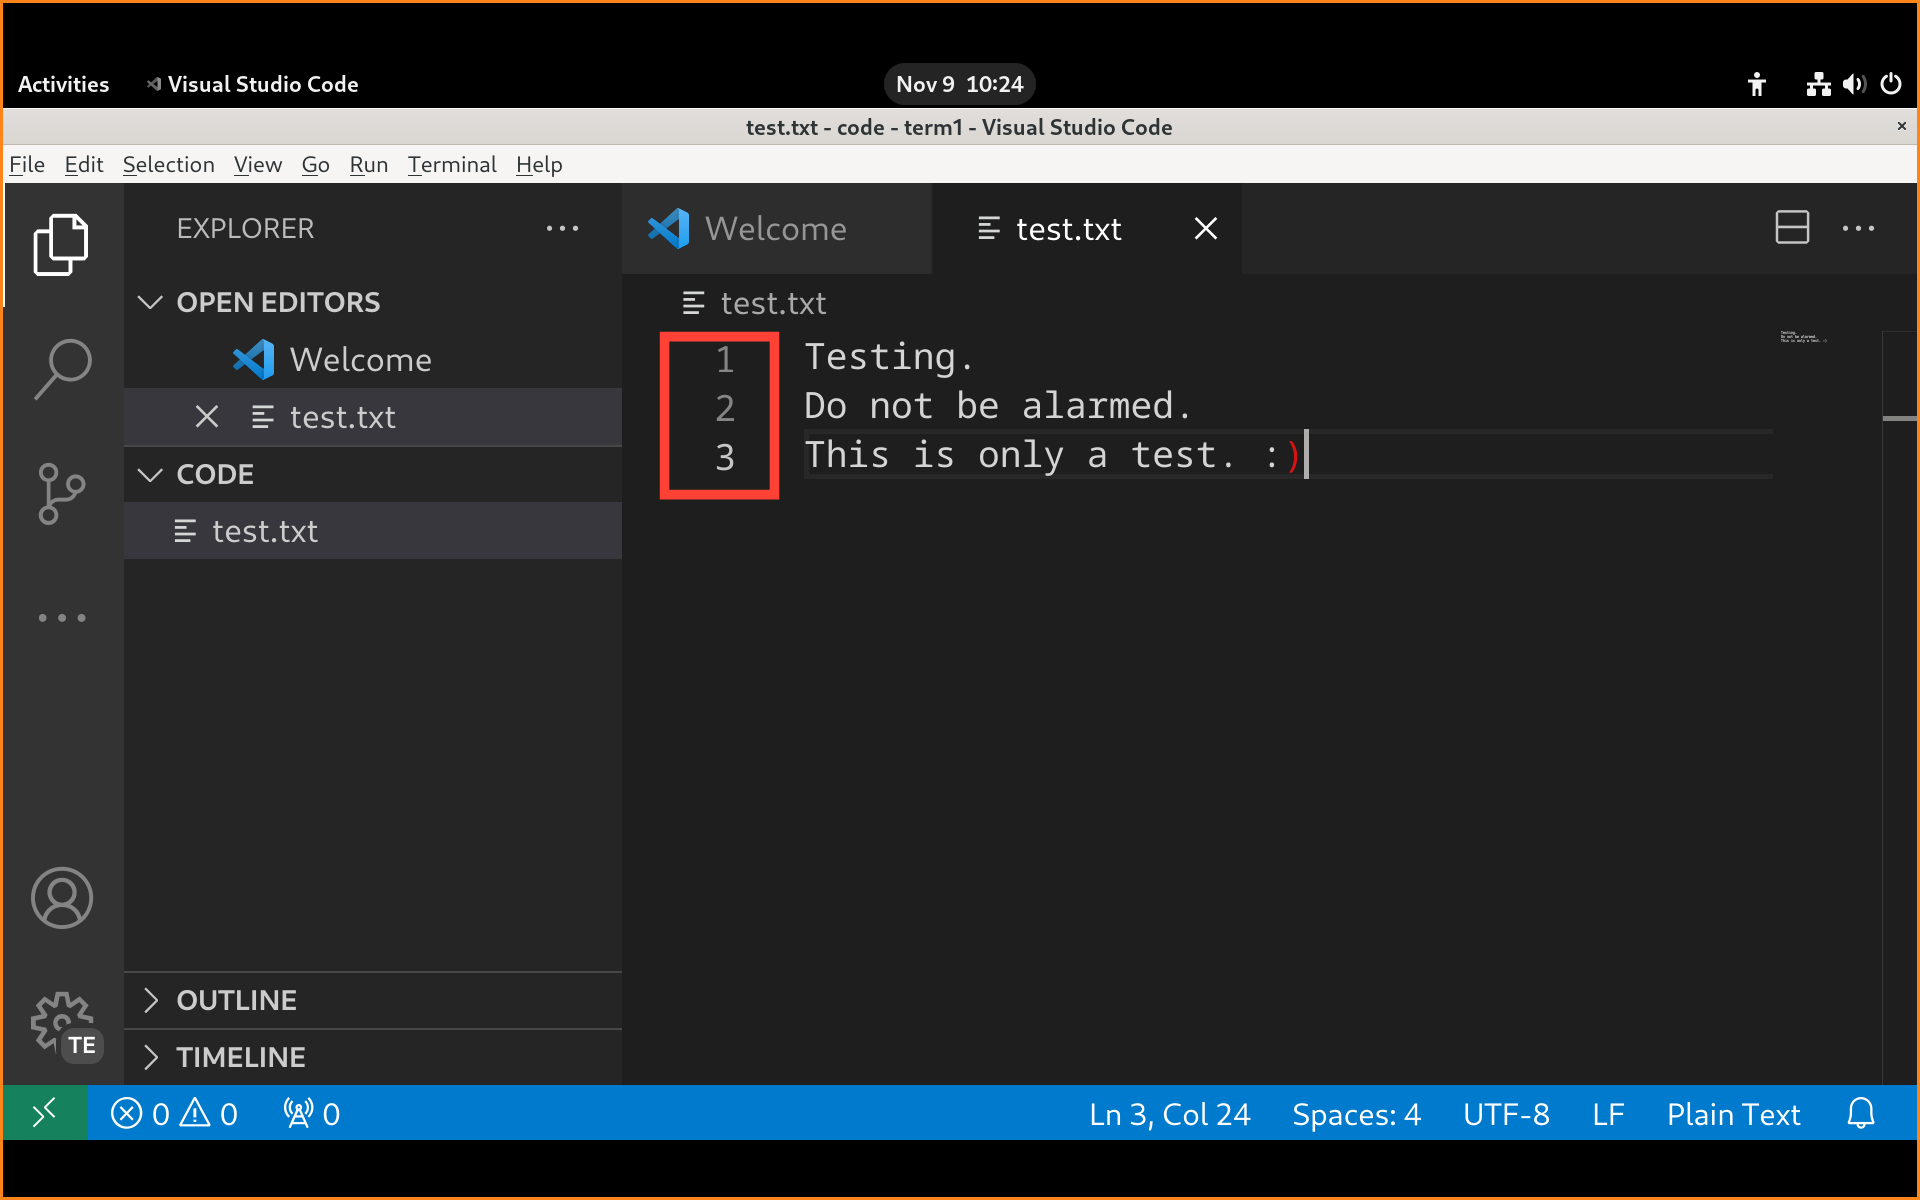
The Editor panel is now opened for "test.txt". Go ahead and type some text! You will find that line numbering is turned on by default as shown in the following figure:
When you are done typing, save your file. This can be done at the File menu or by pressing Ctrl + S. There you go—your first file in VS Code!
If you need to create more files and folders you can use the icons next to the main folder, or right-click in the workspace below the folder name and select an option from there. I use that method quite often.
Components of VS Code
There are several components that make up the entire VS Code window. Take a look at the following figure and we'll describe each numbered component.
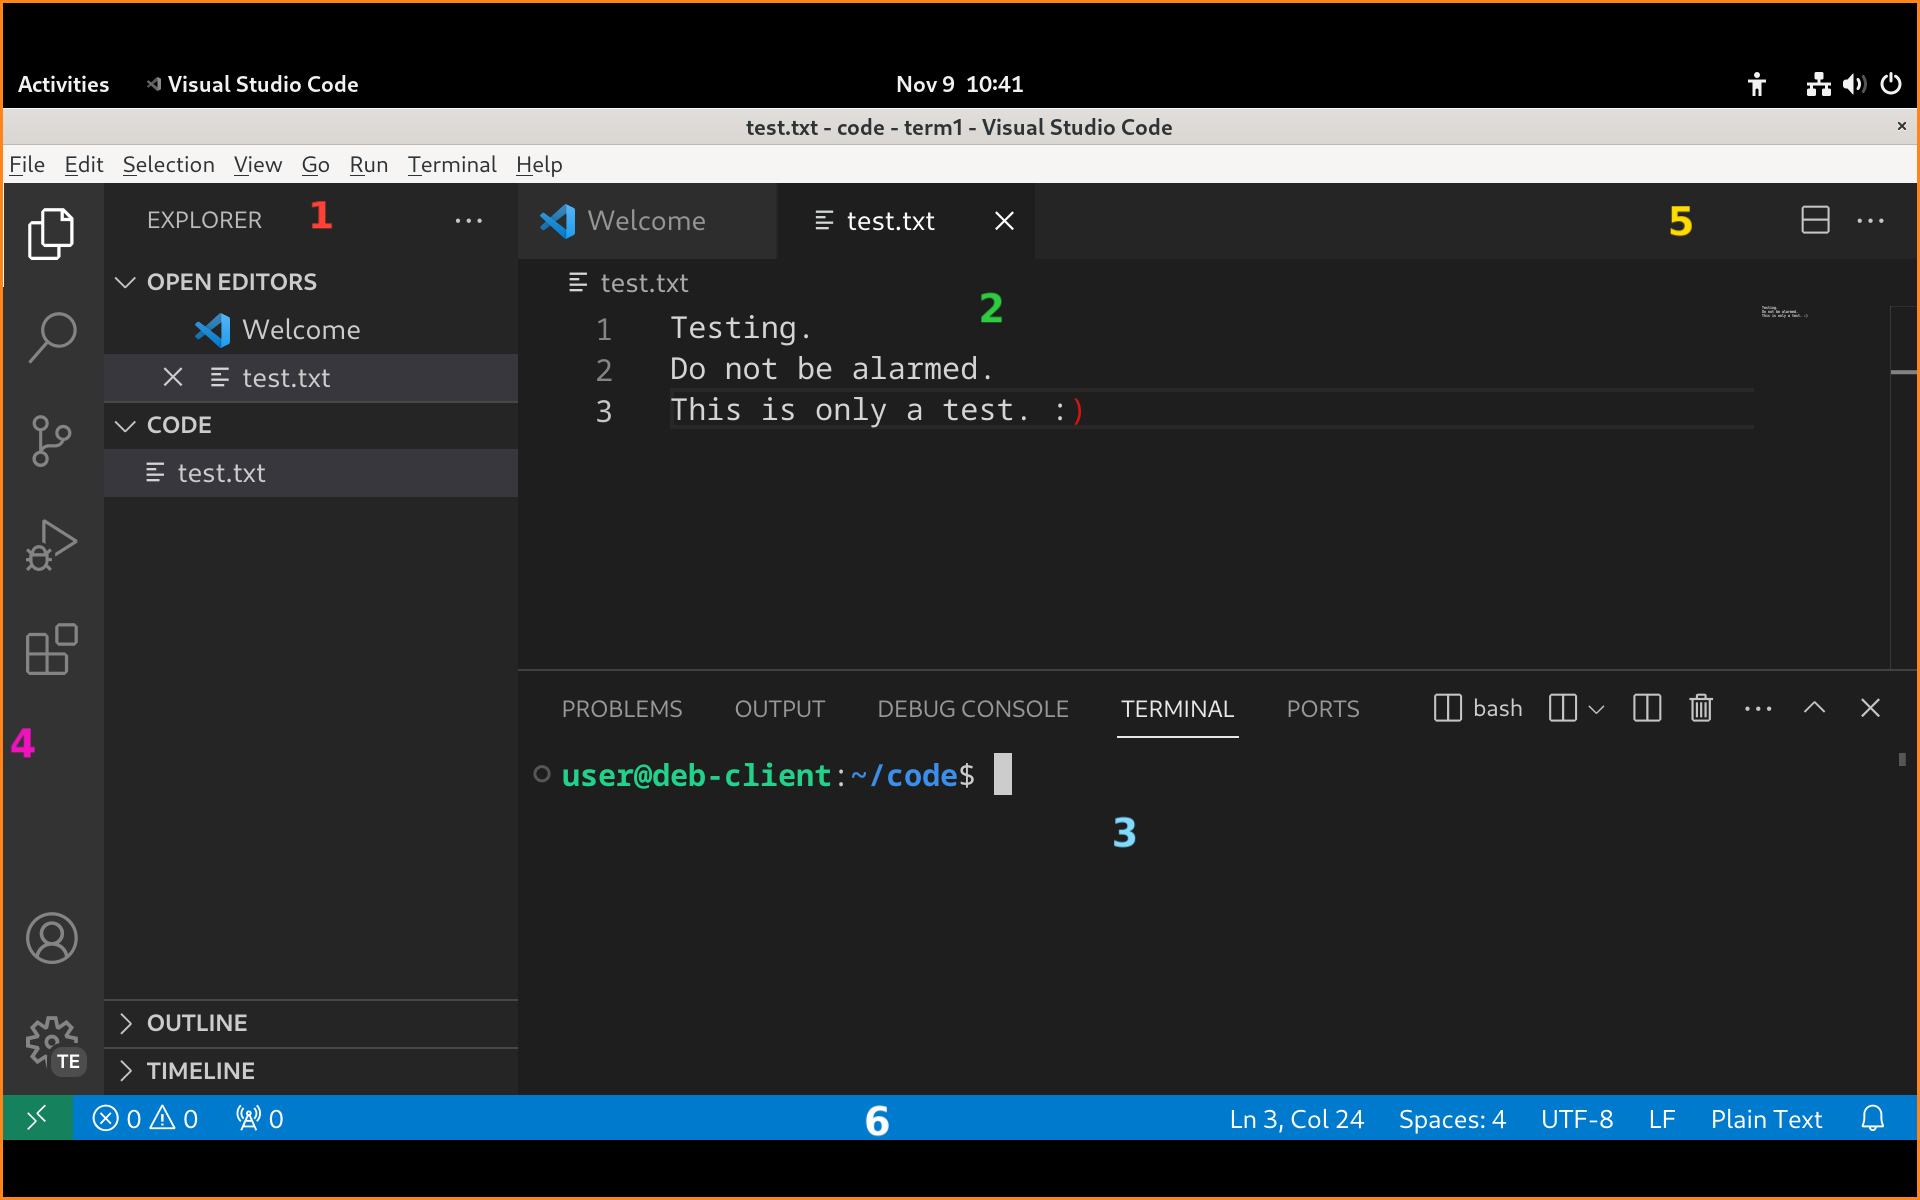
- Explorer — This is where your files and folders are listed. It also shows the open editors list by default. It inhabits the Side Bar. You can quickly hide/unhide the sidebar with the
Ctrl + Bkeyboard shortcut. Other components can inhabit the sidebar as we will discuss in a moment. - Editor Panel — This is where you do your coding. You can have multiple files open at the same time. Each would be opened in a separate tab. You can cycle through these in order with the
Ctrl + PgDnandCtrl + PgUpshortcuts. Or, you can use theCtrl + Tabshortcut to cycle through all open tabs in order of the most recently used.
(To modifyCtrl + Tabso that they cycle in visible order see the trick at the end of the article.)
You can also open editor groups, where you can "group" tabs together in whatever organizational structure you wish. To change between editor groups useCtrl + 1,Ctrl + 2, etc. - Panel (Terminal) — This panel is simply known as "Panel". The item I run the most often here is the integrated terminal.
To display it, pressCtrl + `or use the Terminal option in the Menu bar. (See my article for more information about the integrated terminal.)
You can see that this "Panel" also has Problems, Output, Debug Console, and Ports. The entire panel can be enabled/disabled withCtrl + J. - Activity Bar — This contains the various activities that you run in the Side Bar. While more can be added, the defaults include:
- Explorer (the default activity)—
Ctrl + Shift + E - Search—
Ctrl + Shift + F - Source Control—
Ctrl + Shift + G - Run and Debug—
Ctrl + Shift + D - Extensions—
Ctrl + Shift + X
- Explorer (the default activity)—
- Tab Bar — This is the bar that contains all of the tabs for your edited files. Right-click on it and you will see some options such as creating new files, splitting the tab, and so on. There are a couple of visual icons on the bar for configuring the editors.
- Status Bar — The status bar (on the bottom of the VS Code window) shows you exactly where your cursor is, what indentation you are using (defaults to 4 spaces), the type of document, error notification, and more. You can also right-click the Status Bar to select/deselect the options that are displayed or hide the Status Bar altogether.
You will also note the standard menu bar (File, Edit, etc...) that you can use to navigate through the options of VS Code.
Take some time to click and right-click the various components of VS Code. This will help to familiarize yourself with the layout.
Settings
So far so good. But you will no doubt want to configure VS Code your way. Enter in Settings. You can access Settings by:
- File > Preferences > Settings
- Pressing
Ctrl + ,on the keyboard
Either one of those will open a new tab in the Editor Panel called "Settings" as shown in the following figure:
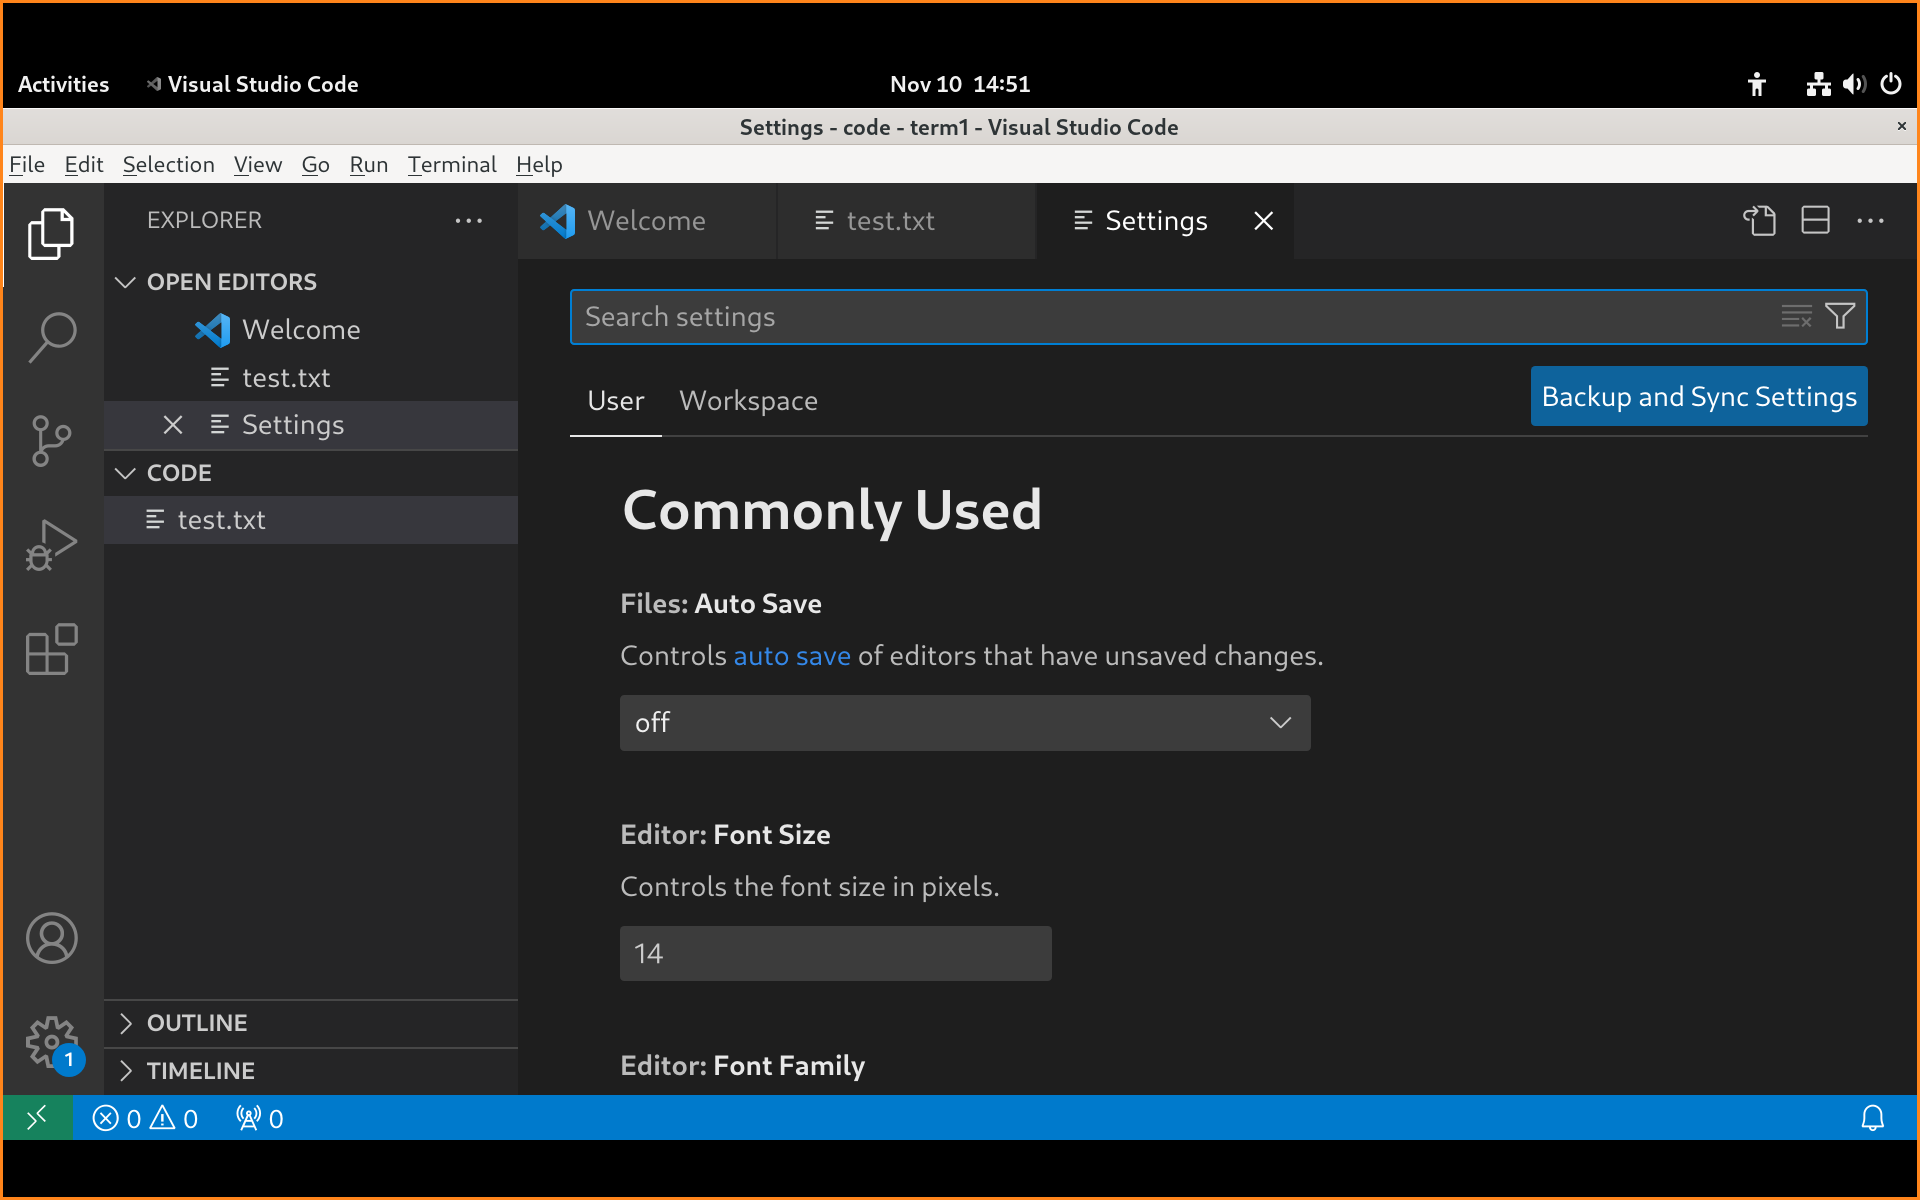
From here you can work with the myriad of settings in VS Code. As you can see, you can enable "Auto Save" or change the font size of your Editor Panel. There are literally hundreds of settings.
User vs Workspace
In Figure 5 you can see that there are actually two sets of settings. One for "user" and one for "workspace". The workspace settings will only affect your current project, but only if you save the project as a workspace. (More on that later.) The user settings will affect all projects that your user account works on in VS Code.
Most of the time, you will configure the more global user settings, but sometimes you will need to have specific settings in certain projects—that's where workspace settings come in.
settings.json
You can also modify your settings within the built-in settings.json files. This can be handy if you have specific configurations you want to use and don't want to hunt them down in the GUI-based settings window, or need to re-use them in different projects or computer systems.
This gets a little more tricky because there are several: user, workspace, application, and default. We'll focus on user and workspace json files. To open either of these, press F1 to bring up the Command Palette and type settings.json. That will provide you will a list of options. The one called "User Settings (JSON)" will open the default settings.json file. This file affects all of your workspaces in VS Code. Here's a basic example:
{
    "workbench.colorTheme": "Default Dark+",
    "markdown-preview-github-styles.darkTheme": "light",
    "window.zoomLevel": 2
}
Code Snippet 1
In this example, there are only three settings: our main color theme, the theme for Markdown Preview, and the zoom level.
If you were to press F1 and select the "Open Workspace Settings (JSON)" option, then VS Code will create a settings.json file directly in your project's main directory. Then you can have specific settings just for that project.
.vscode. Command Palette
We already mentioned it—the Command Palette is... simply put... where you run commands! You can access it by pressing F1 or Ctrl + Shift + P.
Take a minute to scroll through the commands. As you can see, they are formidable, as are the accompanying keyboard shortcuts. It might take some time to familiarize yourself with the system, but the learning curve isn't all that bad—plus, you can use the search feature to speed up the process of finding the commands you need. 15 to 30 minutes and you will be flying through VS Code!
One example of a command you will need to issue somewhat often is the reloading of the entire VS Code window. You can find this command by typing reload window. The option you want is called "Developer: Reload Window". This is necessary sometimes for example if debugging fails, an extension needs to be uninstalled properly, or a terminal stops working. (Ctrl + R is the shortcut for this!)
Color Themes
Without style, humans are nothing. In fact, you could say it's what separates us from the machines. Personally, I prefer the more down-to-earth color themes. My main one is Dark Modern. That's one of the built-in themes, and it suits me just fine. However, if you look back at Code Snippet 1 you will see that the color theme is Default Dark+. Also good! To access the color themes do one of the following:
- File > Preferences > Keyboard Shortcuts
Ctrl + K Ctrl + S
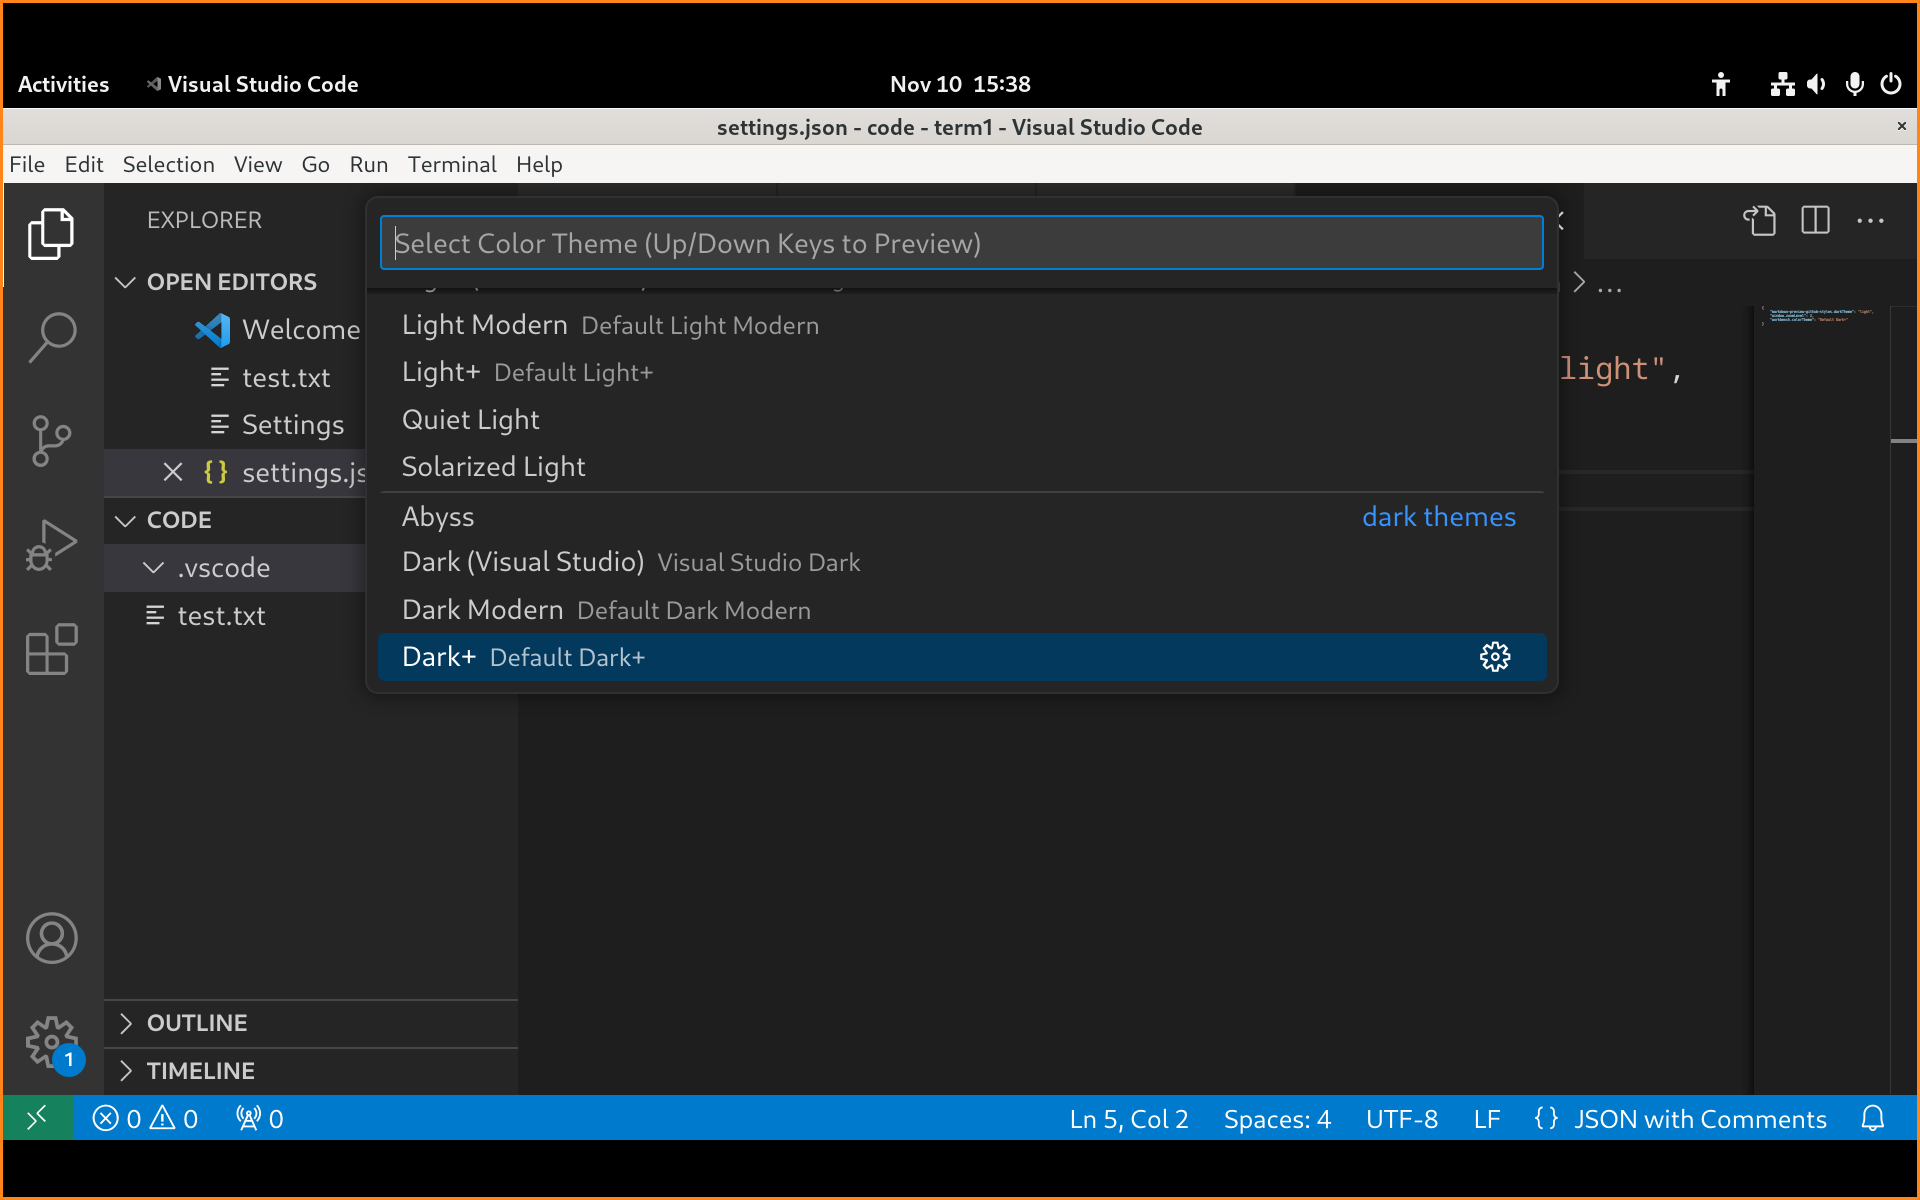
From there you can simply press the up or down arrows to preview a color theme. Like one? Press enter to make it yours! Too much fun.
But each person is different. And thankfully, there are literally hundreds of color themes out there. Because VS Code is open source and has many contributors, you will find no end to color themes, extensions, and other components of VS Code that make it shine.
In fact, themes in VS Code might do more than just change colors. But color is the main reason people install new themes. To do so, you would access the Extensions activity and search for the theme you want. Or, you could go directly to the VS Code Marketplace. More on that in the next section.
Extensions
One of the greatest things about VS Code is its extensibility. You can add-on to VS Code to your heart's delight. Personally, I use about three dozen extensions regularly, and that's somewhat low for a typical tech!
You can install extensions that increase your efficiency, extensions that offer syntax highlighting, extensions that provide you with new themes, and much more.
To access extensions do one of the following:
- Click the fifth icon in the Activity Bar (it looks like three blocks with a fourth one separated as shown in Figure 7).
- Press
Ctrl + Shift + Xon the keyboard
That opens the Extensions portion of the SideBar.
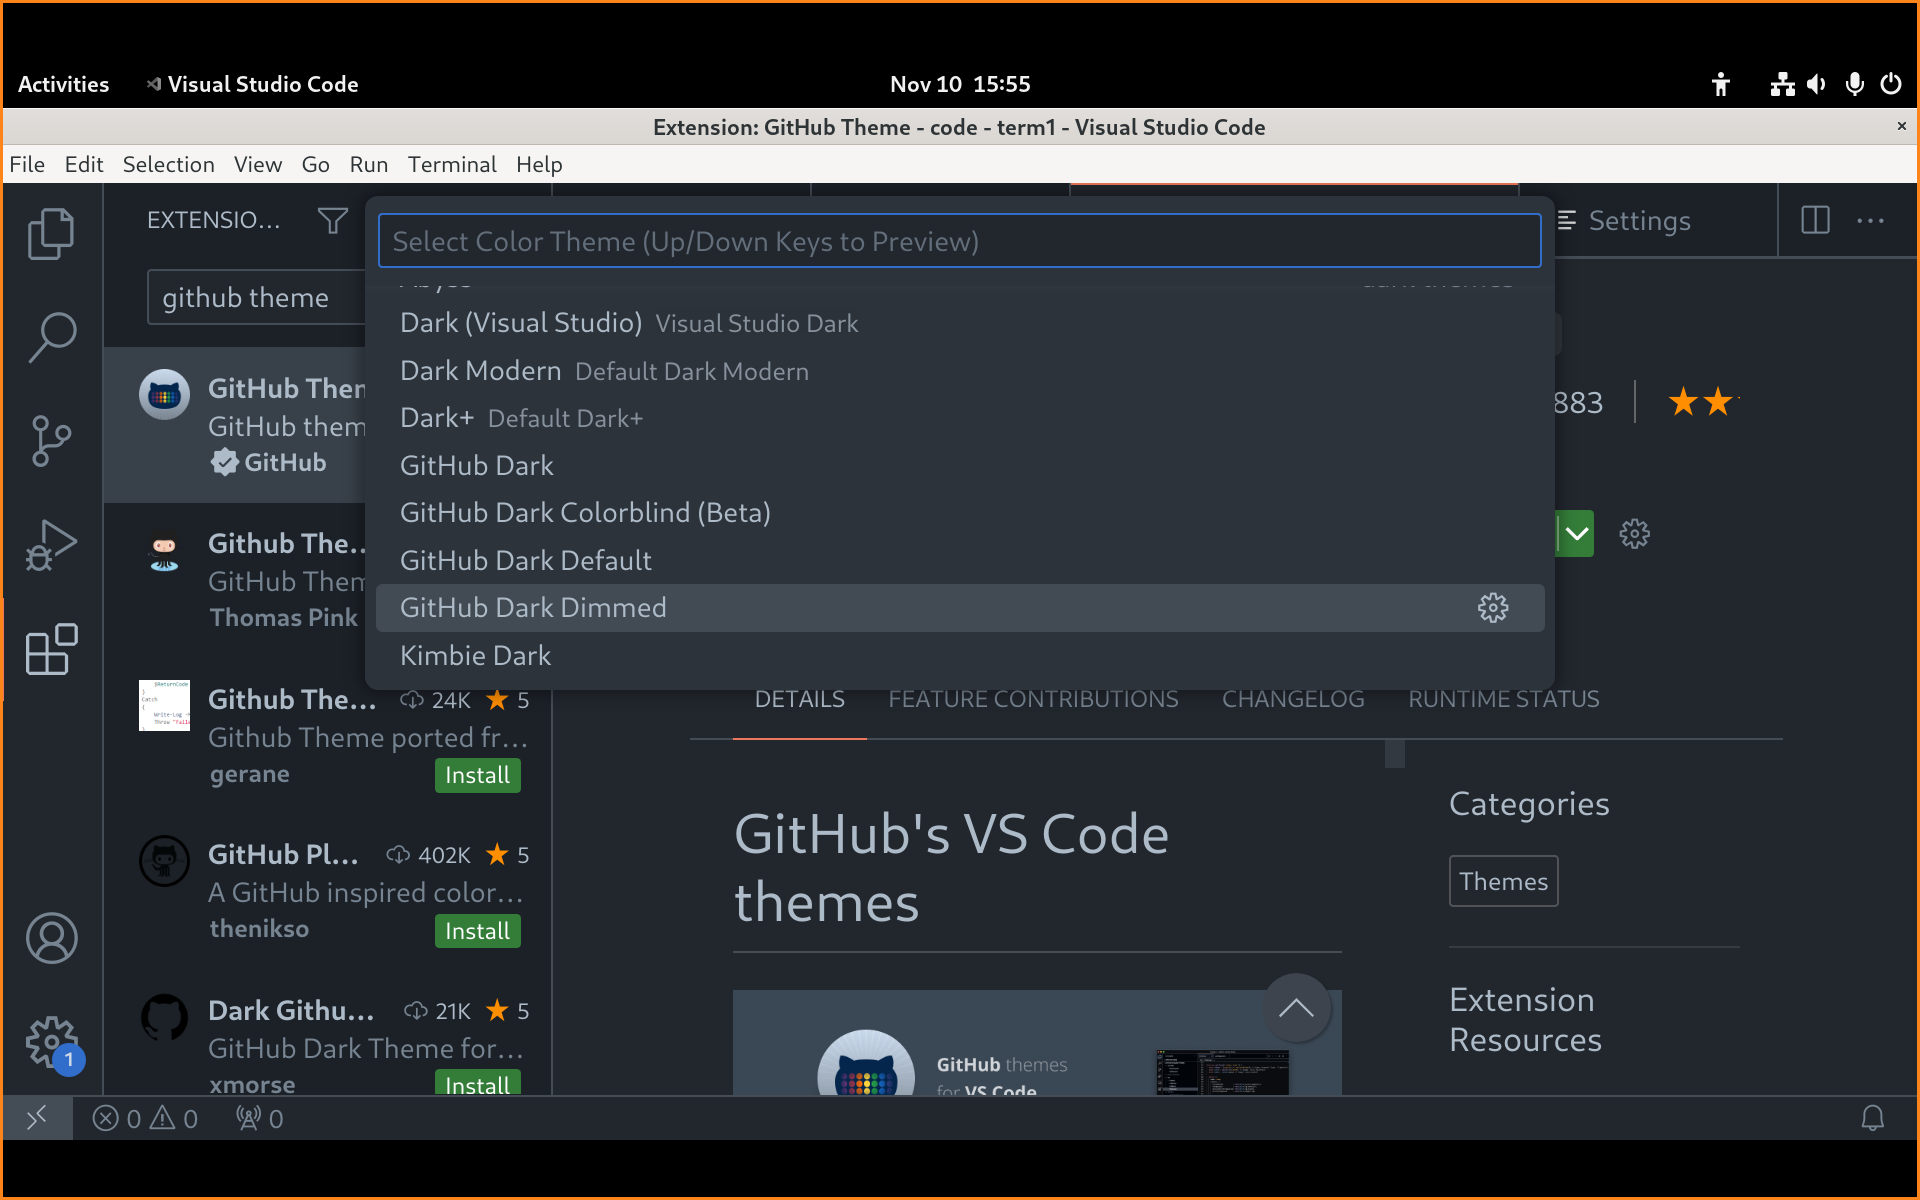
This will list the currently installed extensions (if any). You can also search for extensions right here. For example, in Figure 7 I searched for the GitHub Theme.

The first one listed is the official GitHub Theme. Let's check it out.
In this case, I see that the first one listed is from GitHub. We can click it to find out more about the extension and to confirm the officiality of the theme. It displays this information as a tab in the Editor Panel.
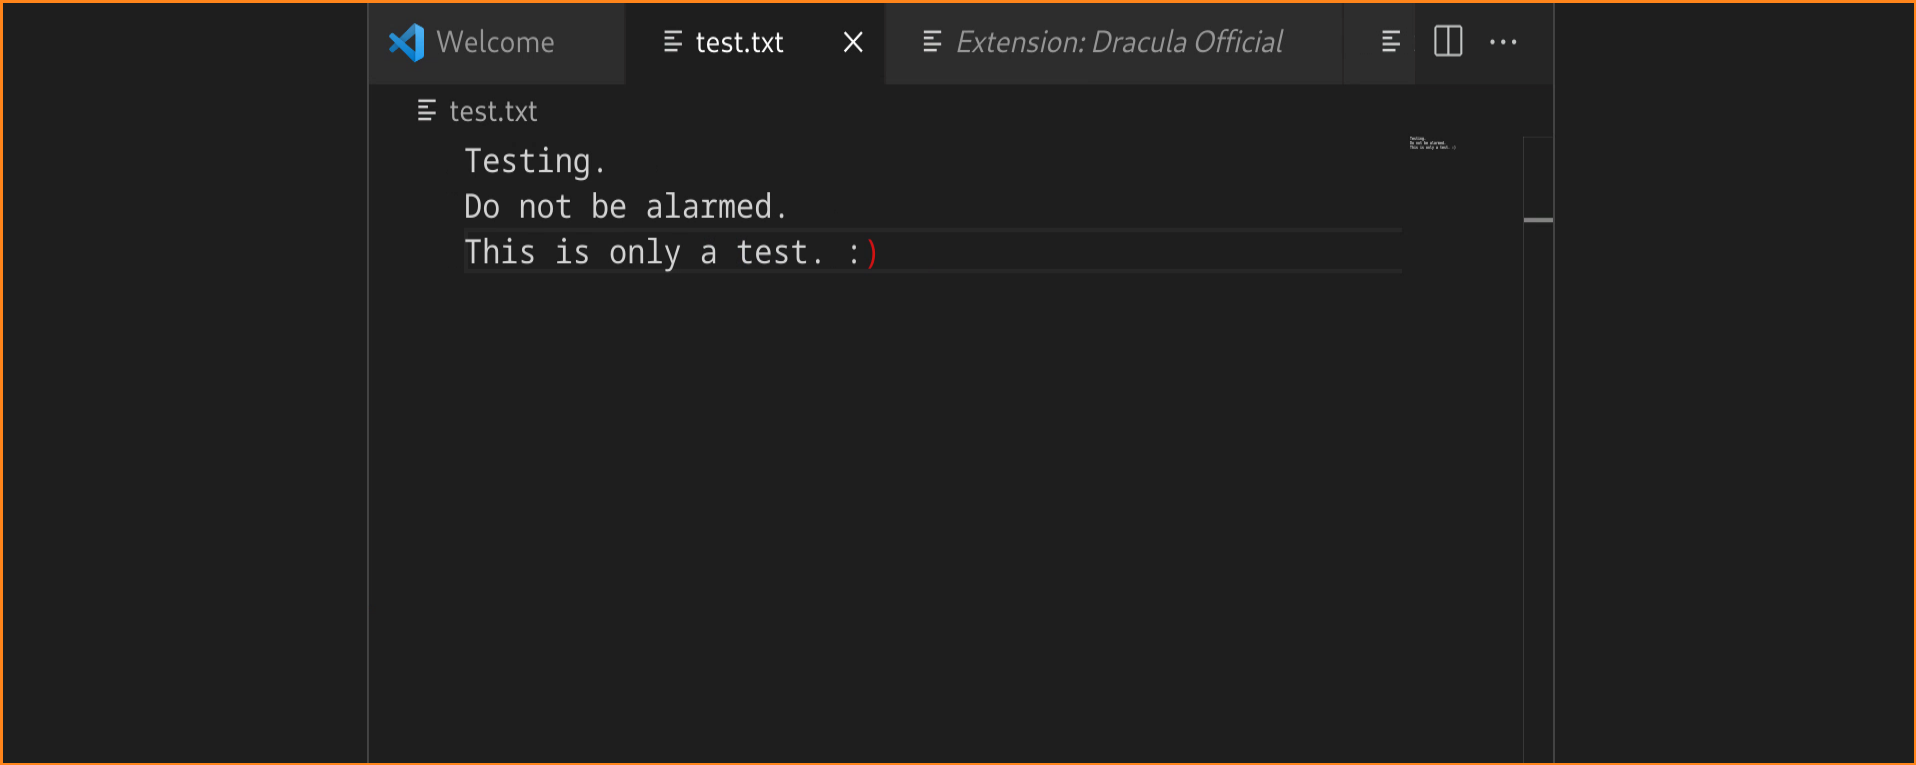
If you wish you can install the extension and you will have more color themes listed as shown in the following figure:
Note the subtle color changes in Figure 8 compared to Figure 7. Other subtle themes that are easy on the eyes include Tokyo Night and Atom One Dark Theme. However, there are much more flamboyant themes out there. For example, the popular Dracula Theme.
This is only the tip of the iceberg when it comes to extensions. You can install extensions that will incorporate syntax highlighting, help suggestions, auto-completion of code, documentation help, and much more. Check out the Marketplace to get an idea of some commonly used extensions.
Some people like to keep Extensions, Run and Debug, or custom activities in the secondary Side Bar for easy access without closing the Explorer activity in the primary Side Bar.
To return back to your regular code files you can either click the appropriate tab or click on the Explorer icon in the Activity Bar (Ctrl + Shift + E). Remember—it's all about the coding!
Zen Mode
If you feel you need more space, you can press F11 for fullscreen mode. However, this is limited — it only removes the Title Bar and Menu Bar. To really create space, use Zen Mode.
Zen Mode is essentially a presenter mode. It removes the Menu, Activity, Side, and Status bars. This way, you can focus more on your code. It also works well if you are demonstrating code for team members or in an educational environment.
To initiate Zen Mode do one of the following:
- On the Menu Bar go to View > Appearance > Zen Mode
- Press
Ctrl + K Z
Now your window will look something like this:
As you can see, only the Editor Panel is showing. However, you can incrementally add VS Code components back in. For example, press Ctrl + ` to bring up the terminal. Press Ctrl + B to show the Side Bar. Slowly, it starts to look like the original window!
To exit out of Zen Mode press Ctrl + K Z again. You could also press Esc twice (but only while in the Editor panel).
Standard keyboard shortcut chords are accomplished when you press a shortcut, let go, and quickly press a second shortcut.
For example, Ctrl + K Ctrl + T.
But the second key press can also be a single key, as is the case with Ctrl + K Z when accessing Zen Mode.
Workspaces
Once you have your project set up the way you want you can save it as a workspace in VS Code. This will allow you to open the project at a later time simply by selecting the appropriate workspace. When you open a workspace all of the individual settings you selected for the project are activated. It also remembers the last file that you were working on.
To save a workspace go to File > Save Workspace As. Then select the location for your workspace and a filename. It should be placed in your main project directory. A best practice is to save it in a hidden .vscode directory in your main project. It will save with a .code-workspace extension by default. An example is shown in Figure 10.
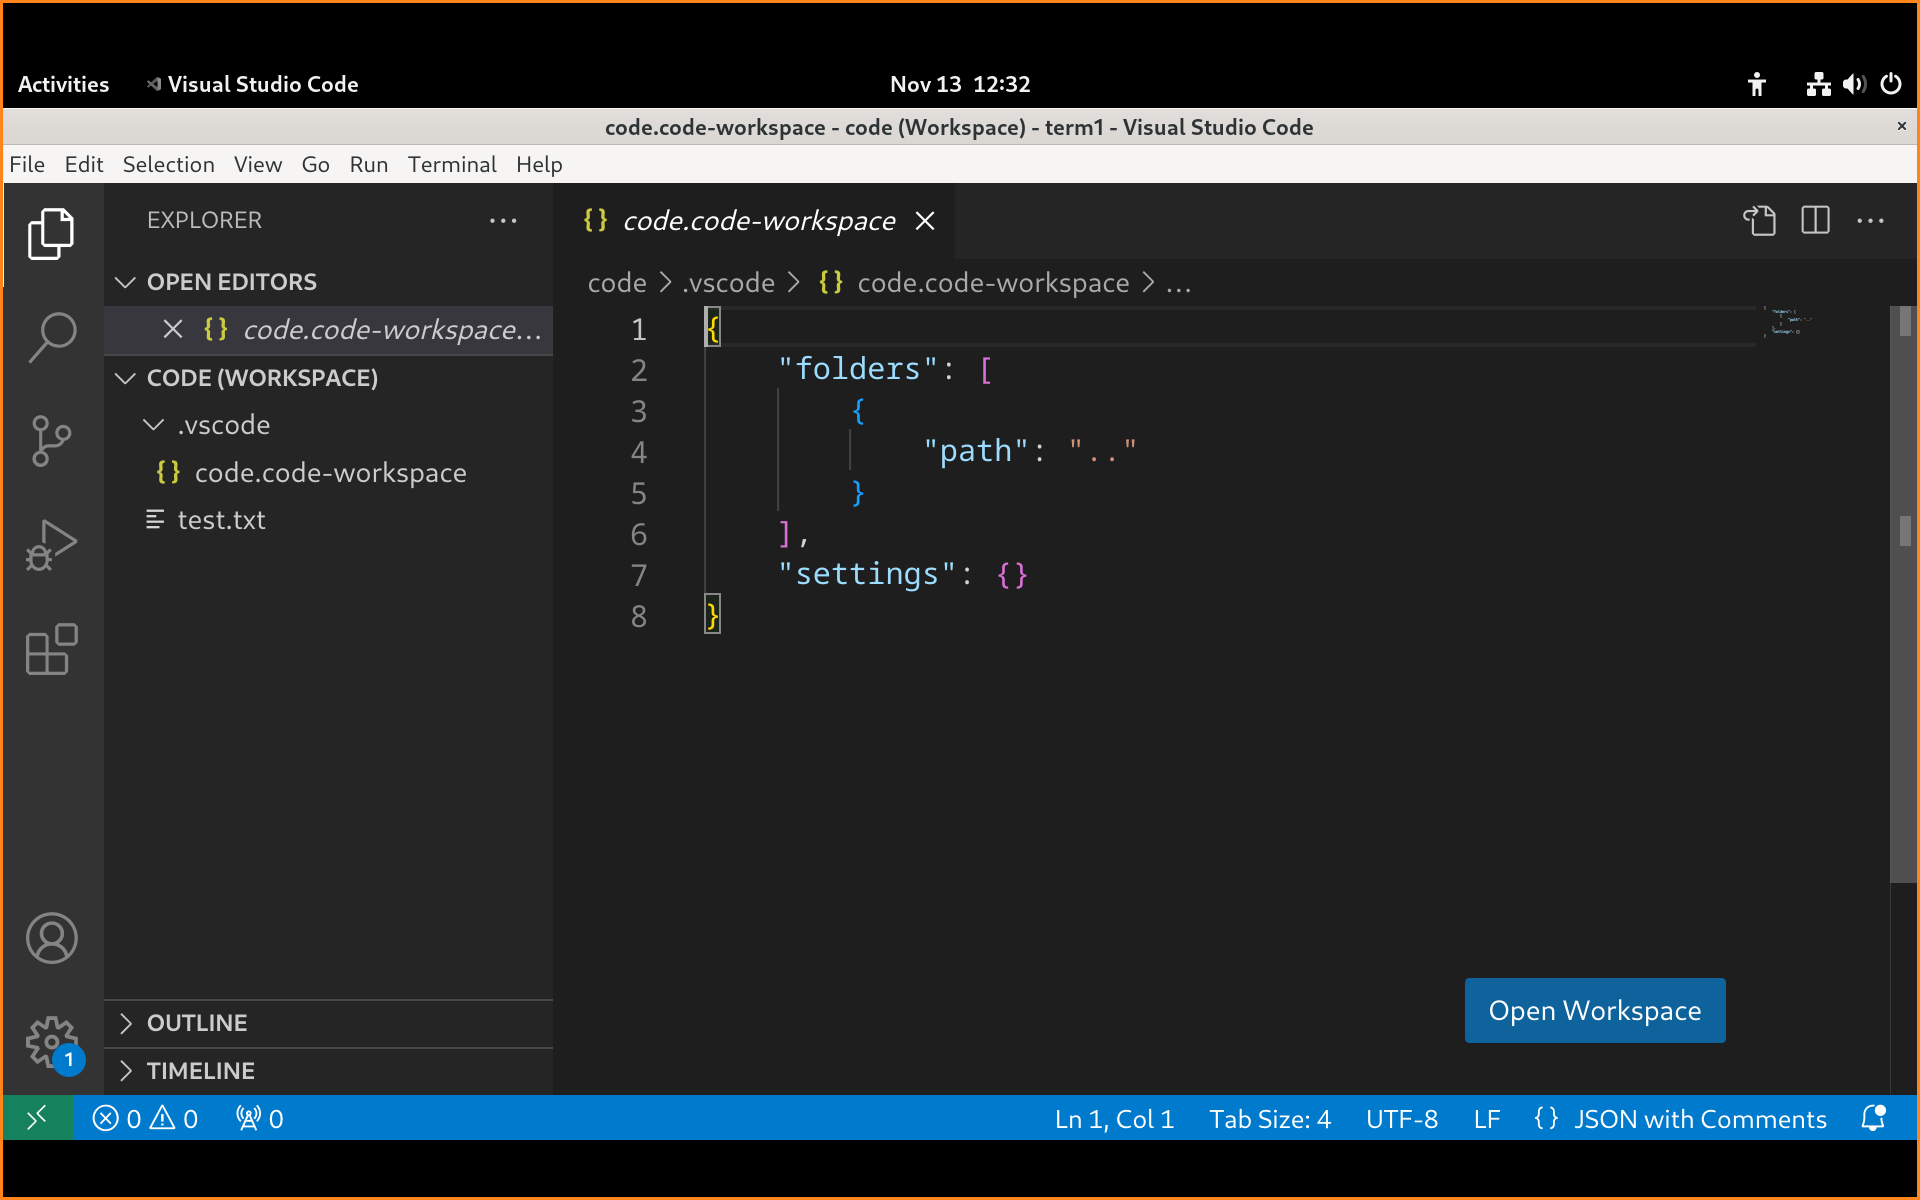
In the figure, you can see the code.code-workspace json file that I saved within the hidden .vscode directory. The file is devoid of any real configurations but we can modify that.
For example, let's say I added an extension called Peacock to modify the Status Bar and Activity Bar colors. Then you would have what's shown in Figure 11.
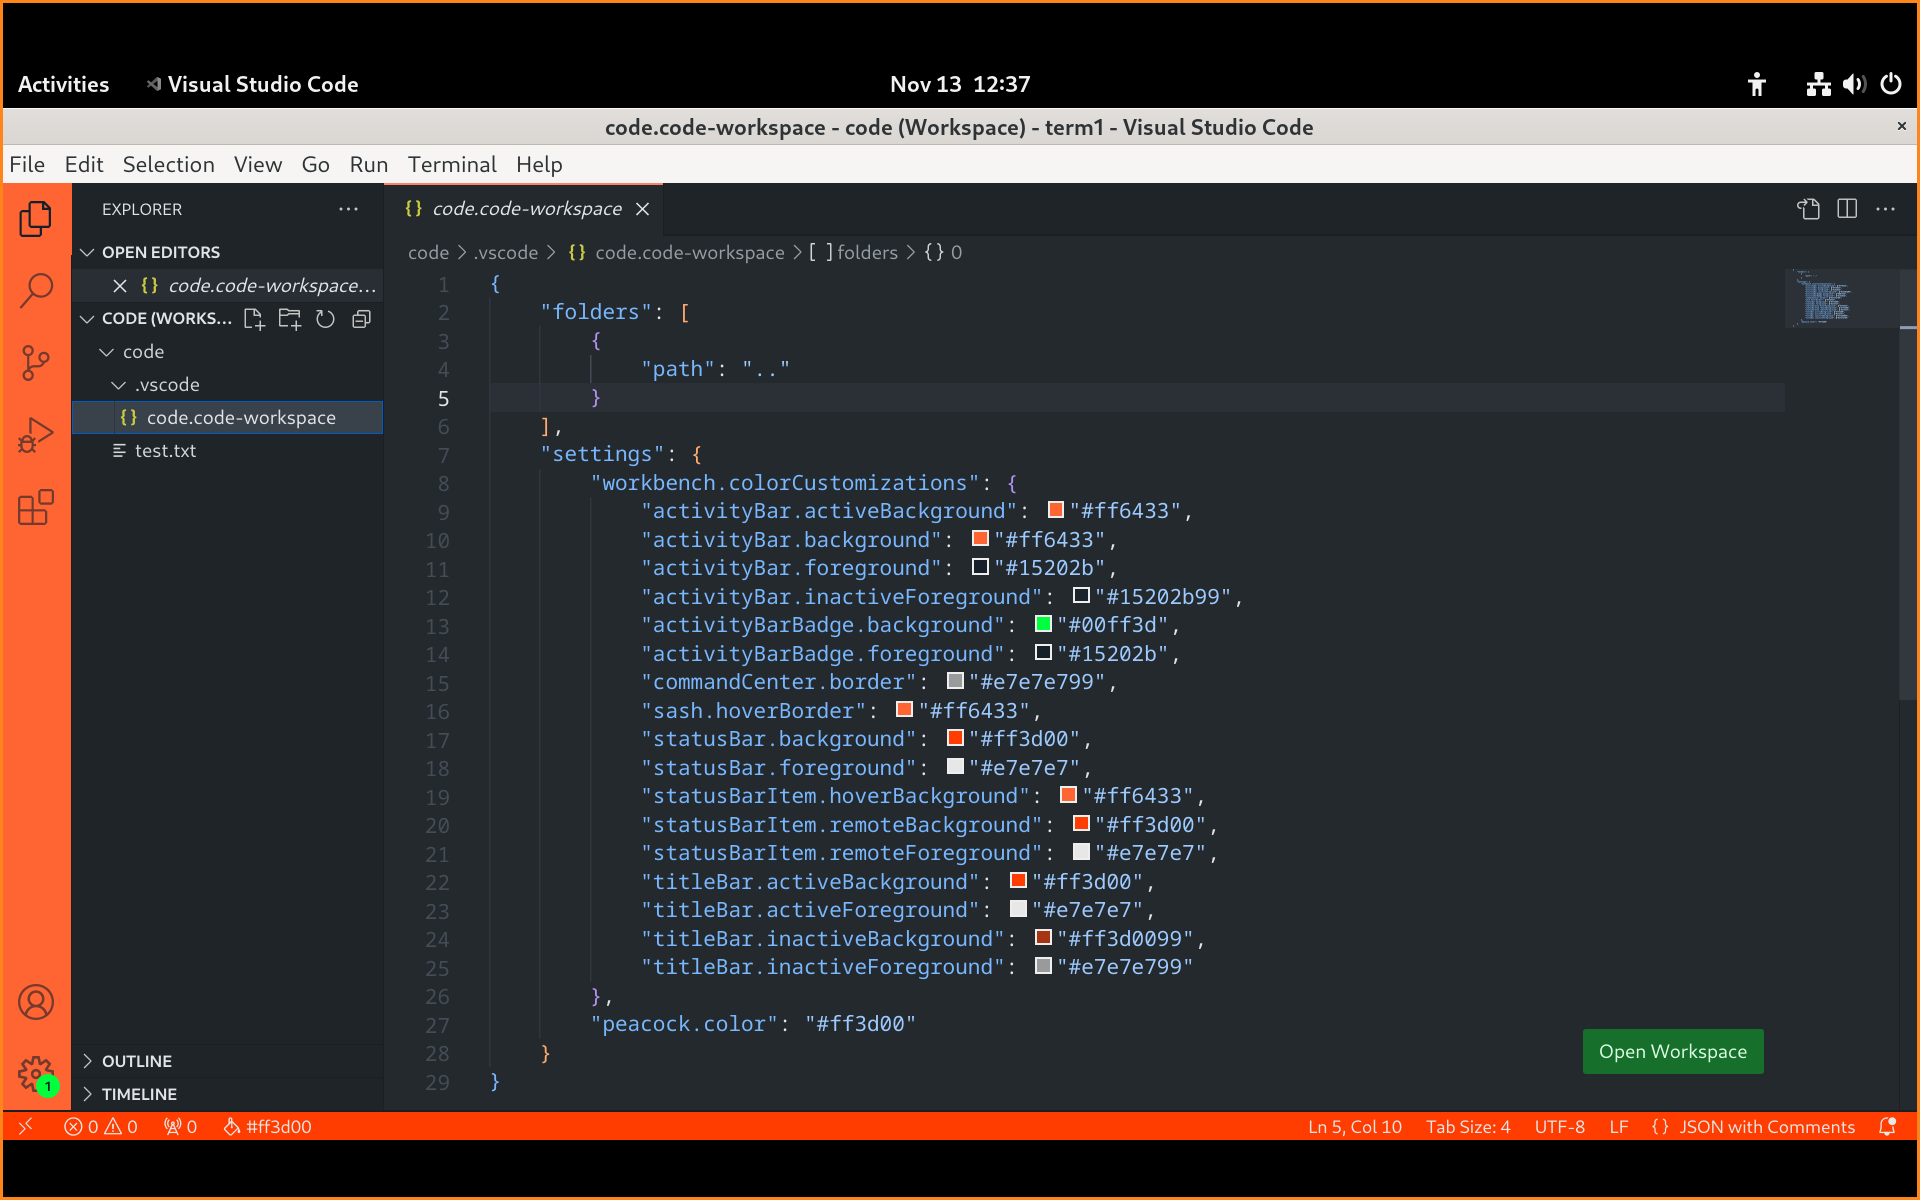
Now, every time I open this workspace, VS Code will read the code.code-workspace JSON file and apply the settings that are within, modifying the colors as shown in Figure 11. And that's just the beginning, you can modify all kinds of settings and save them to the particular workspace so that they don't affect other workspaces. If you are working on multiple developing projects, this can be extremely helpful.
By the way, to open a Workspace, go to File > Open Workspace from File... or Open Recent (which should show a list of recent projects and VS Code files.) Save it as a shortcut on your desktop or in your Dash/Dock to save time.
It's best used when integrated with your Workspace file though the settings can be saved elsewhere in your project if you wish.
It's a great tool that helps you to differentiate between various VS Code projects.
Summary
In this article, we demonstrated how to install VS Code, identified the main components, configured it to our liking, and made use of Settings and the Command Palette. We also worked with themes, extensions, Zen Mode, and workspaces.
In truth, this actually was a "basics" article. There is so much more to VS Code. But at this point, you are ready to use VS Code efficiently. Practice with it.
For more techniques, check out the VS Code Tips and Tricks page.
Also, consider using the Interactive Playground: Help > Editor Playground, and visit the main VS Code documentation page often.
Remember that millions of people with widely varying careers use VS Code—coders, DevOps personnel, systems administrators, engineers, documentation specialists, scientists, and more. Make it a part of your individual workflow by incorporating extensions and modifying settings to your liking.
And have fun with it!
Bonus Trick
Previously in the article we mentioned that you could modify the default method for cycling of tabs while using the Ctrl + Tab shortcut as you work with multiple files. The default is to go by the recently used files. Many people prefer this to default to cycling in order.
While you can do this with Ctrl + PgDn and Ctrl + PgUp, that requires a "two-hand" keyboard shortcut. Many people prefer the Ctrl + Tab method.
So, to change the cycling order while using Ctrl + Tab, do the following:
- Access your keybindings.json file:
- Press
F1( orCtrl + Shift + P) - Enter: "Preferences: Open Keyboard Shortcuts (JSON)"
- That will open the keybindings.json file in a new tab.
- Press
- Add the following to the file (for cycling through tabs in the current editor group):
[
    {
        "key": "ctrl+tab",
        "command": "workbench.action.nextEditorInGroup"
    },
    {
        "key": "ctrl+shift+tab",
        "command": "workbench.action.previousEditorInGroup"
    }
]
JSON for cycling through tabs in current editor group.
[]) so you need not enter those again. If you have other keyboard shortcuts listed here, just be sure to keep them all in one set of square brackets.Alternatively, add the following to the file (for cycling through tabs in all editor groups):
[
    // ...
    {
        "key": "ctrl+tab",
        "command": "workbench.action.nextEditor"
    },
    {
        "key": "ctrl+shift+tab",
        "command": "workbench.action.previousEditor"
    }
]
JSON for cycling through tabs in all editor groups.
- Save the file. Your change should be initiated immediately. (Restart VS Code if necessary.) NICE!


