✩ Run Linux instead of Windows.
✩ Build a fairly powerful computer and not break the bank.
✩ Use a DAW in Linux to record music. (I'm using Reaper.)
✩ Game on Linux.
Spoiler alert - this article is extraordinarily long! Read on!
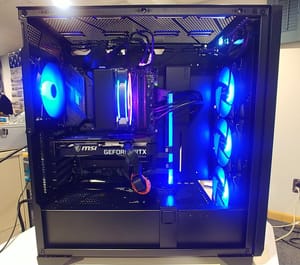
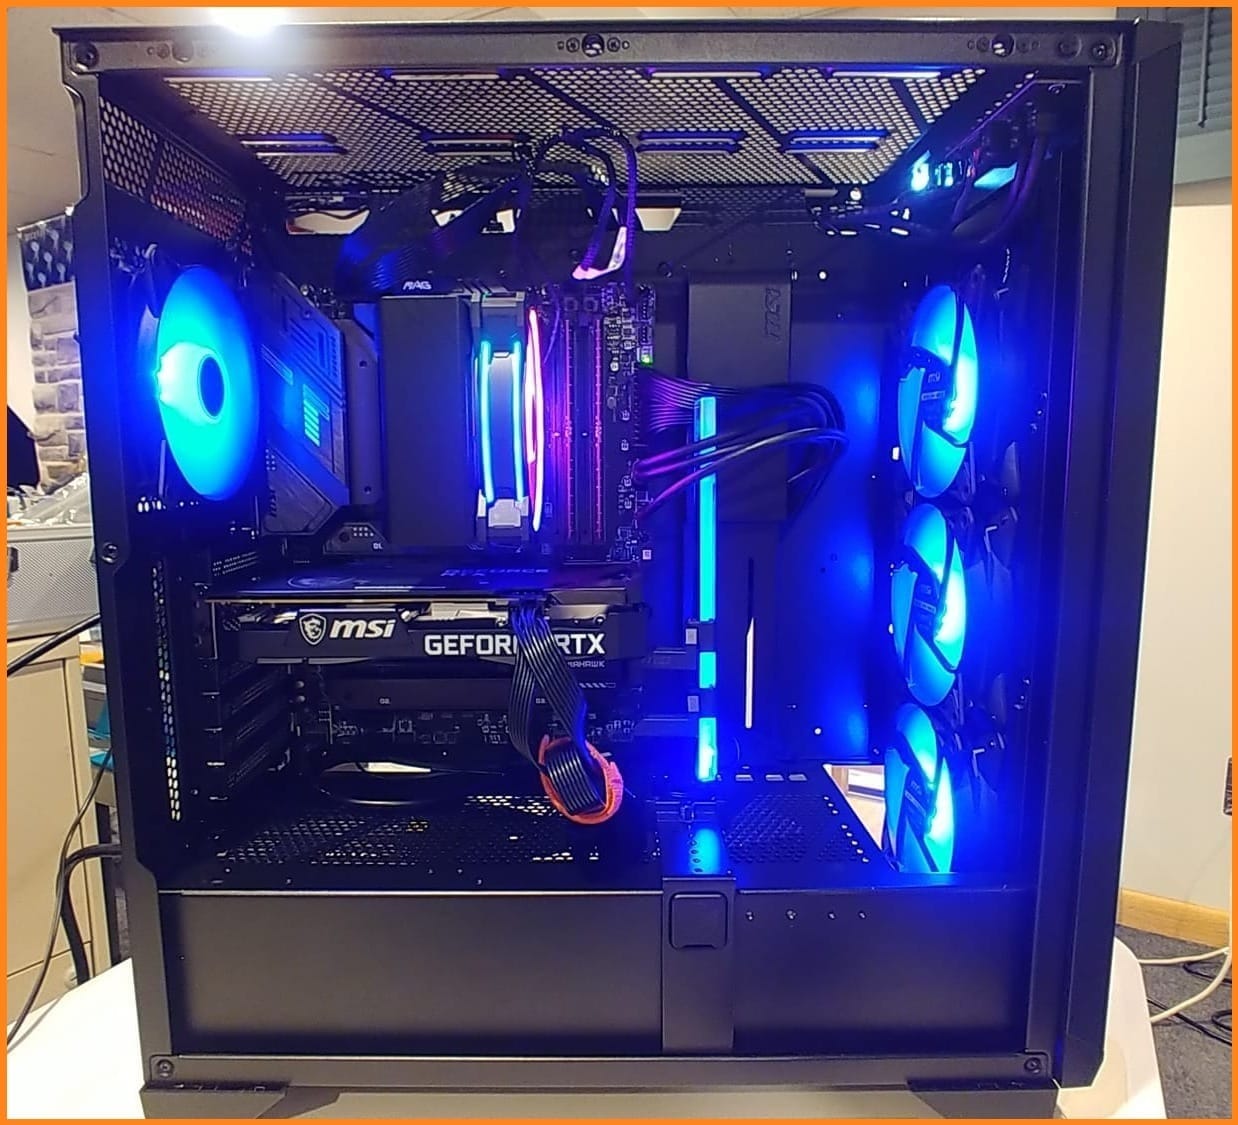
Greetings all! Well, it was time to build a new home PC. I wanted something that I could record music on—something fairly powerful. So, I researched some parts over the past few months, culminating in a hardware grab during mid-to-late-November, when the prices were at their lowest all year. Built the computer from December, 2024 to January, 2025. It was a fun build and it went pretty smooth. Here it is:
"It's the good old hobby days!"
Indeed... Indeed.
Specifications 🖺
Here are the specifications and cost of the devices.
(Prices are from November of 2024. Prices can change at any time. I like to show what I paid so you can get an idea of what is reasonable.)
| Component | Model | Cost |
|---|---|---|
| Motherboard | MAG B760 TOMAHAWK WIFI | $180 |
| CPU | Intel Core i7-12700KF | $185 |
| CPU Heatsink | Cooler Master Hyper 212 | $29 |
| RAM | Crucial 64 GB 5600 MHz | $171 |
| Storage Drive | Samsung 990 Pro 2 TB | $151 |
| Storage Drive | Samsung 970 Pro 1 TB | nil (salvaged from older system) |
| GPU | MSI Nvidia RTX 3060 (12 GB DDR5) | $279 |
| Case | MSI MPG GUNGNIR 300R Airflow | $155 |
| PSU | MSI MAG A850GL | $85 |
| Total | $1235 |
Not the latest components mind you. I usually go down at least one generation from the latest in order to SAVE MONEY!!! The technical differences from generation to generation are often minimal. (Not always, but often.) This mindset has served me well over the years.
Oh yes, but the discipline prevailed! And my overall budget of $1200 was almost met. I splurged on RGB lighting for fun.
For example, as of the writing of this post, Intel has Core i9 chips and plenty of newer i7 chips going into the 13th and 14th generations. However, the i7-12700KF is a proven winner and doesn't differ all that much from those newer generations (even though it was released 3 years before this build). It aged well, and I was able to find a great deal on it.
I approach AMD CPUs in a similar manner. Speaking of which, I was tempted to go with AMD, or perhaps build an ARM-based system, but went with Intel because compatibility for this particular system seemed to warrant it.
I purchased from NewEgg, Amazon, and elsewhere. Wherever the price was lowest essentially. I used https://pcpartpicker.com/ to aid in the search for compatible parts, for comparisons, and of course, for price checks.
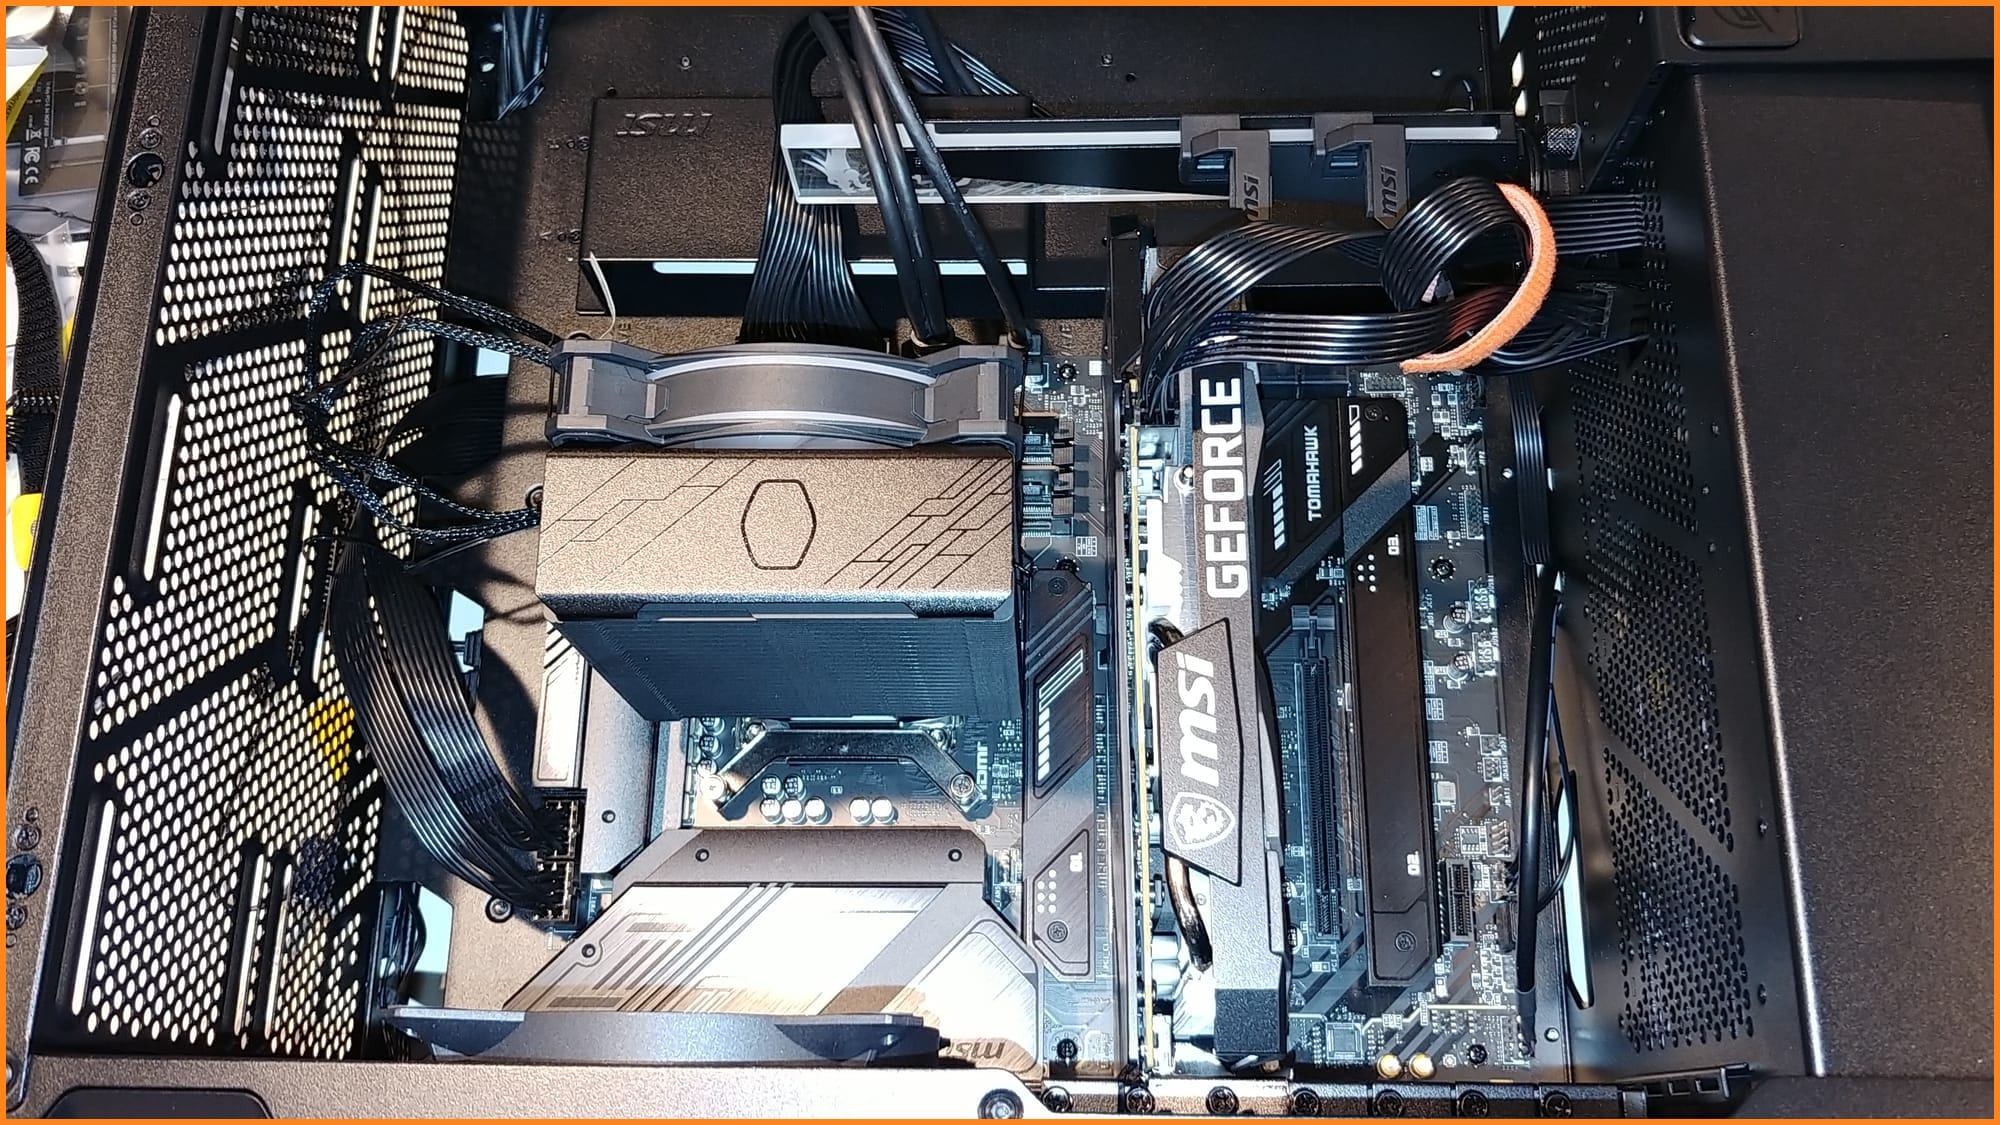
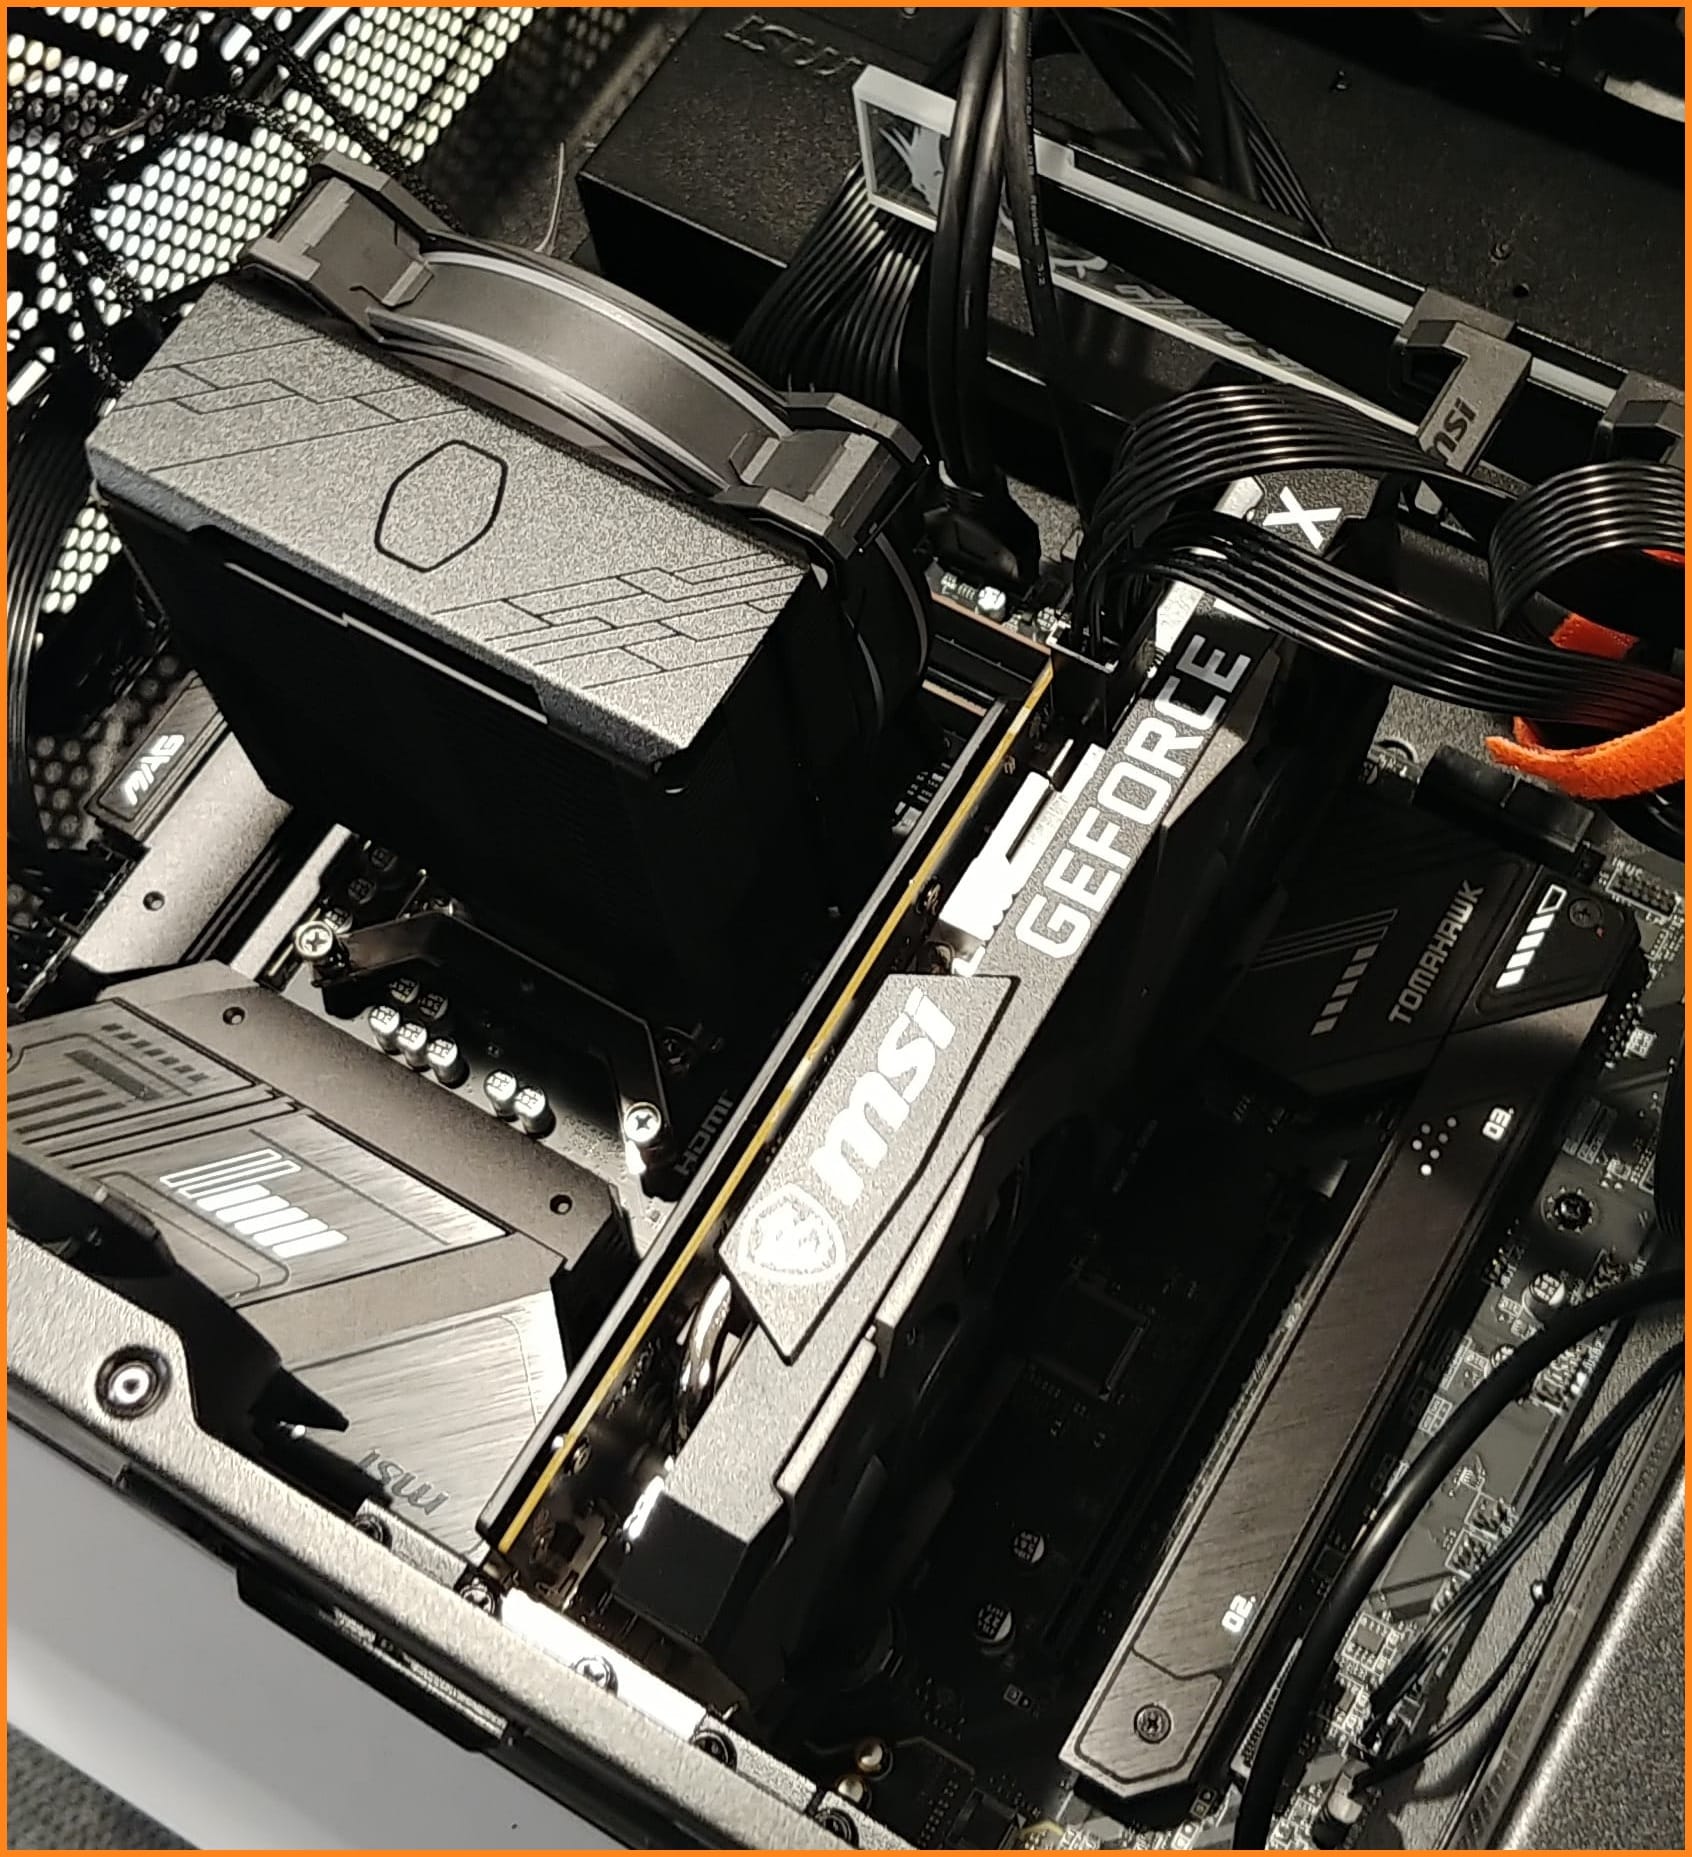
So far, I absolutely love the motherboard (link to specifications). It provides an excellent foundation for the rest of the system. Here are a few more pictures:
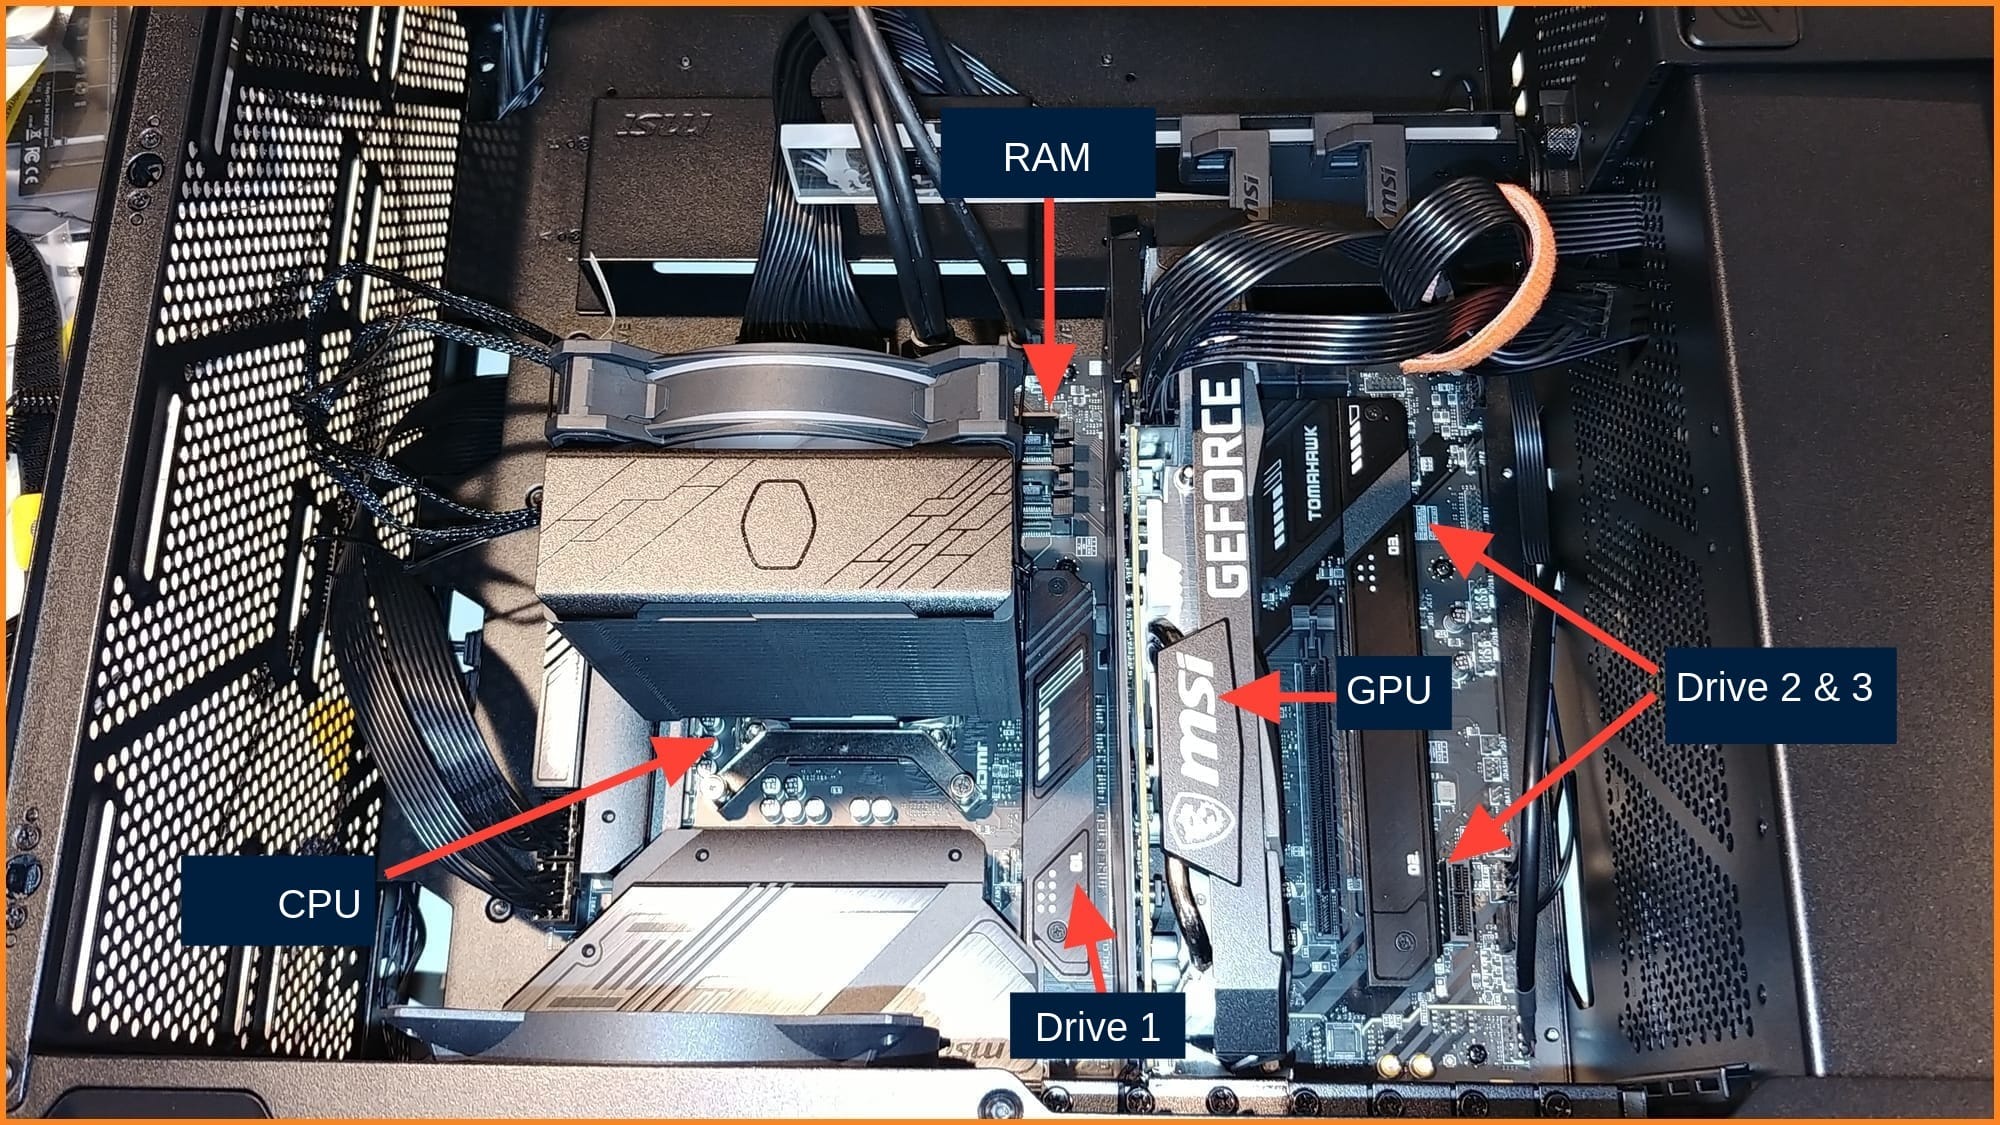

Cable management is pretty nice in this case. Still have some cleanup to do, but it'll be all buttoned up soon.
Lots of spaces for 2.5" drives, but I'm not using any on this system. Perhaps I'll add a 2 TB SSD for cloning the entire OS later on, but I'm still testing what will be the cloning solution.
One interesting setup is the Fan Control Board. I hadn't worked with particular board before, and I was intrigued. Take a look:
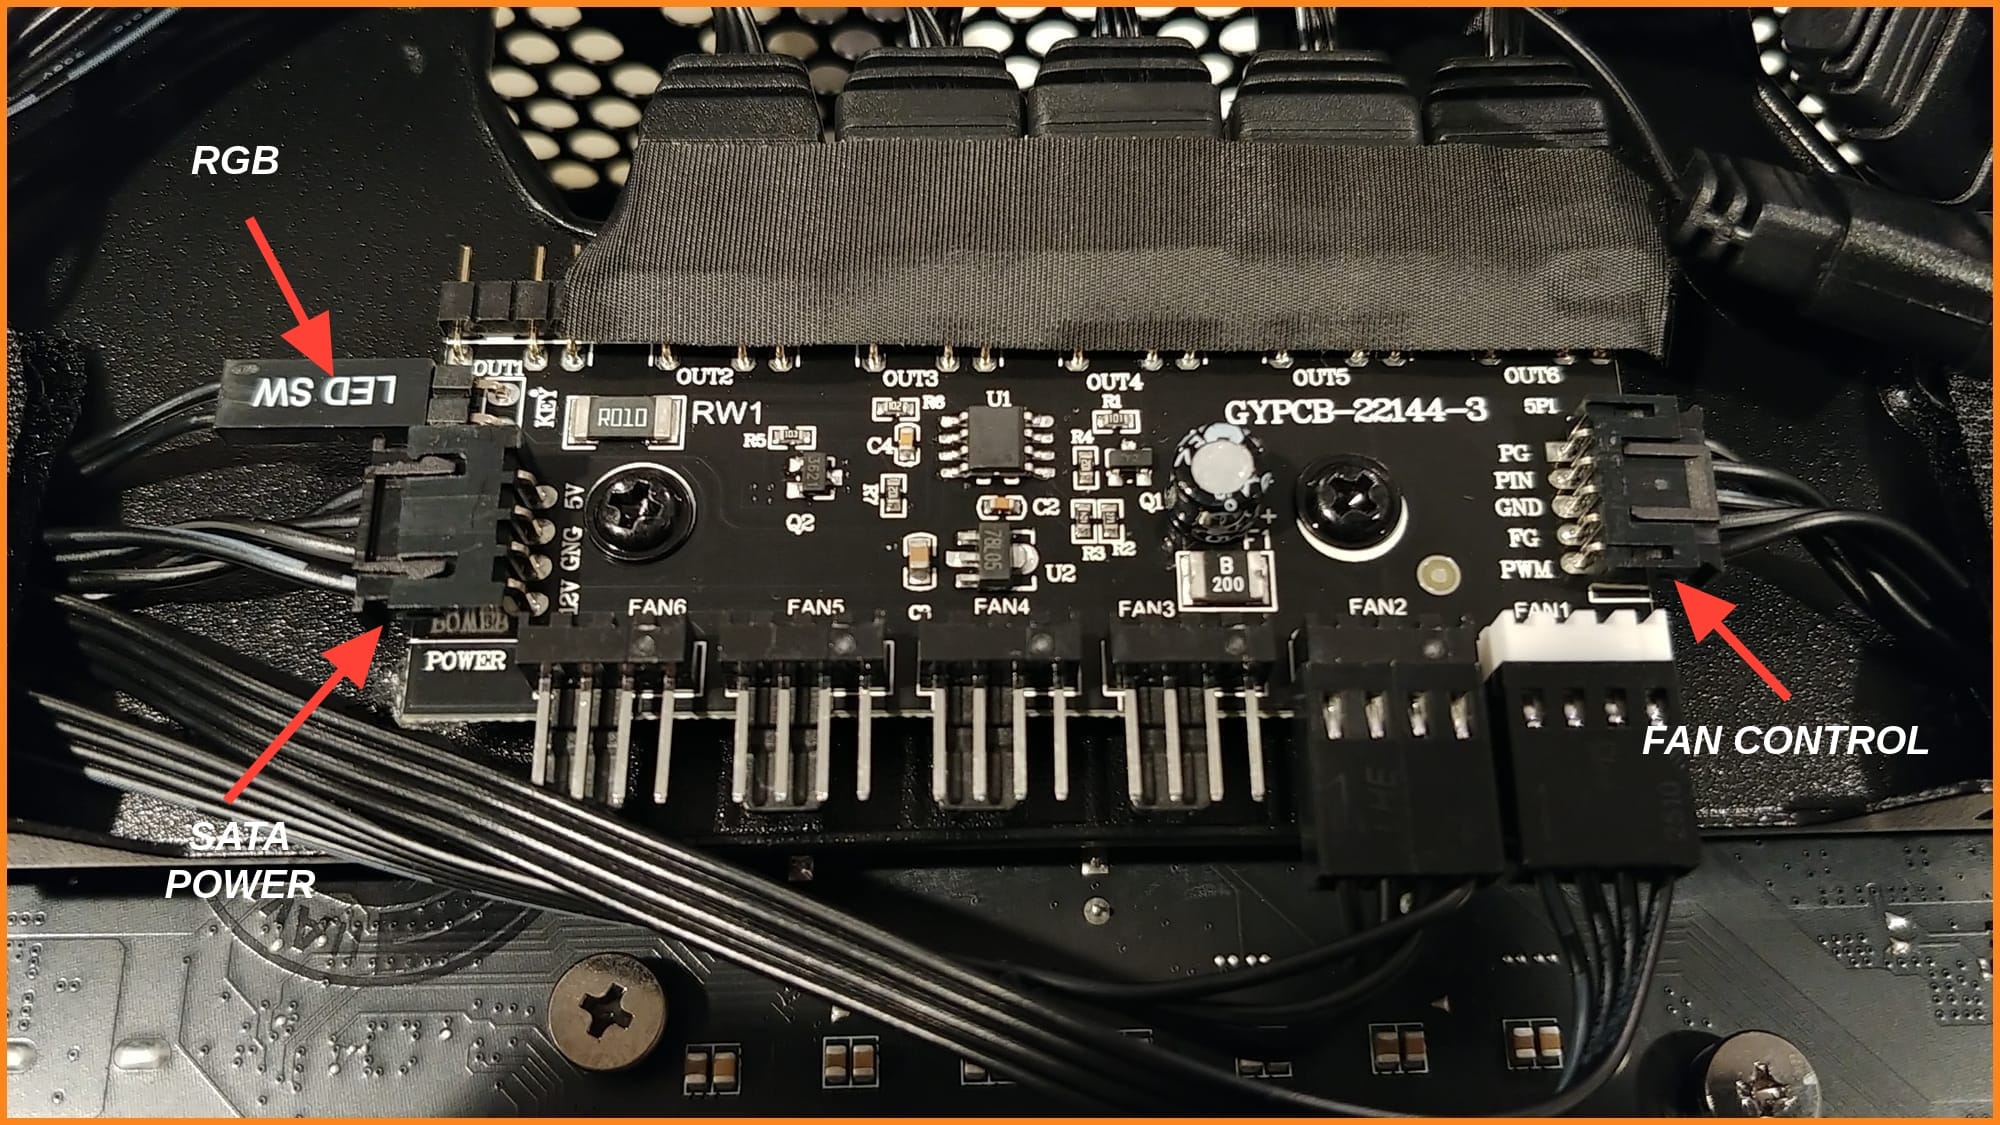
This board can handle a whole boatload of fans. Currently there are only two incoming fan connections being made to it—one for the three front fans (FAN1 - bottom right) and one for the rear fan (FAN2). But as you can see, we can add four more fans–labeled FAN3 through FAN6 from right to left. Plus there are enough RGB connections for all of those additional fans. The case also came with a back panel swap out (where the slot covers go) to allow for an additional rear fan. However, 5 fans (including the CPU fan) is enough for me. If I had to go beyond that, I would probably consider a liquid cooled system.
Three connections leave the Fan Control Board: Fan control, LED, and SATA (for power). The fan control and LED (RGB) connectors go to the motherboard and the SATA power connector goes to the PSU's SATA cable. It's a cool setup and I dig it.
Finally, we have the ports on the back of the system. Take a look at the image below showing the motherboard back panel ports.
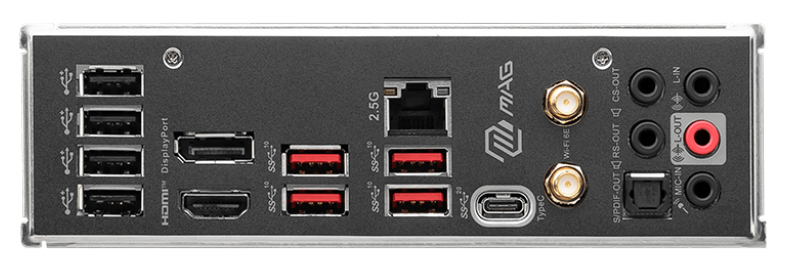
Starting on the left with USB, we've got four USB 2.0 ports, 4 USB 10 Gbps ports, and 1 USB Type C 20 Gbps port. (Some of the USB ports are also available on the top front of the case {via case connectors} but those are half-speed, as usual.) There is also a built-in DisplayPort and HDMI port for video. For networking we have a 2.5 Gbps wired RJ45 connector and wireless terminals for the Wi-Fi antennae. Finally, we have surround sound audio ports plus a Toslink optical port.
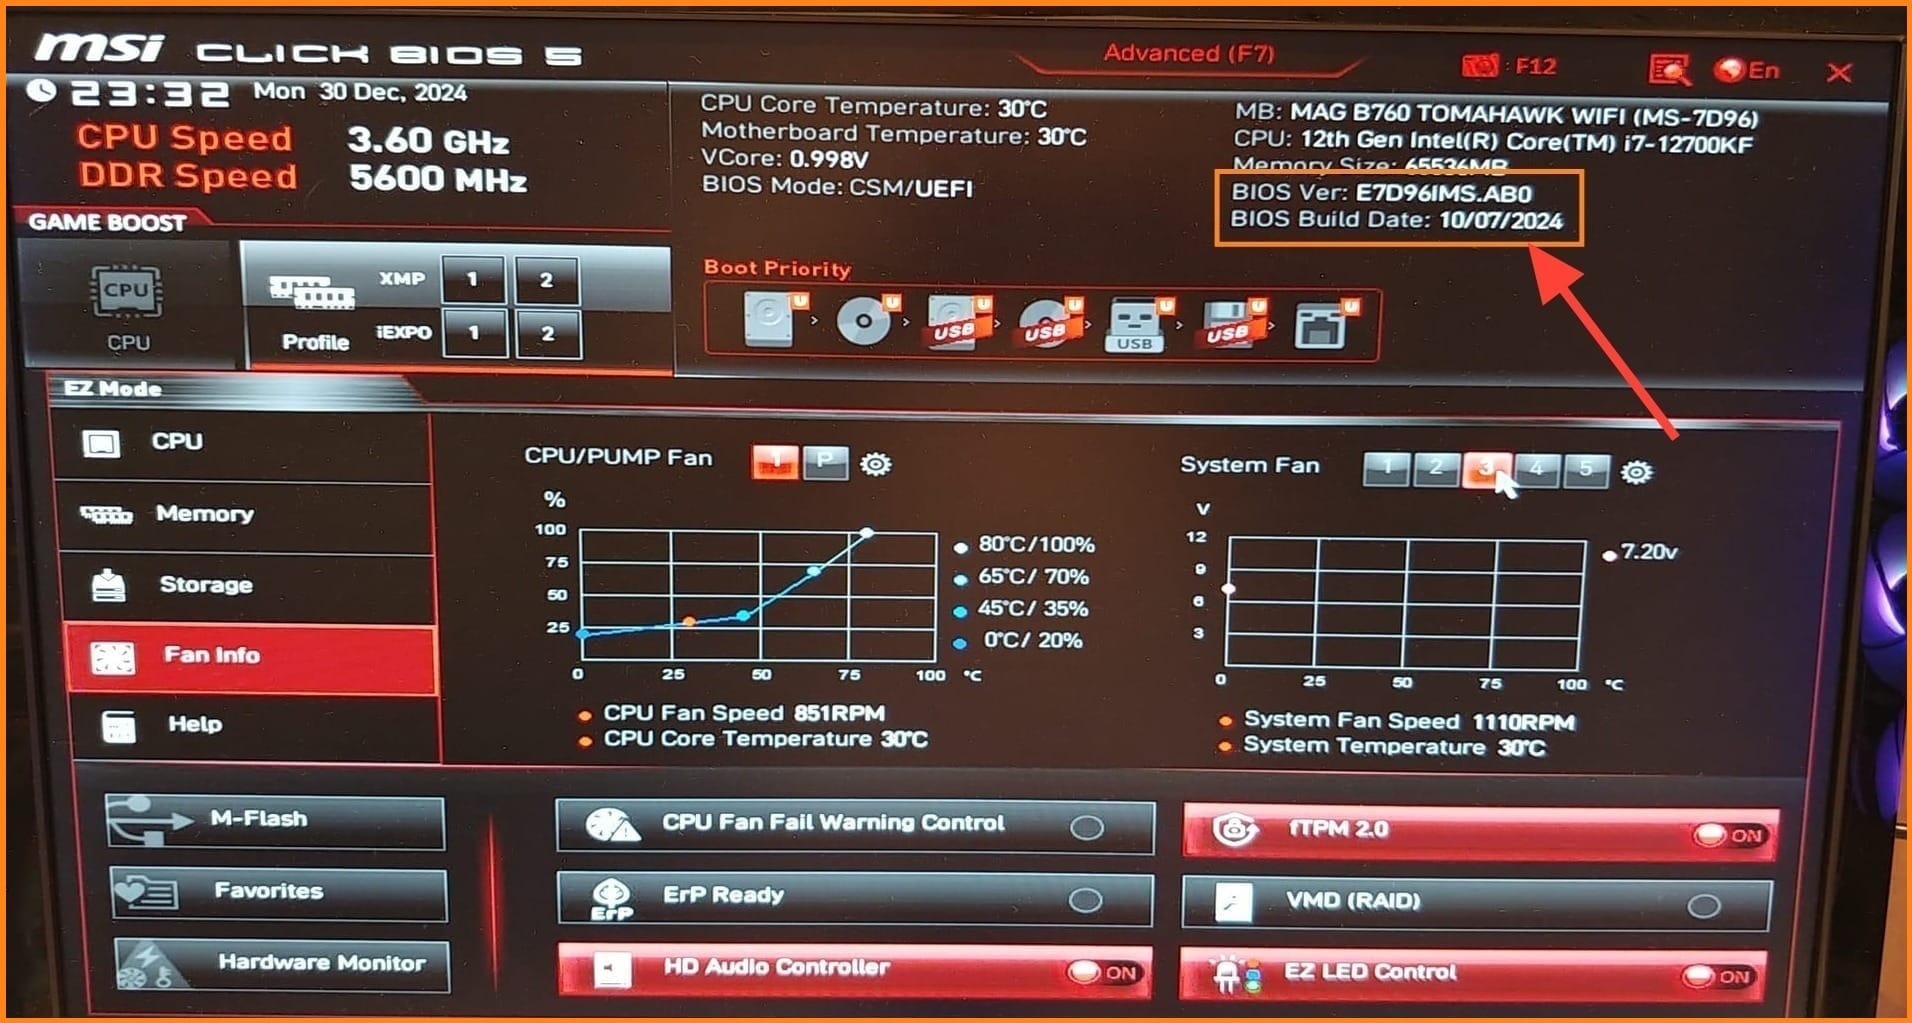
BIOS 👨💻
BIOS (Basic Input/Output System) is a type of firmware. That means it is code that runs on a chip on the motherboard. In PCs and laptops, the BIOS boots up before your operating system. It locates and initializes the hardware in your system. The BIOS is also a program that you can enter when the system is booting. Common keys to access the BIOS include del, F2, F1, F10, and others. If your system doesn't have an operating system installed yet (like mine) then the computer will either boot to the BIOS automatically, or tell you that no OS is found. To access the BIOS for this board the default key is del.
BIOS Updates
I always update the BIOS on my systems after building them (and before installing the operating system). BIOS updates can be crucial to the functionality, performance, and security of the system.
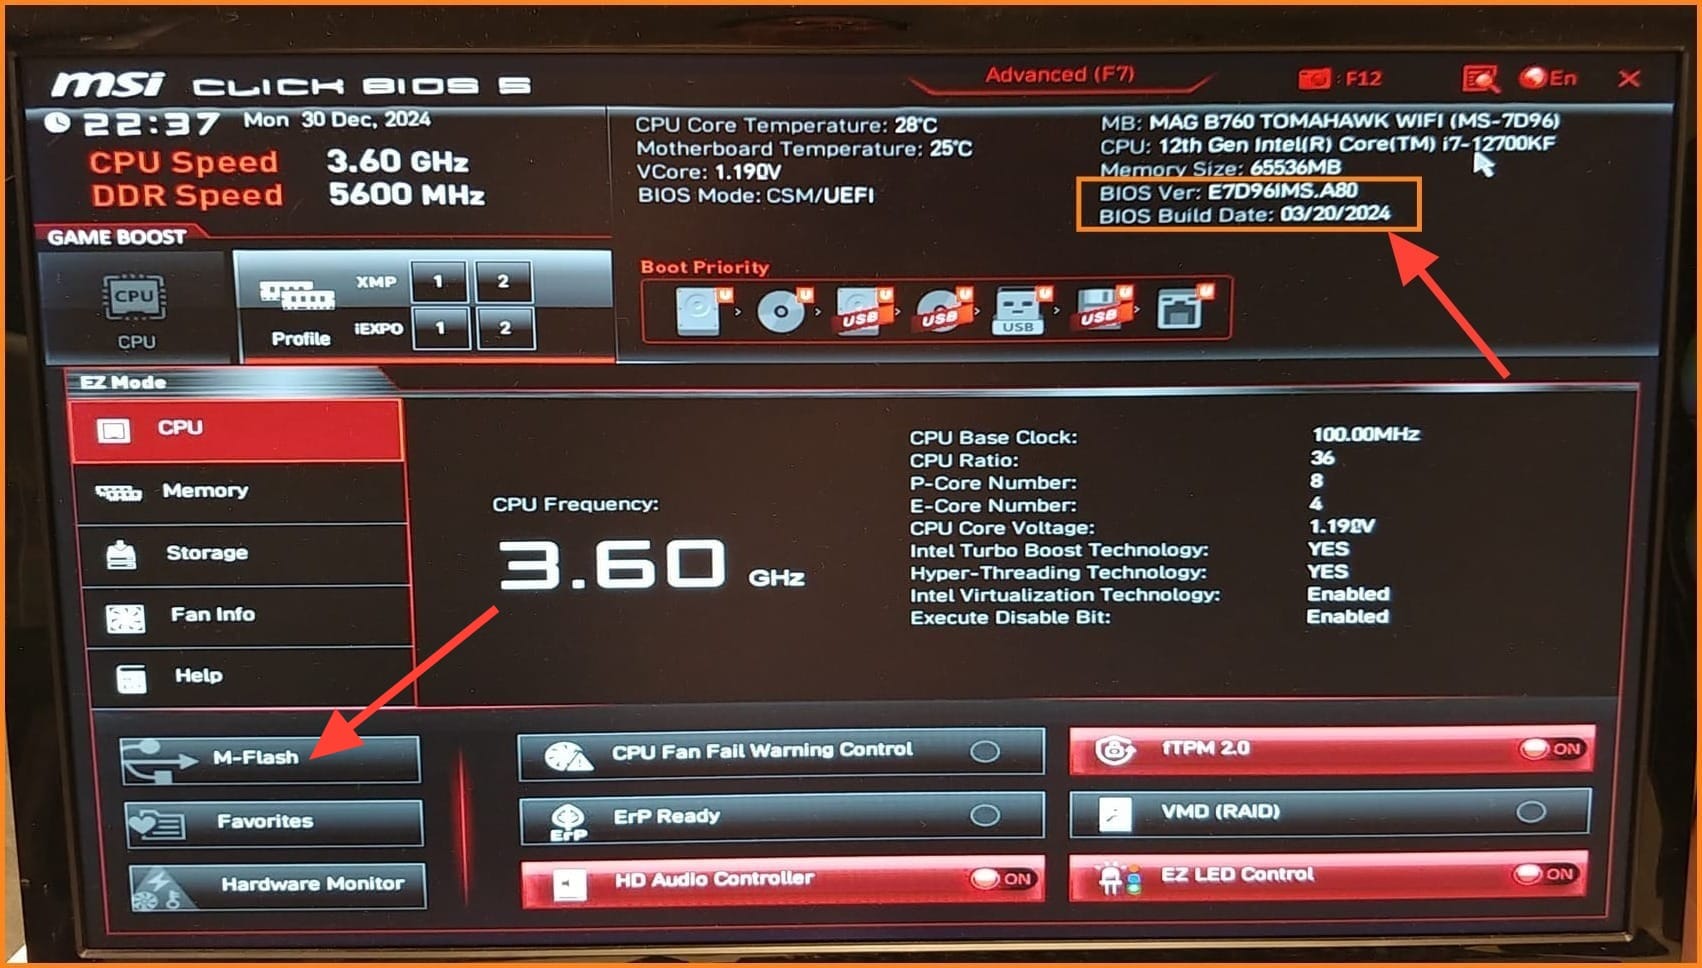
This particular board (MSI MAG B760 TOMAHAWK WIFI) had an original BIOS date of 3/20/2024. As it was 9 months later, I knew it would be wise to check the manufacturer website and see if there were any BIOS updates— and indeed there were!
The BIOS updates for this board can be found at this link. When I viewed that website I found that there were several. I grabbed the latest one which was released in October.
The nice thing is that even if you attempt to use a flash update file for that board, the newer board's BIOS I am using will not recognize them, so you can't accidentally install the wrong BIOS (and potentially brick the motherboard!) It looks for a file with the correct extension type, thus eliminating a lot of user error. SMART!!
Wait until you learn what a BIOS flash is, how it is done properly, and how to select the exact BIOS for your system's exact motherboard.
Update Process
MSI has fairly good documentation. Included on their BIOS update page is a link to a written how-to and a separate video demonstration. They use something called the M-Flash utility. It's built right into the BIOS and is super-easy to use.
I always download flash updates to a USB flash drive that has been formatted as FAT32. Almost all motherboards will recognize that file system.
The process was easy:
- Download the BIOS update file to USB flash drive. Place it in the root of the drive.
- Boot the computer and access the BIOS.
- Insert the USB flash drive into a USB port.
- Access the M-Flash utility.
- Locate the BIOS update file.
- Begin the update.
Don't turn off the computer during the update. WAIT for it to complete.
Operating System Installation 🖥
Well, now it's time to install the operating system (or OS). For this build I chose Linux (of course). Specifically, Ubuntu Desktop 24.04. The reason for this choice was maximum compatibility with the hardware and software I want to use—with the least amount of technical effort.
I plan on using the system primarily for recording music, but also playing games, video editing, running an "A.I." server, and more. From my years of working with Linux, and in my opinion, Ubuntu offers the best out-of-the-box experience for this particular type of system. Not that it's a really big deal which distro you use. I could probably get everything to work with most distros. But Ubuntu supports my mixing board and musical needs well.
I use all kinds of Linux including Debian (my main computer at work), Mint, Arch, Fedora/RHEL/CentOS, openSUSE, and others.
However, that common phrase rings true: "the right tool for the job". For me, and for this particular build, Ubuntu was the way to go. You never know, that could change in the future, but I see it as a viable long-term OS for this computer. My second choice would have been Linux Mint, then archlinux, then Debian sid. As I say though, anything Linux can work!
While Ubuntu is sometimes viewed as the Linux distro for "noobs" and Canonical (the company that develops Ubuntu) has made some bad decisions in the past, I still absolutely love the OS. It performs flawlessly for me, is somewhat cutting-edge without things breaking constantly, and a lot of hardware manufacturers and software developers look to it first when embracing Linux.
So... I downloaded Ubuntu 24.04.1 to flash drive. (I always wait for the first big patch release before using any OS seriously.) Booted to the flash drive and started the install.

If you like this article, and Linux in general, check out some of my upcoming webinars!
Partitioning
During the partitioning stage of the installation I had to choose how I would divvy up the 2 TB Samsung 990 Pro drive. This drive is located in the primary M.2 slot of the motherboard, the one that connects directly to the PCI Express x16 bus. This drive was recognized by Ubuntu 24.04 and was named nvme1n1 as shown in the figure below.
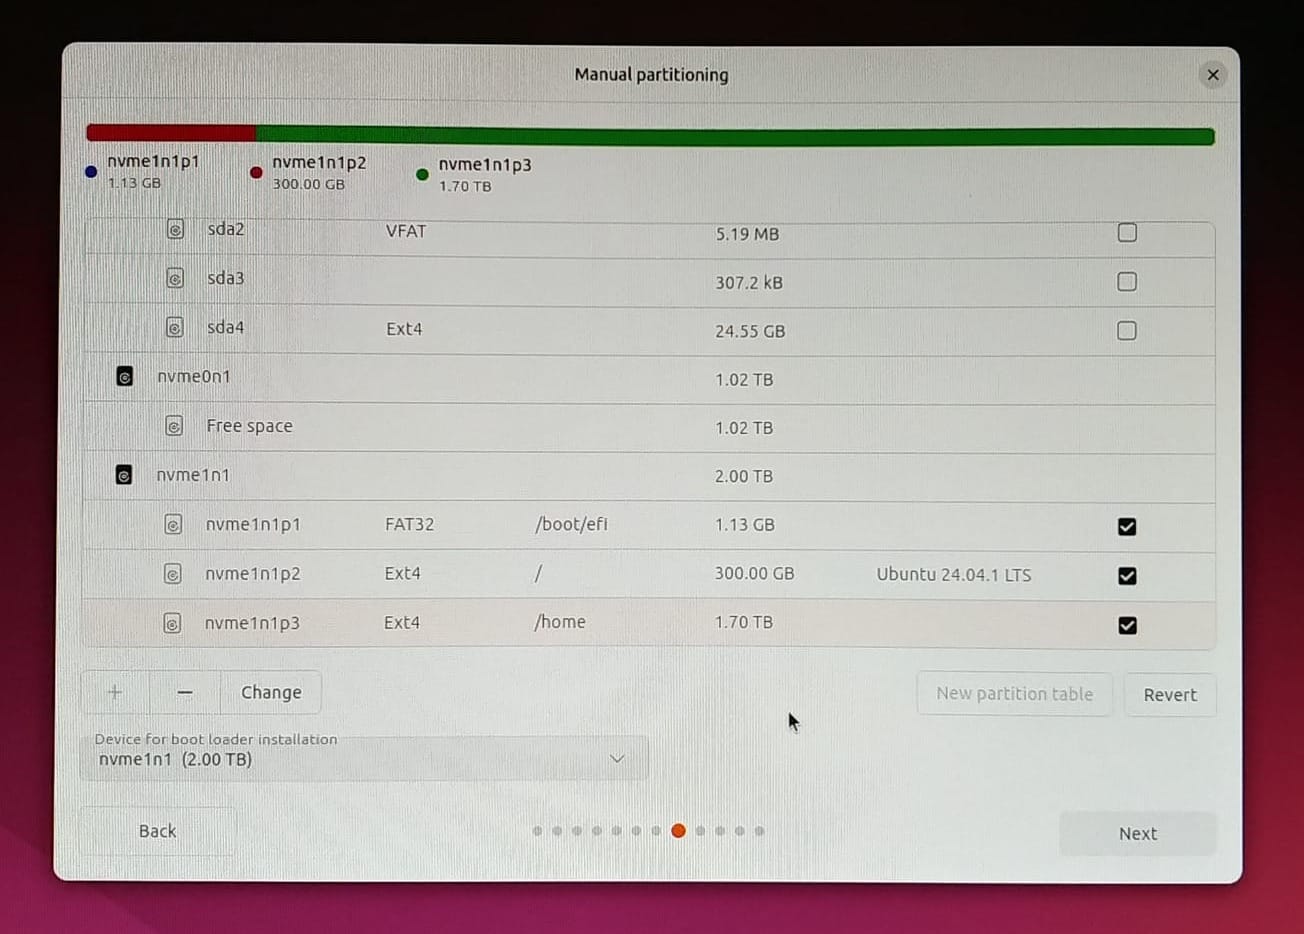
I chose to set up the system with separate root (/) and home partitions. This way, the user account information is separated. This can be helpful in the case that a reinstall is necessary.
To do this you have to select "manual partitioning". Then, start with a /boot partition, which Ubuntu creates as 1.13 GB and formats as FAT32. Then, decide on how big the root partition will be. I went with 300 GB. I figured that would be quite enough for the operating system and all of the applications I would install. That left 1.7 TB for the /home directory. Plenty of storage for my user account. I do plan to work with a lot of large music and video files (not to mention games—which are normally stored in the user's home directory) so a large partition was necessary. However, if I need to store more data (or archive it, I have a second M.2 drive (in the secondary M.2 slot in the motherboard) which gives another 1 TB of storage. This one is known as nvme0n1.
Interesting that Ubuntu would see the secondary drive (which is in the 2nd M.2 port) as the "first" drive numerically—nvme0n1 as opposed to the actual primary drive—nvme1n1. I could have changed this in Linux, but I put that toward the end of my to-do list because it wasn't all that important to me at the time. Good thing, because I ended up having to install again (the first two installs failed because of my tinkering) and on the last install Ubuntu named the drives properly! You see? Sometimes doing nothing is the best solution! 😁
Wireless Issue
There was one hardware issue concerning the Wi-Fi connection. The motherboard on this system has an Intel Wi-Fi 6E wireless M.2 module. Driver support is somewhat limited on Linux so connectivity was sporadic. When connecting directly to the wireless access point, it was usually good—until it wasn't. However, when connecting to my Deco mesh wireless it would perform abominably.
I did select "Third-party drivers" when I installed Ubuntu, so it did install the driver. When I ran the following command it showed that it saw the iwlwifi device:
> ethtool -i wlo1
driver: iwlwifi
version: 6.8.0-51-generic
firmware-version: 86.fb5c9aeb.0 so-a0-gf-a0-86.uc
expansion-rom-version:
bus-info: 0000:00:14.3
supports-statistics: yes
supports-test: no
supports-eeprom-access: no
supports-register-dump: no
supports-priv-flags: no
We see the firmware version. I believe that an upcoming firmware version should fix the Deco mesh issue and will keep an eye on it. But I wanted better wireless speed now. So...
Running an iwconfig gave the following information:
~> iwconfig
lo        no wireless extensions.

enp4s0    no wireless extensions.

wlo1      IEEE 802.11  ESSID:"EMF-5B"
          Mode:Managed  Frequency:5.745 GHz  Access Point: 50:C7:BF:3B:96:78
          Bit Rate=866.7 Mb/s   Tx-Power=22 dBm
          Retry short limit:7   RTS thr:off   Fragment thr:off
          Power Management:off
          Link Quality=70/70  Signal level=-36 dBm
          Rx invalid nwid:0  Rx invalid crypt:0  Rx invalid frag:0
          Tx excessive retries:0  Invalid misc:146   Missed beacon:0
As you can see, the Bit Rate when connecting directly to the access point is 866 Mb/s. This card is 802.11ax (and Wi-Fi 6E) compliant so not too bad. Even the Deco mesh connection would show about 600 Mbps. But that is just the connection to the access point. When I would do Internet tests directly from the CLI (for example, with speedtest-cli) the throughput would be much less—especially for the mesh connection. We're talking in the range of 4 MB/sec (equivalent to about 32 Mbps - super slow). It would be quick (just after booting), and then slow down after a time. So, after some research I tried a couple of things that have helped other people on the Internet:
- Accessed
/etc/NetworkManager/conf.d/default-wifi-powersave-on.conf. I then set thewifi.powersavesetting to 2 which essentially disables the power saving feature. This seemed to permanently help with the direct connection to the access point, and would help temporarily with the mesh connection. Something about the power save option in Linux that would be triggered after x amount of time and wouldn't deactivate automatically when accessing the Internet. Still researching more about this but this is my primary solution for now. - I modified the networking to prioritize IPv4 over IPv6. IPv6 prioritization is the current trend with Linux installations, but it doesn't suit my needs. So I accessed
/etc/gai.confand modified the 5th of the precedence line items to:precedence ::ffff:0:0/96 100
This appeared to help the direct connection to the access point somewhat, but did nothing for the mesh connection. - I did a variety of updates (this was during the first install of Ubuntu) but found that none of them really helped much. I settled on using #1 and #2 during my final install of Ubuntu.
Another reason to use wired connections is because wireless has historically been known to indirectly cause latency issues when recording/playing back music.
GNOME Desktop
So I went with the default GNOME desktop (with built-in Ubuntu modifications). I'm a big fan of GNOME and use it most of the time. I do also run KDE, Cinnamon, and XFCE on other Linux systems, but GNOME is the champion for most of my work.
- Introduction: https://release.gnome.org/
- GNOME Shell (Wiki): https://en.wikipedia.org/wiki/GNOME_Shell
One of the reasons I like the GNOME desktop is because of its extensibility. You can install extensions that can do all kinds of wonderful things. In fact, I am the new maintainer for one that I've been using for a long time: Draw On Gnome (previously Draw On Your Screen), a tool that let's you, well... draw on your desktop—annotate it, and so on. It's a great tool. Check it out here. Another great extension is Dash to Dock (link). It allows you to modify the Dash in GNOME in a variety of ways. Some of this functionality is built into the Ubuntu version of GNOME.
Ubuntu and GNOME see all of my monitors and working with various windows and workspaces is easy as pie. Plus, the Super key on the keyboard is the best thing in the world. Here's an example of one of my displays after pressing the Super key:

Super key.Installation Issues
One thing to note. I hosed the installation twice. Imagine that! I always do a lot of testing and push the envelope as far as possible when I first setup new computers. It's a great idea to see what the computer is capable of before settling on the OS install and storing any data on it. Well, I caused it to fail twice, or three times, depending on how you look at it. Here's what happened:
- TLDR: Watch out for Linux third-party LED controlling software for the Cooler Master RGB fan - it could break your system. After installing Ubuntu I attempted to install a third-party driver for the LED lights in the Cooler Master fan. Bad mistake! While OpenRGB is awesome, it does not recognize that particular fan (as of the writing of this post). There was another person who had some software that "can" recognize it. However, this caused a spectacular system failure. Blinking cursor... all that. I was able to connect on another terminal (with
Ctrl+Alt+F3) but the errors included video and hard drive issues. It's amazing that this simple fan controlling software could be so devastating. My guess is that it has to do with the installation of a kernel module. Those can wreak havoc with an install. While I'm sure I could fix it, I decided to simply reinstall Ubuntu—I don't need to spend too much time on RGB lights! In fact, the Cooler Master fan makes a little more noise than the MSI case fans; I might end up swapping it out later anyway. - TLDR: Ubuntu Studio wasn't necessary for me! I tried the standard Ubuntu install and loaded Ubuntu studio afterward. I also tried a fresh install of Ubuntu Studio (which is a separate download of Ubuntu 24.04). Both of these didn't appear to want to work with my hardware properly. Both times I installed the low-latency kernel. I expected to need this to record audio well in Linux (after all it's what I used back in the day). To my surprise, both Ubuntu Studio installs gave me issues. The culprit appeared to be the low-latency kernel. While I could have fixed these issues, I am looking for a clean out-of-the-box experience. I've found that if the system fails in the beginning, it will fail even more later on!
One of the big reasons for using Ubuntu Studio is that it utilizes a "low-latency Linux kernel". However, I have found that the stock kernel that comes with Ubuntu 24.04 (6.8) is pretty darn low-latency. Plus, there are ways of increasing the performance of any kernel that you use. For the 24.04 kernels, the main tweak I use ispreempt=full nohz_full=all threadirqs. More tweaks at this link.
Be especially careful installing Ubuntu Studio after installing Ubuntu. On my system, it caused a massive video driver failure (and two other service errors when running asystemctl --failed). Then I realized that I was acting like it was 2016. The package (and the low-latency kernel and driver) wasn't necessary for my needs. (Which BTW is the Reaper DAW working with a SoundCraft MTK 22 track board.) This is mainly because the standard Ubuntu Desktop version 24.04 - and many other current Linux distros - use PipeWire today for handling audio streams instead of the older PulseAudio, plus Jack, and associated programs/services. NICE! Thanks, Wim Taymans for your work on PipeWire! (a fellow Commodore 64 guy 😄)
So... third time is the charm right? Well, I installed the standard Ubuntu 24.04 LTS again, updated it (sudo apt update && sudo apt upgrade -y), and started installing all the required applications. The system now runs like a champ. In this case, simpler is better.
It's freakishly good. Linux has been getting a lot of love from software developers, especially over the past several years. Our dreams are coming true my friends!
Essentially, all hardware was working out-of-the-box. I couldn't be more pleased. It saw and installed drivers for all the devices in the computer. External device access is good too. Well... My Logitech webcam is still one of the pain points in Linux. But with v4l-utils or guvcview it is at least usable–and can look pretty good. Doesn't matter because I use an actual camera most of the time; the webcam is the backup.
I also have my eye on the BlackMagic Quad HDMI Desklink for work, but that is an internal card (and much more $$$).
That said, Linux will not recognize all audio and video devices fully—especially brand new ones. One example is my RodeCaster Pro at work. It sees it as a stereo device, which is fine for my needs, but it won't play with ALSA nicely (though I never really troubleshot it much.) However, driver support is an ongoing process. A device that is not supported today might be supported tomorrow. (For example, the Focusrite 16 audio processor is supported by Linux kernel 6.14.) A huge thank you to all the committers for Linux and their endless pursuit of hardware compatibility! 🙏
Using an Audio-Technica BPHS1 headset with it. Good mic, decent speakers, but I need to change out the pads, they are rough after an hour or so.
Applications 💽
So! The operating system was installed and updated. Now it was time to install the applications I need. Here's a short list:
Reaper, Steam, OBS, KVM, Firefox, Obsidian, KeypassXC, VS Code, Dolphin, Konsole, Discord, Kenku, Spotify, Tilix, etc...
Then there's all the fun command-line tools - there's a billion. Here is an example of some of the CLI tools that I install directly from the command line:
curl neofetch speedtest-cli btop htop nwtop duf tilix tmux dolphin konsole obs-studio cowsay fortune rsync code
The list goes on and on! More applications to come I'm sure. But the bulk of it is there - and it rocks.
Applications is where the Ubuntu distro really shines. If a software or hardware developer decides to port their program or device for Linux, they often do it with Ubuntu in mind first. One example of this is BlackMagic Design. I've used Blackmagic cards and their Davinci software on both Ubuntu and Debian and it always works better out-of-the-box in Ubuntu.
Can you get all this stuff to work in Debian, Arch, Fedora, and other distros? Of course, but it might require more doing. I know this from experience. For my main workstation at work I use Debian Sid, but it's always a balancing game.... Every time I turn around I see another application that was developed specifically for Ubuntu. (The latest was the new Presonus Studio One DAW.) I also have an Arch laptop with the the Hyprland tiling window manager (plus a bunch of servers and other distros...) But for home use, I want to maximize my time, and get the best out-of-box experience. Ubuntu does that for me. That's my reasoning. Like I say, it could change over time, but for now, it is working very well.
Firefox and Snap
Firefox comes installed as the default web browser in Ubuntu. However, it is installed as a snap. Many people out there will not notice a difference, but snaps are notorious for lesser performance because of their sand-boxed architecture.
Now, this system is fast, but I did notice some performance gaps, especially when accessing and downloading files—and perhaps a little during start-up of Firefox. This is in comparison to my main system at work (which is not nearly as powerful) that runs the Firefox package instead of the snap. It's hard to quantify the performance gap without fully bench-marking it, but the feeling is there.
So, I got rid of the Snap version and installed the .deb package. Here's how I did it:
Remove the Firefox Snap:
snap disable firefoxsnap remove --purge firefox
Then, install the official .deb version of Firefox:
The step-by step list can be found here. But essentially, it's a 6 step process where you are installing the Debian keyring and signing key, checking the key, adding the Mozilla repository to the list of repos, configuring APT to prioritize Mozilla, updating with apt, and installing Firefox. (An alternate method can be found here.)
Note: For this to work I had to install the firefox-esr package.
Once done, it seems to perform better. The problem is that Canonical is really in love with Snaps. I'm not particularly. But I will probably have to repeat the process when I upgrade to the next version of Ubuntu (which hopefully won't be for a long while!) Although not necessary, for now, I am also blocking snap updates with the following command:
sudo apt-mark hold snapd
However, use this command with caution as it can block other snaps that you might want to update.
Personally, I like a hardened installation of Firefox (manual, Betterfox, or arkenfox) for the bulk of what I do. If a particular powerful web-based app doesn't run well in Firefox, then something Chromium-based is the solution.
LibreOffice with Ubuntu 24.04
LibreOffice was another trouble spot. It was installed during the installation of Ubuntu as part of the "extra" packages. Not as a snap. However, Writer and Calc simply wouldn't run.
I had not encountered this with previous versions of Ubuntu or with Debian, so it was interesting, but annoying.
So, I removed LibreOffice altogether from a Bash terminal:
sudo apt purge libreoffice*
Then, ran:
sudo apt autoremove
Rebooted, then installed LibreOffice from the package manager:
sudo apt install libreoffice
Now it works just fine. All apps open instantaneously. Writer and Calc work great. Impress works well, but it doesn't like my multi-monitor setup when running presentations. I'll have to dig into that more.
Partition Tables and Storage Sizes after Installations
Here are a couple more images of the partition table after the installation was done and programs installed. The first is generated from gnome-disks and the second is done with the duf program.
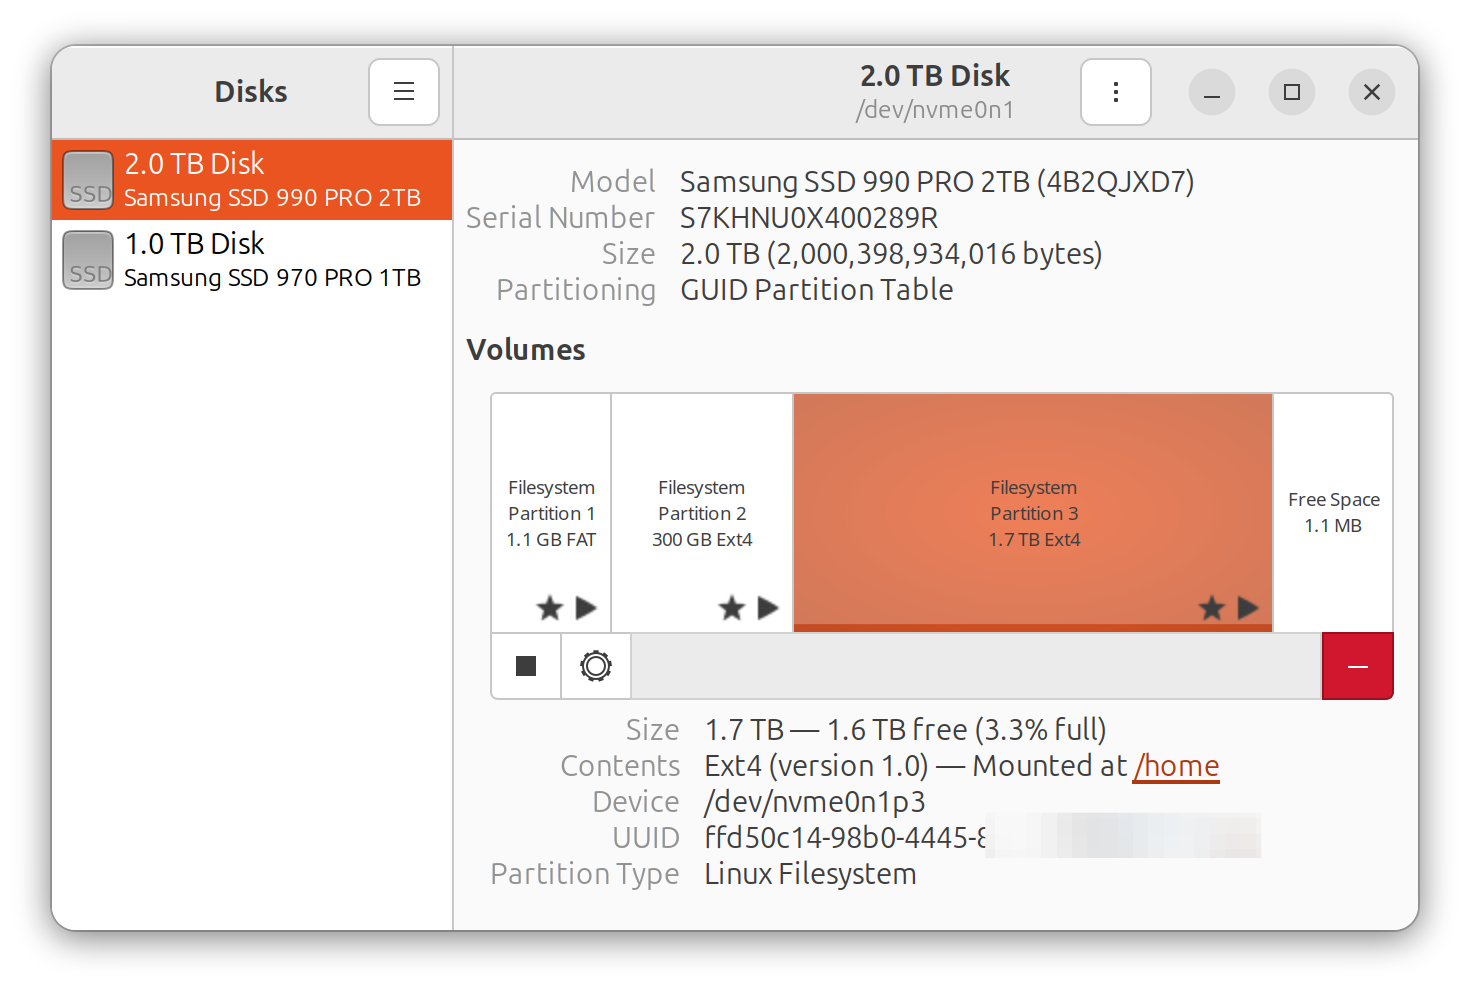
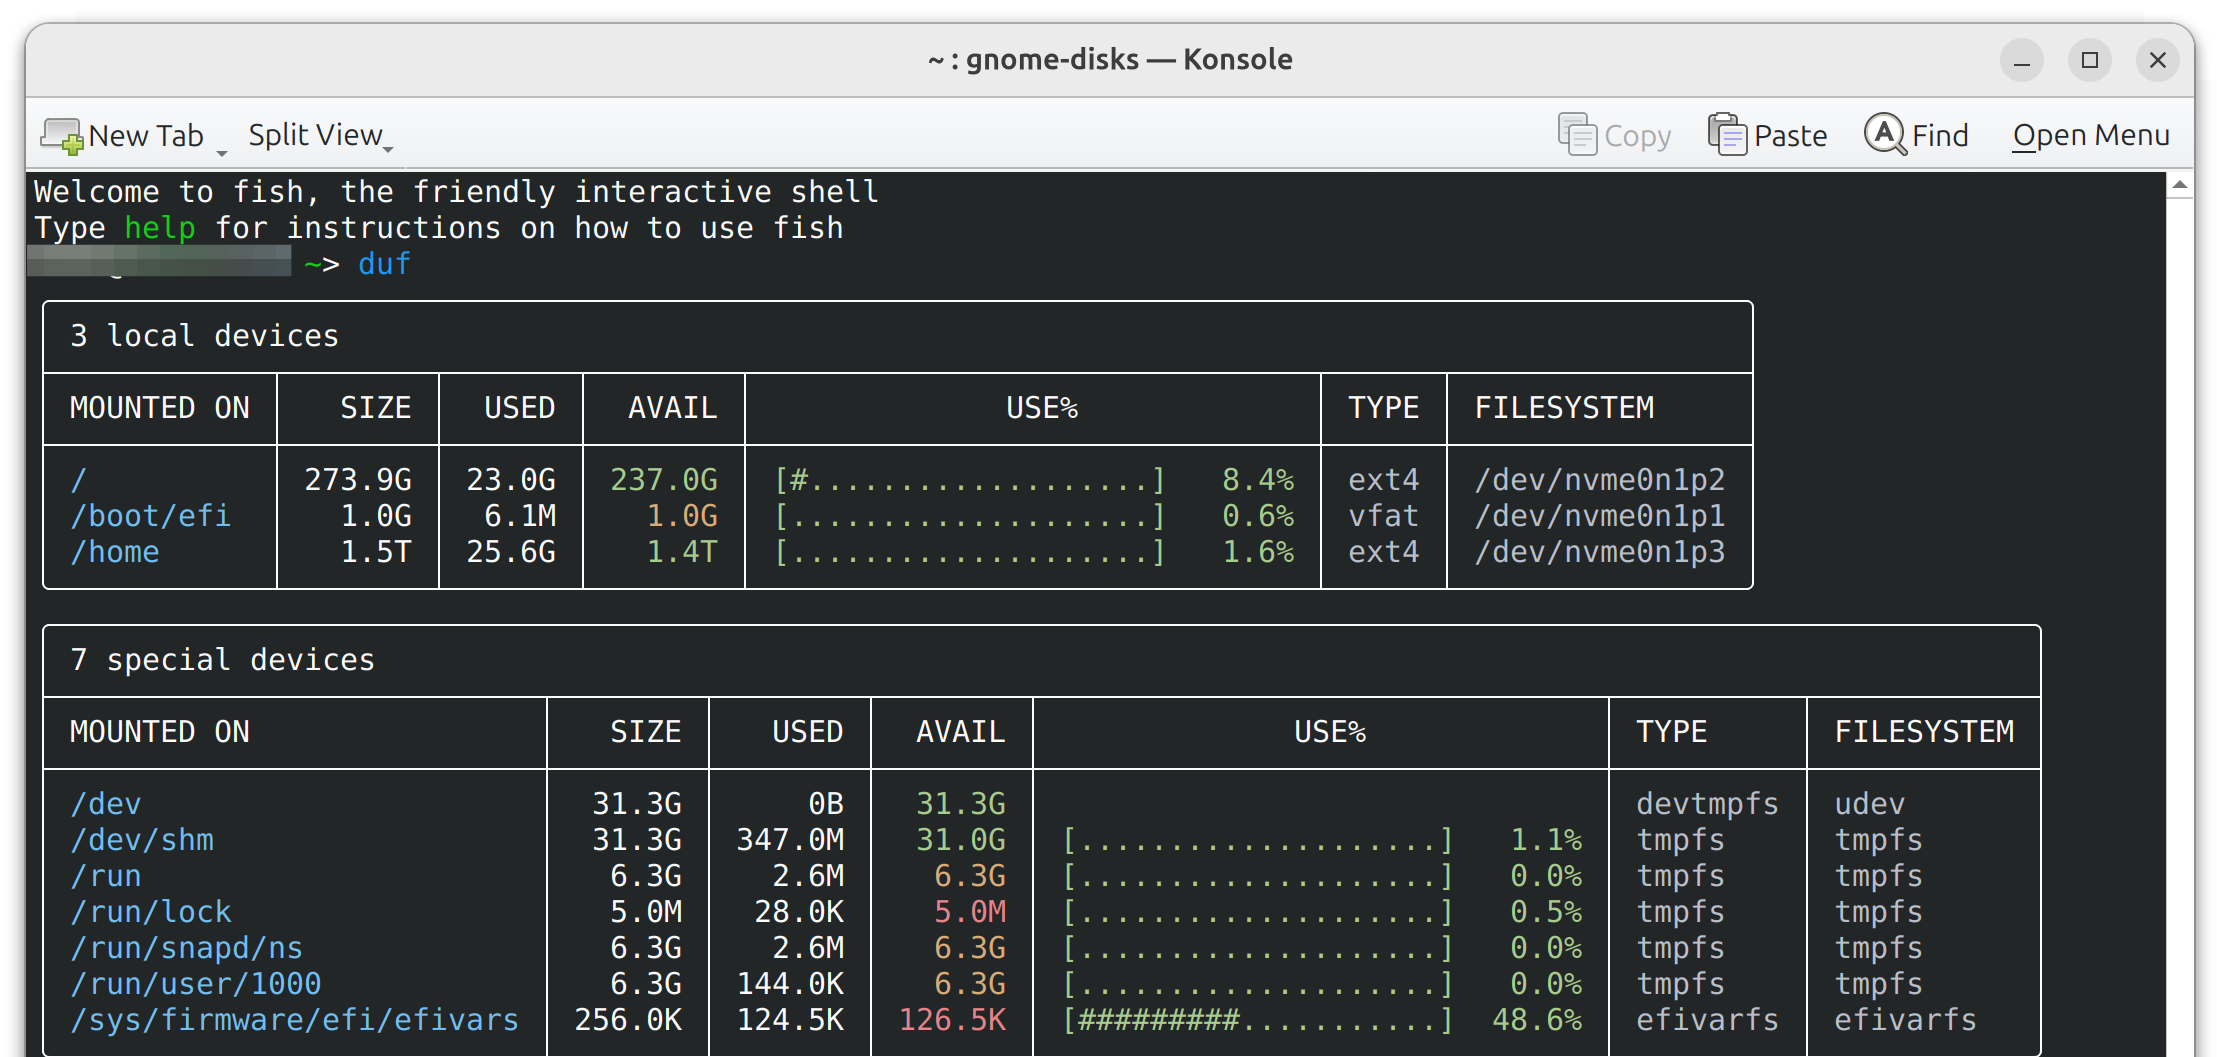
The root (/) partition has over 200 GB left for applications. The /home partition has over 1.7 TB. Plus we have the second M.2 drive (1 TB) for overflow. This configuration should serve my purposes well.
In my live streams I am sometimes asked about the swap partition. Many newer versions of Linux (including Ubuntu) don't use a separate swap partition anymore. Instead, Ubuntu automatically creates a swap file called swap.img within the root directory (/). It's a percentage of the RAM that you have onboard. In my case, it's about 1/8th of the RAM, and comes in at close to 8.6 GB. To find out your swap.img file size go to the root directory (cd /) and use the ls -la command. See the image below:
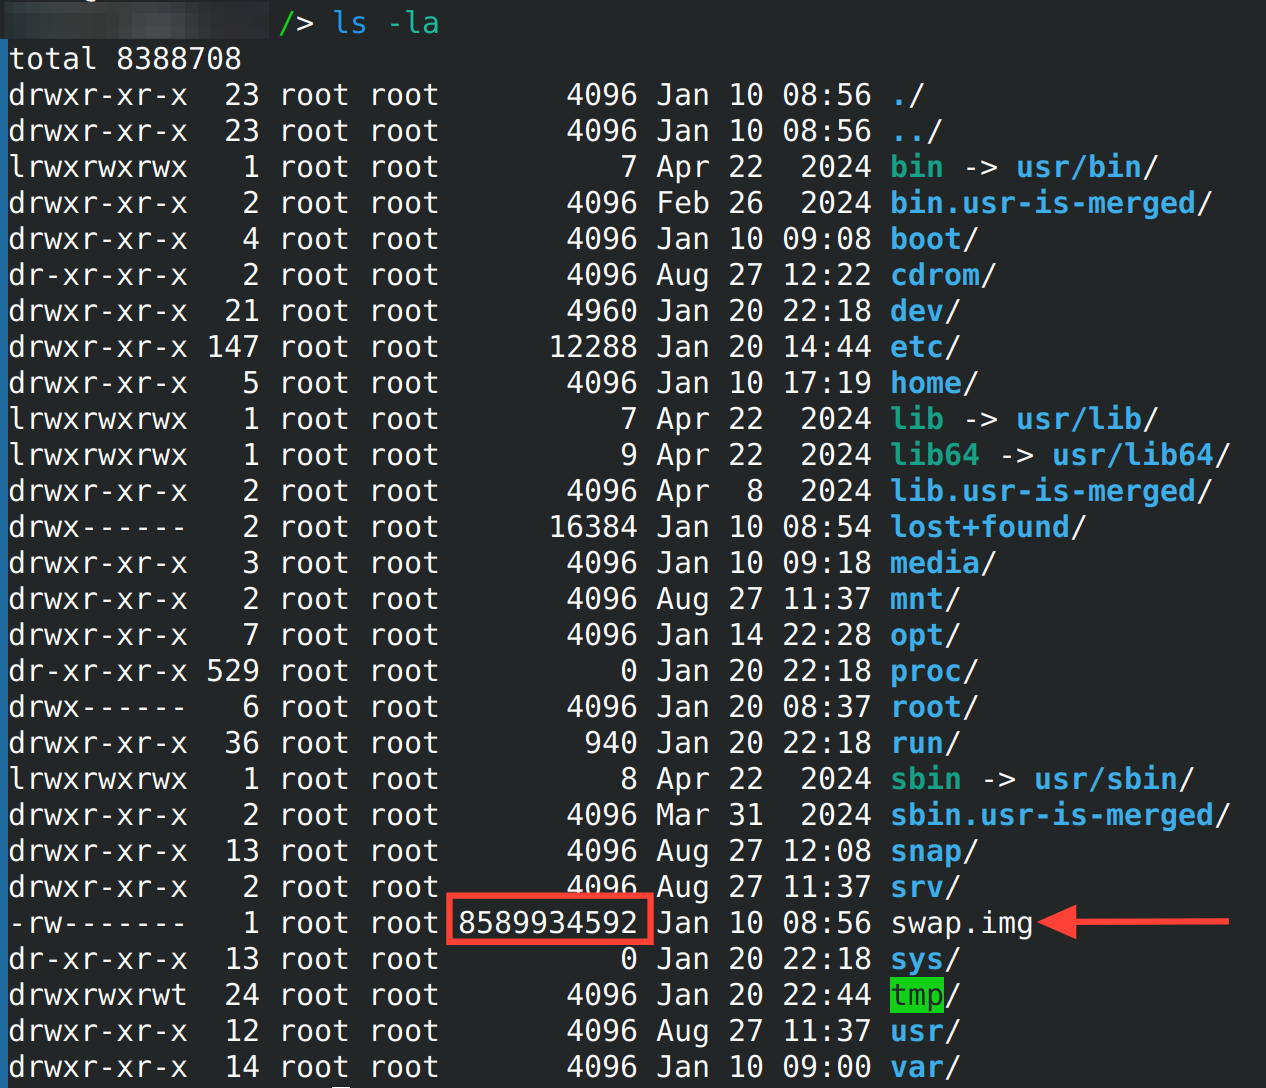
ls -la command showing the swap.img file at 8.589 GB.Remember that this "swap" file will inhabit the root partition. So if you install Ubuntu with separate root and home partitions you should include this amount into your calculations.
Terminal Emulator and Shell
If you are wondering, my favorite terminal emulator is Tilix. I don't need much for this system—a single window with two terminals side-by-side is enough. (At work, I run over 25 terminal windows in Tilix... I know, I'm weird...)
When necessary, I also use the built-in gnome-terminal, as well as konsole, and tmux (when working with servers). Thing is, there are so many awesome terminals out there (Kitty, Tabby, etc...), you could spend all day tooling with terminals! I settled on Tilix because it does what I want, has a decent level of configurability, doesn't crash, and increases my workflow speed!
I use the Fish shell (and Bash as necessary) and the Dracula color theme. At work I also use the Starship prompt, but not on this computer. Here's a screenshot of neofetch which shows a summary of the computer including the shell and terminal used:
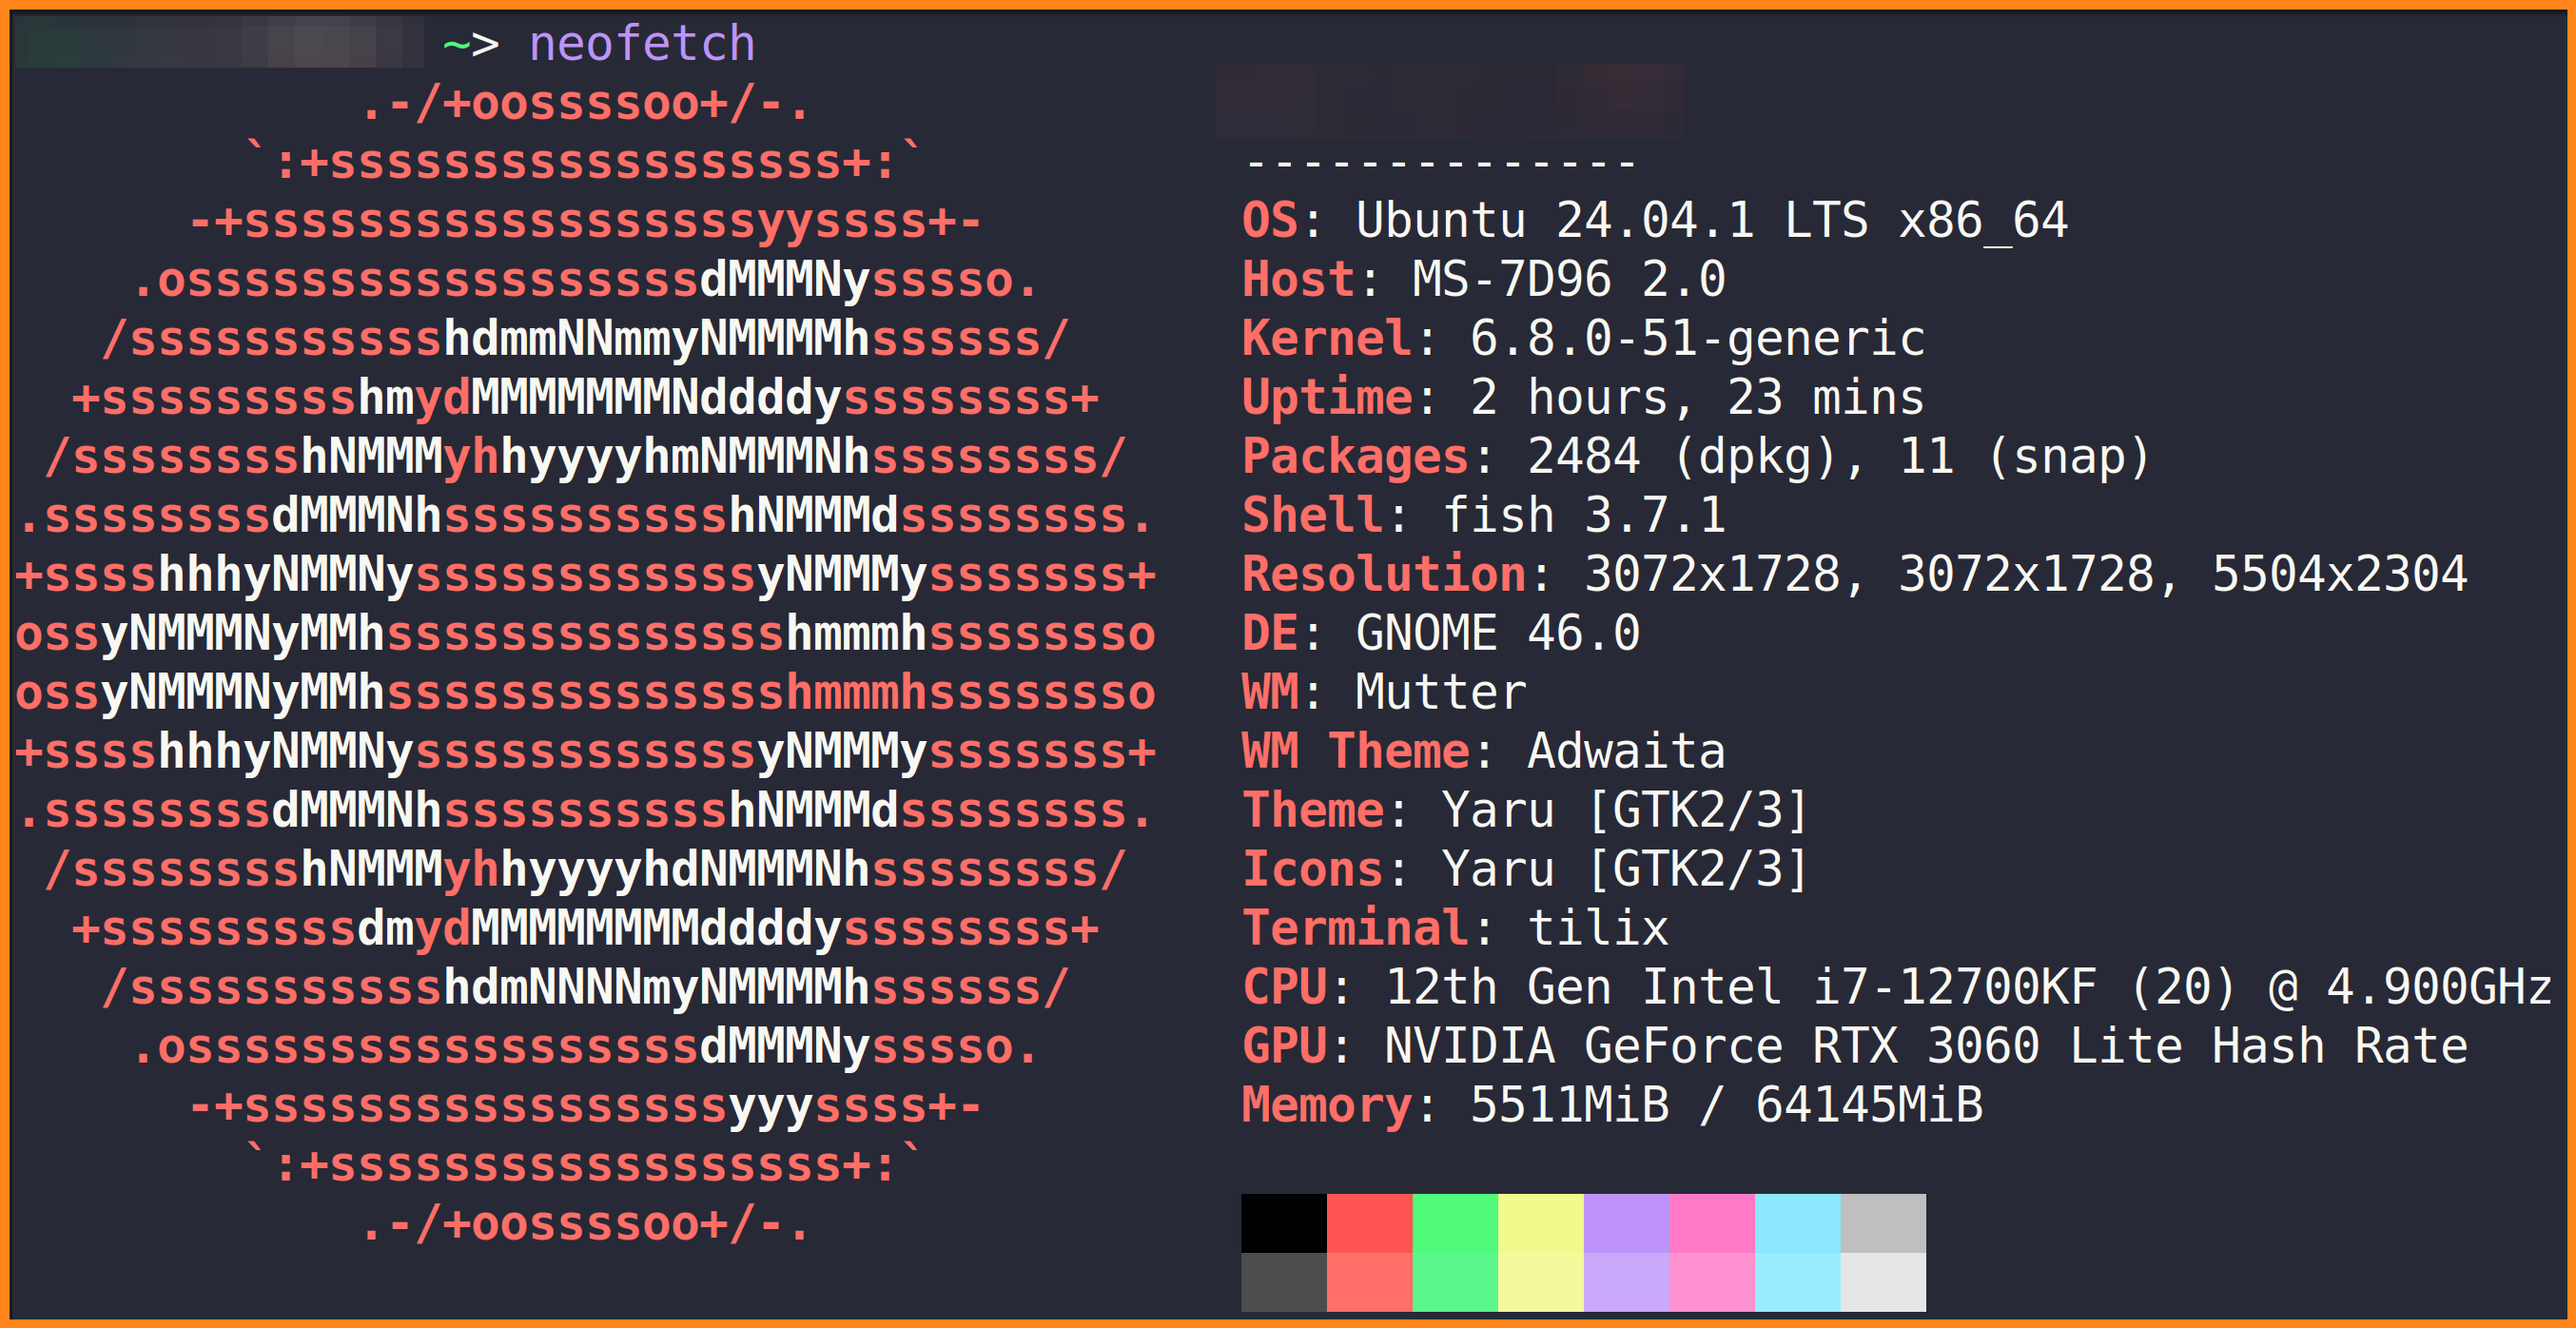
neofetch is a nice little tool. All-in-all, this system is too much fun! 😁The Audio Software 🎶
Now we finally get to the main point of this computer: Audio recording. I love music—listening, playing, and recording. It's fun, and it prevents me from standing in the back yard shaking my fist at the clouds.
Reaper
For many years I was a Pro Tools guy. It was awesome (except when it wasn't). But several years back I tried Reaper and really liked it. Then, they started supporting Linux and I fell in love. It's cross-platform, meaning you can take your tracks from a Linux system running Reaper and load them up to a Windows or macOS system if need be.
Take a look at Reaper running on my system:
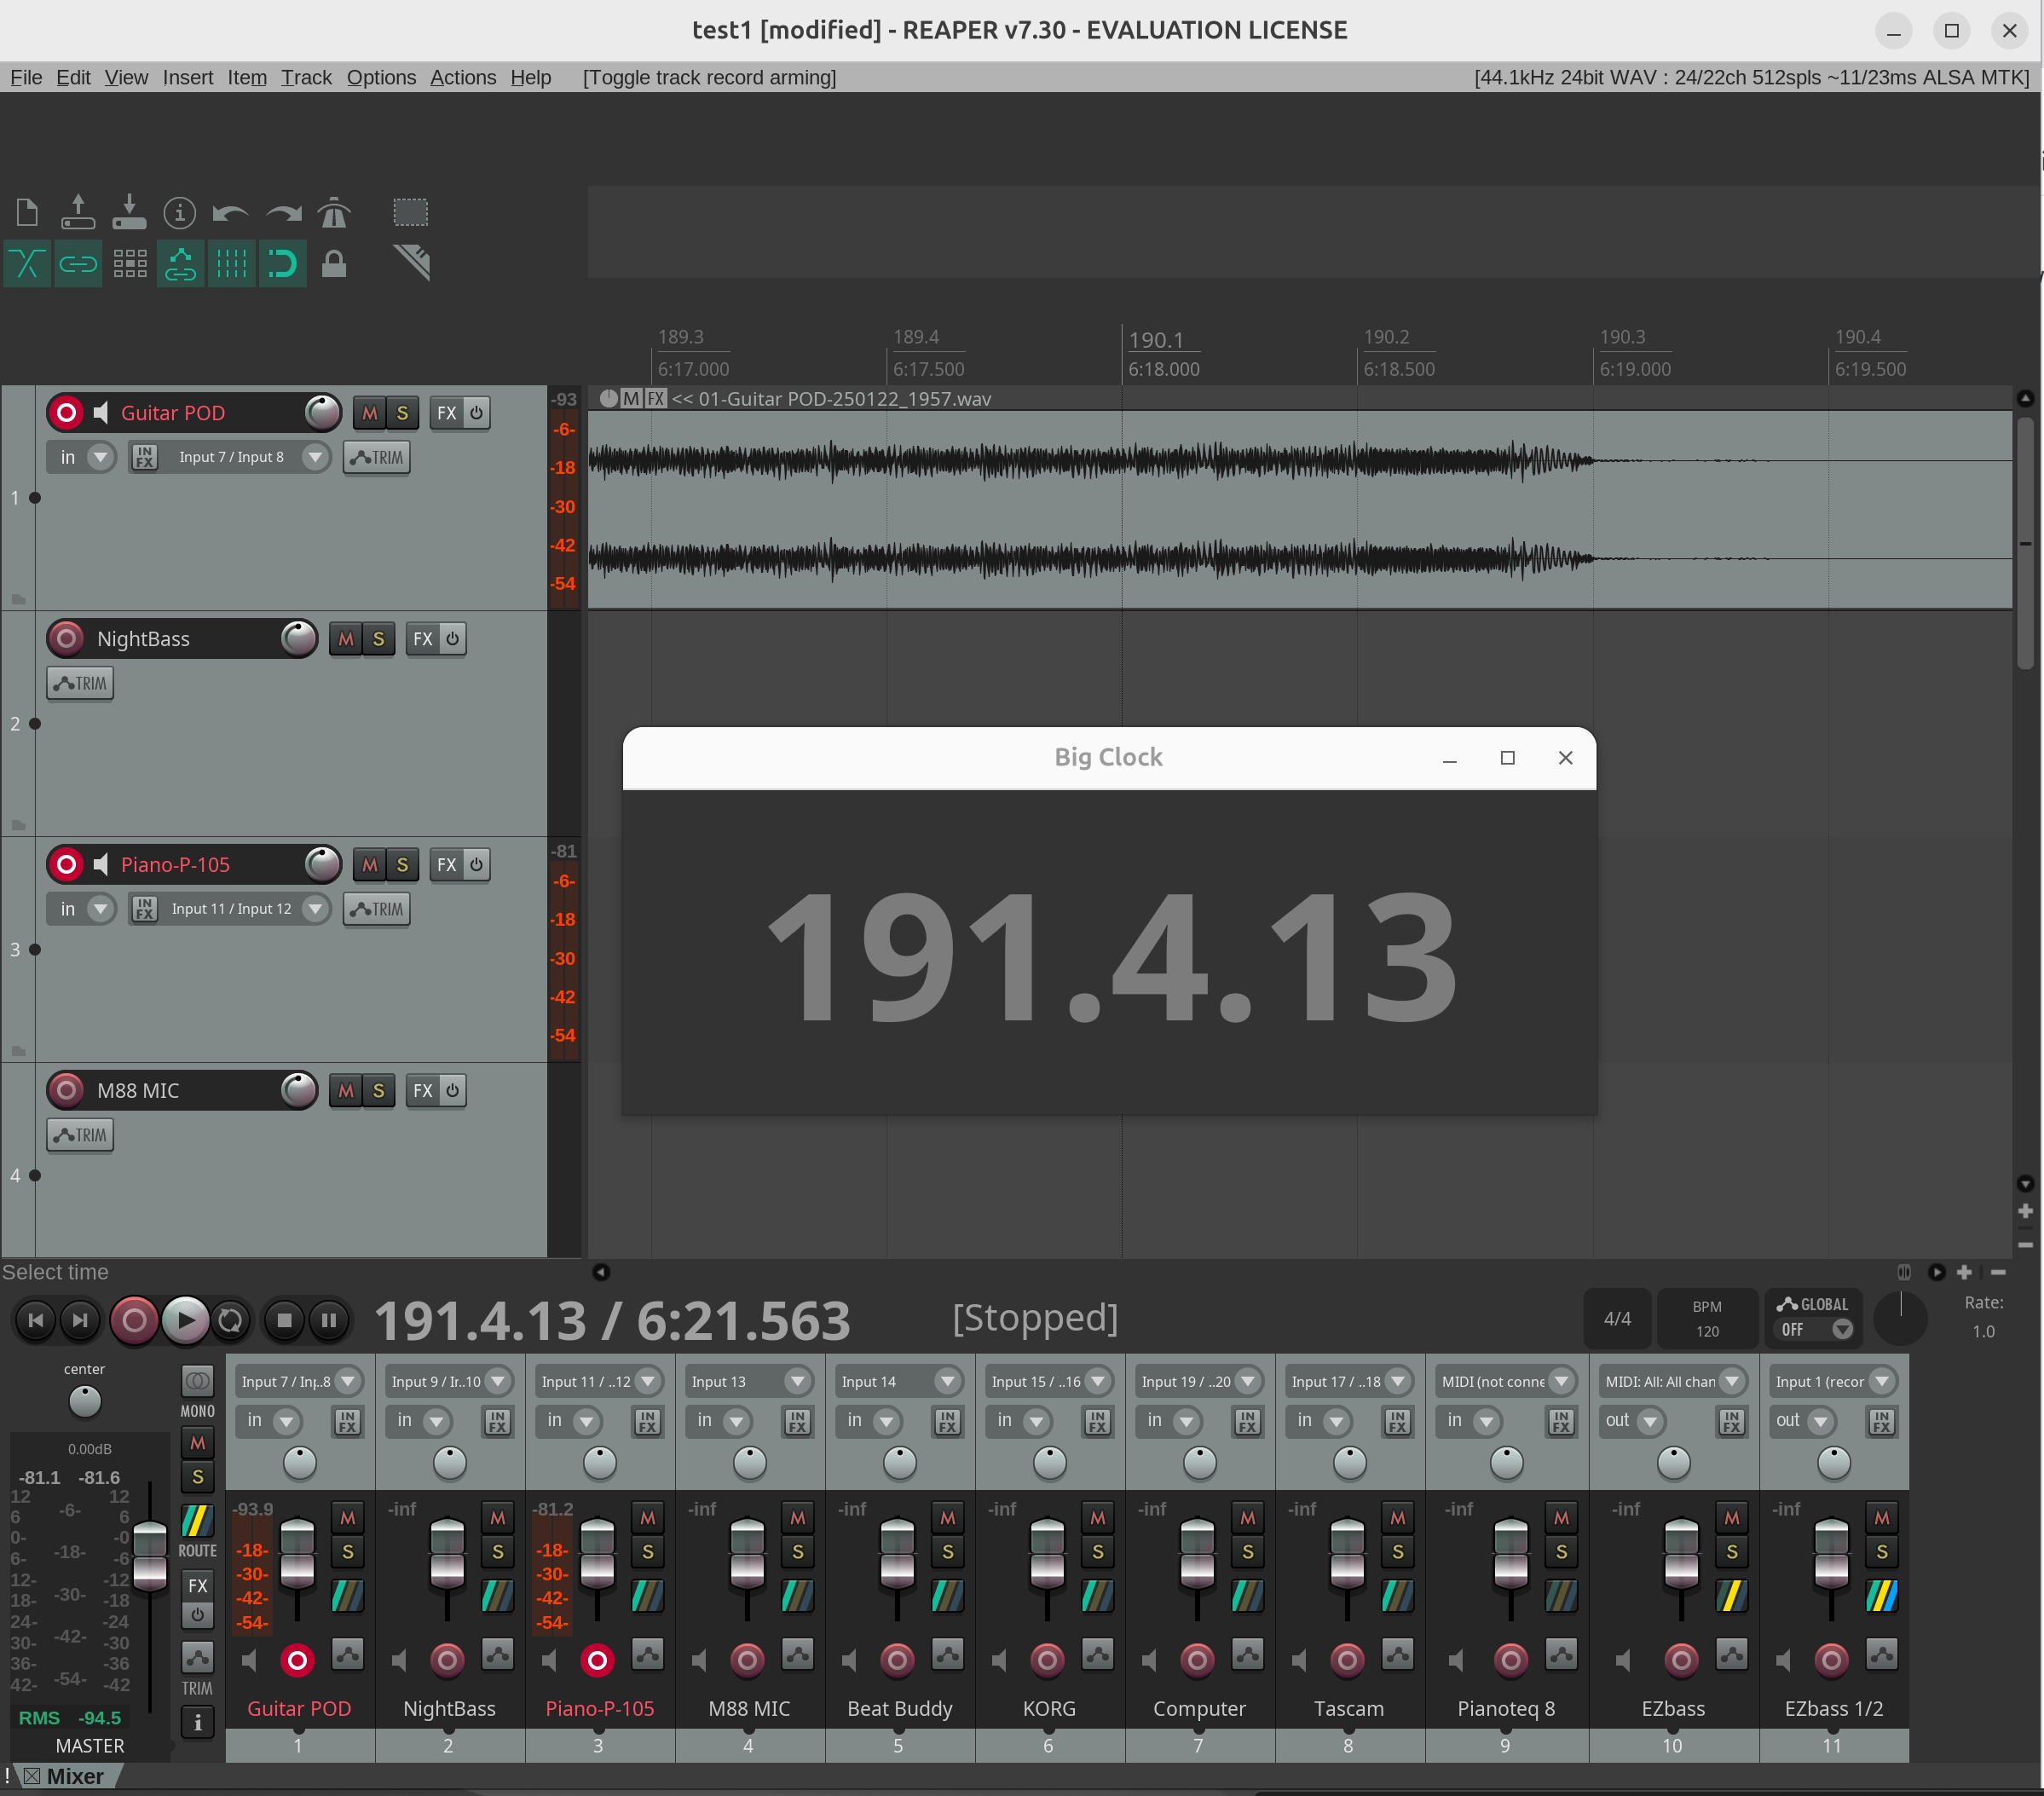
Here's the mixing board I use:

After seeing it, you might say: "Why in the world are you using this thing?!?"
Well, I purchased it a ways back to do some live mixing. But I quickly found it worked great as a recording device (part of it's design intentions). I like having the ability to connect all my instruments and devices to it permanently. Plus it has faders right at my fingertips. In addition, the USB is pretty flawless, so I held onto it. Glad I did, because it works great with Reaper and Linux as well; out-of-the-box I might add. I don't know who wrote the driver code for Linux, but a million thank yous!
This board comes in different models. Most of them only support a 2-channel USB connection. However, this one (the 22 track MTK Signature) supports 22 simultaneous USB connections. This way, I can record multiple inputs at the same time. I can also split out the playback and record feeds.
Key point! Remember to use a quality USB cable! I connect my board to the USB-C input on the back of the computer. Of the different options, that seems to work best. It is known to have less latency than USB-A connections, however your experience can vary!
Lots of other great options with this board, and I am sure a bunch that I don't even know of (or understand for that matter!)
If I had to choose another multi-channel device, I might go with Soundcraft's rackmount option (link). That one can be controlled via the browser. Also great. However, I prefer to not run browsers while working in a DAW - in my experience they tend to cause "interference". I suppose I could connect to it from a laptop via the browser; and therein lies the beauty of it! Something to chew on for later.
But I digress... Back to Reaper! Another great thing about Reaper—it's cheap. In fact, the free version acts as a full-fledged DAW - you can do most things on it. For the "full version" you can get the personal license for $60 and the commercial license for $225 (same software, honor system.) Prices are as of January, 2025. That's pretty darn good on the wallet (especially coming from Pro Tools land.)
Reaper is closed source, which I suppose it would have to be since they have versions for Windows, macOS, as well as Linux. Maybe they will open source the Linux version at some point, who knows. Regardless, I've never had Reaper crash (on it's own). It has stopped due to a faulty Wine configuration, but I can't blame Reaper for that.
Other good DAWs for Linux include Bitwig, Renoise, and Mixbus.
ALSA
For this system, I rely heavily on Advanced Linux Sound Architecture (ALSA). It is the software in Linux that provides kernel driven audio device drivers—and a user space for API development so that the audio device (and associated applications) can interact directly with the kernel. With ALSA, the Soundcraft mixer board I use is seen easily by Reaper and works perfectly. Couldn't ask for more... Seriously, I almost fell on my face in shock...
- Turn on the board first (I always boot audio devices first).
- Boot the computer.
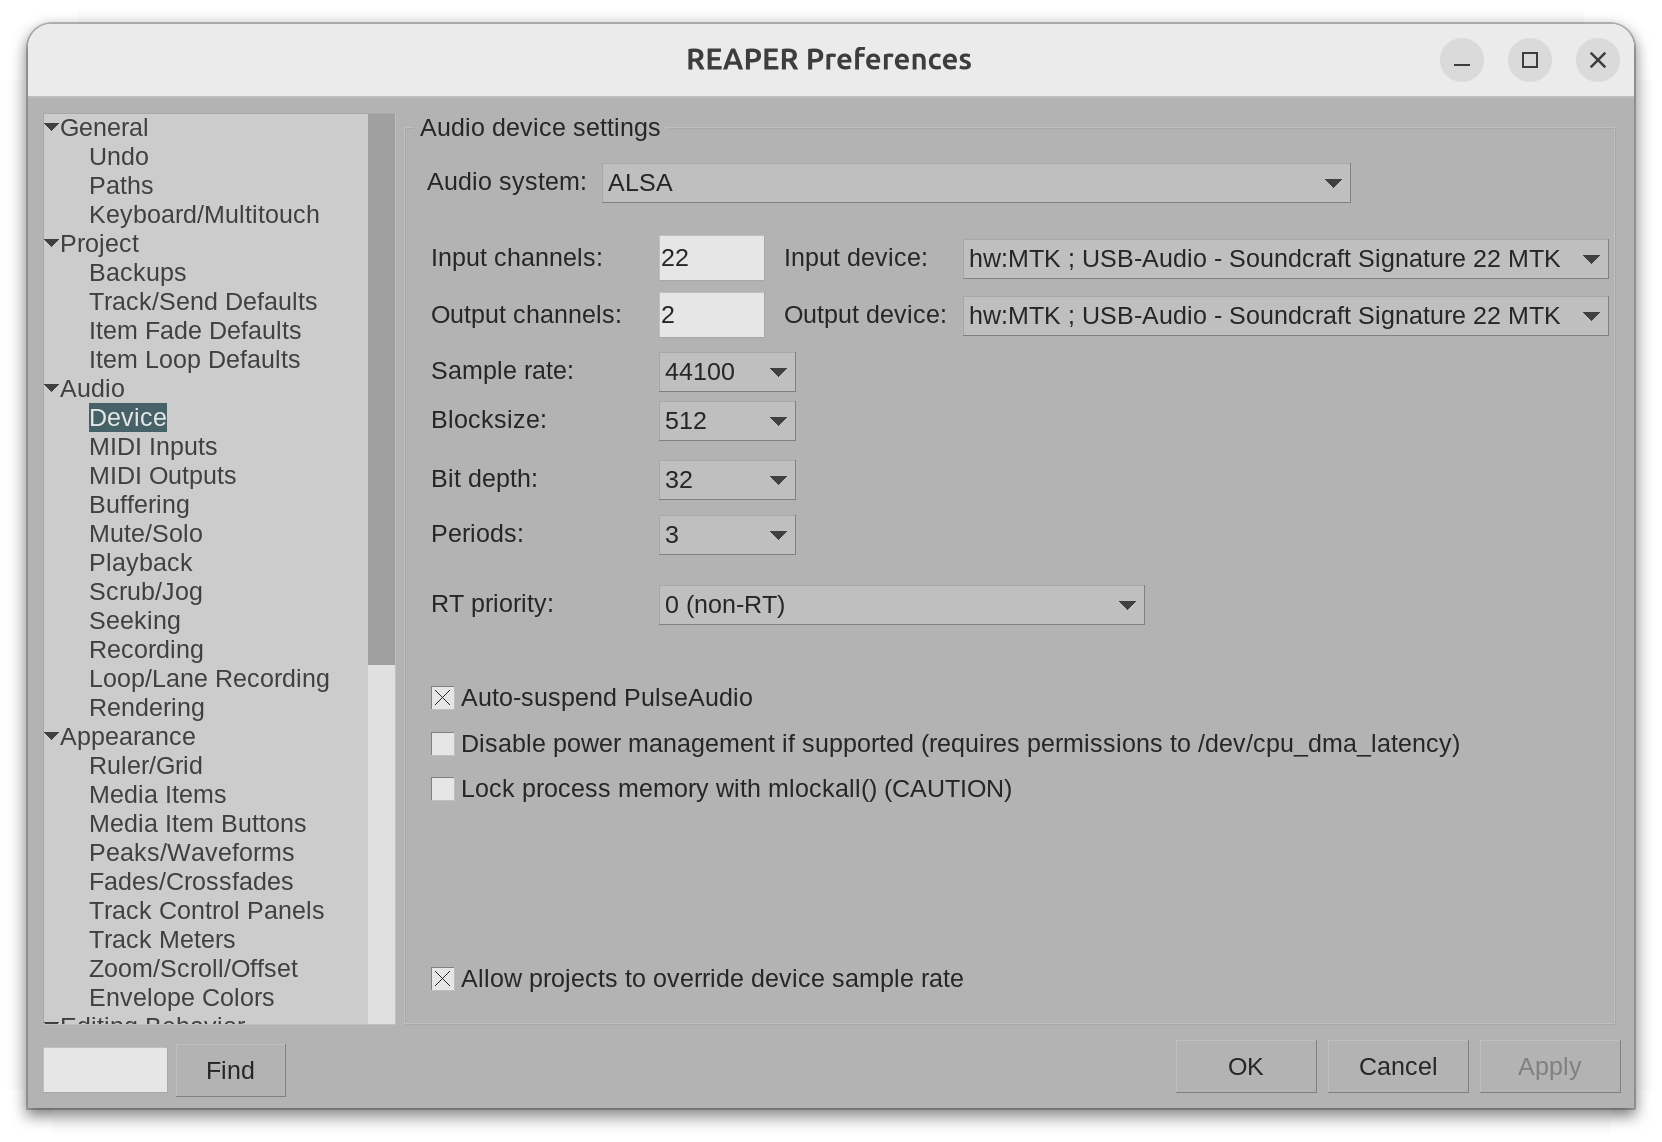
- Open Reaper and go to Preferences > Input Devices.
- Change the Audio system to ALSA.
- Select the board for input and output.
- For input enter "22 channels".
(This board works well at a sample rate of 44.1 kHz but can also work at 48 kHz if need be.)
Boom! Everything works. I can record on 22 channels (I've only done 8 simultaneously) in Reaper without breaking a sweat. With VSTs running. It's 2025 and I'm so excited. Gonna go listen to the Pointer Sisters now.
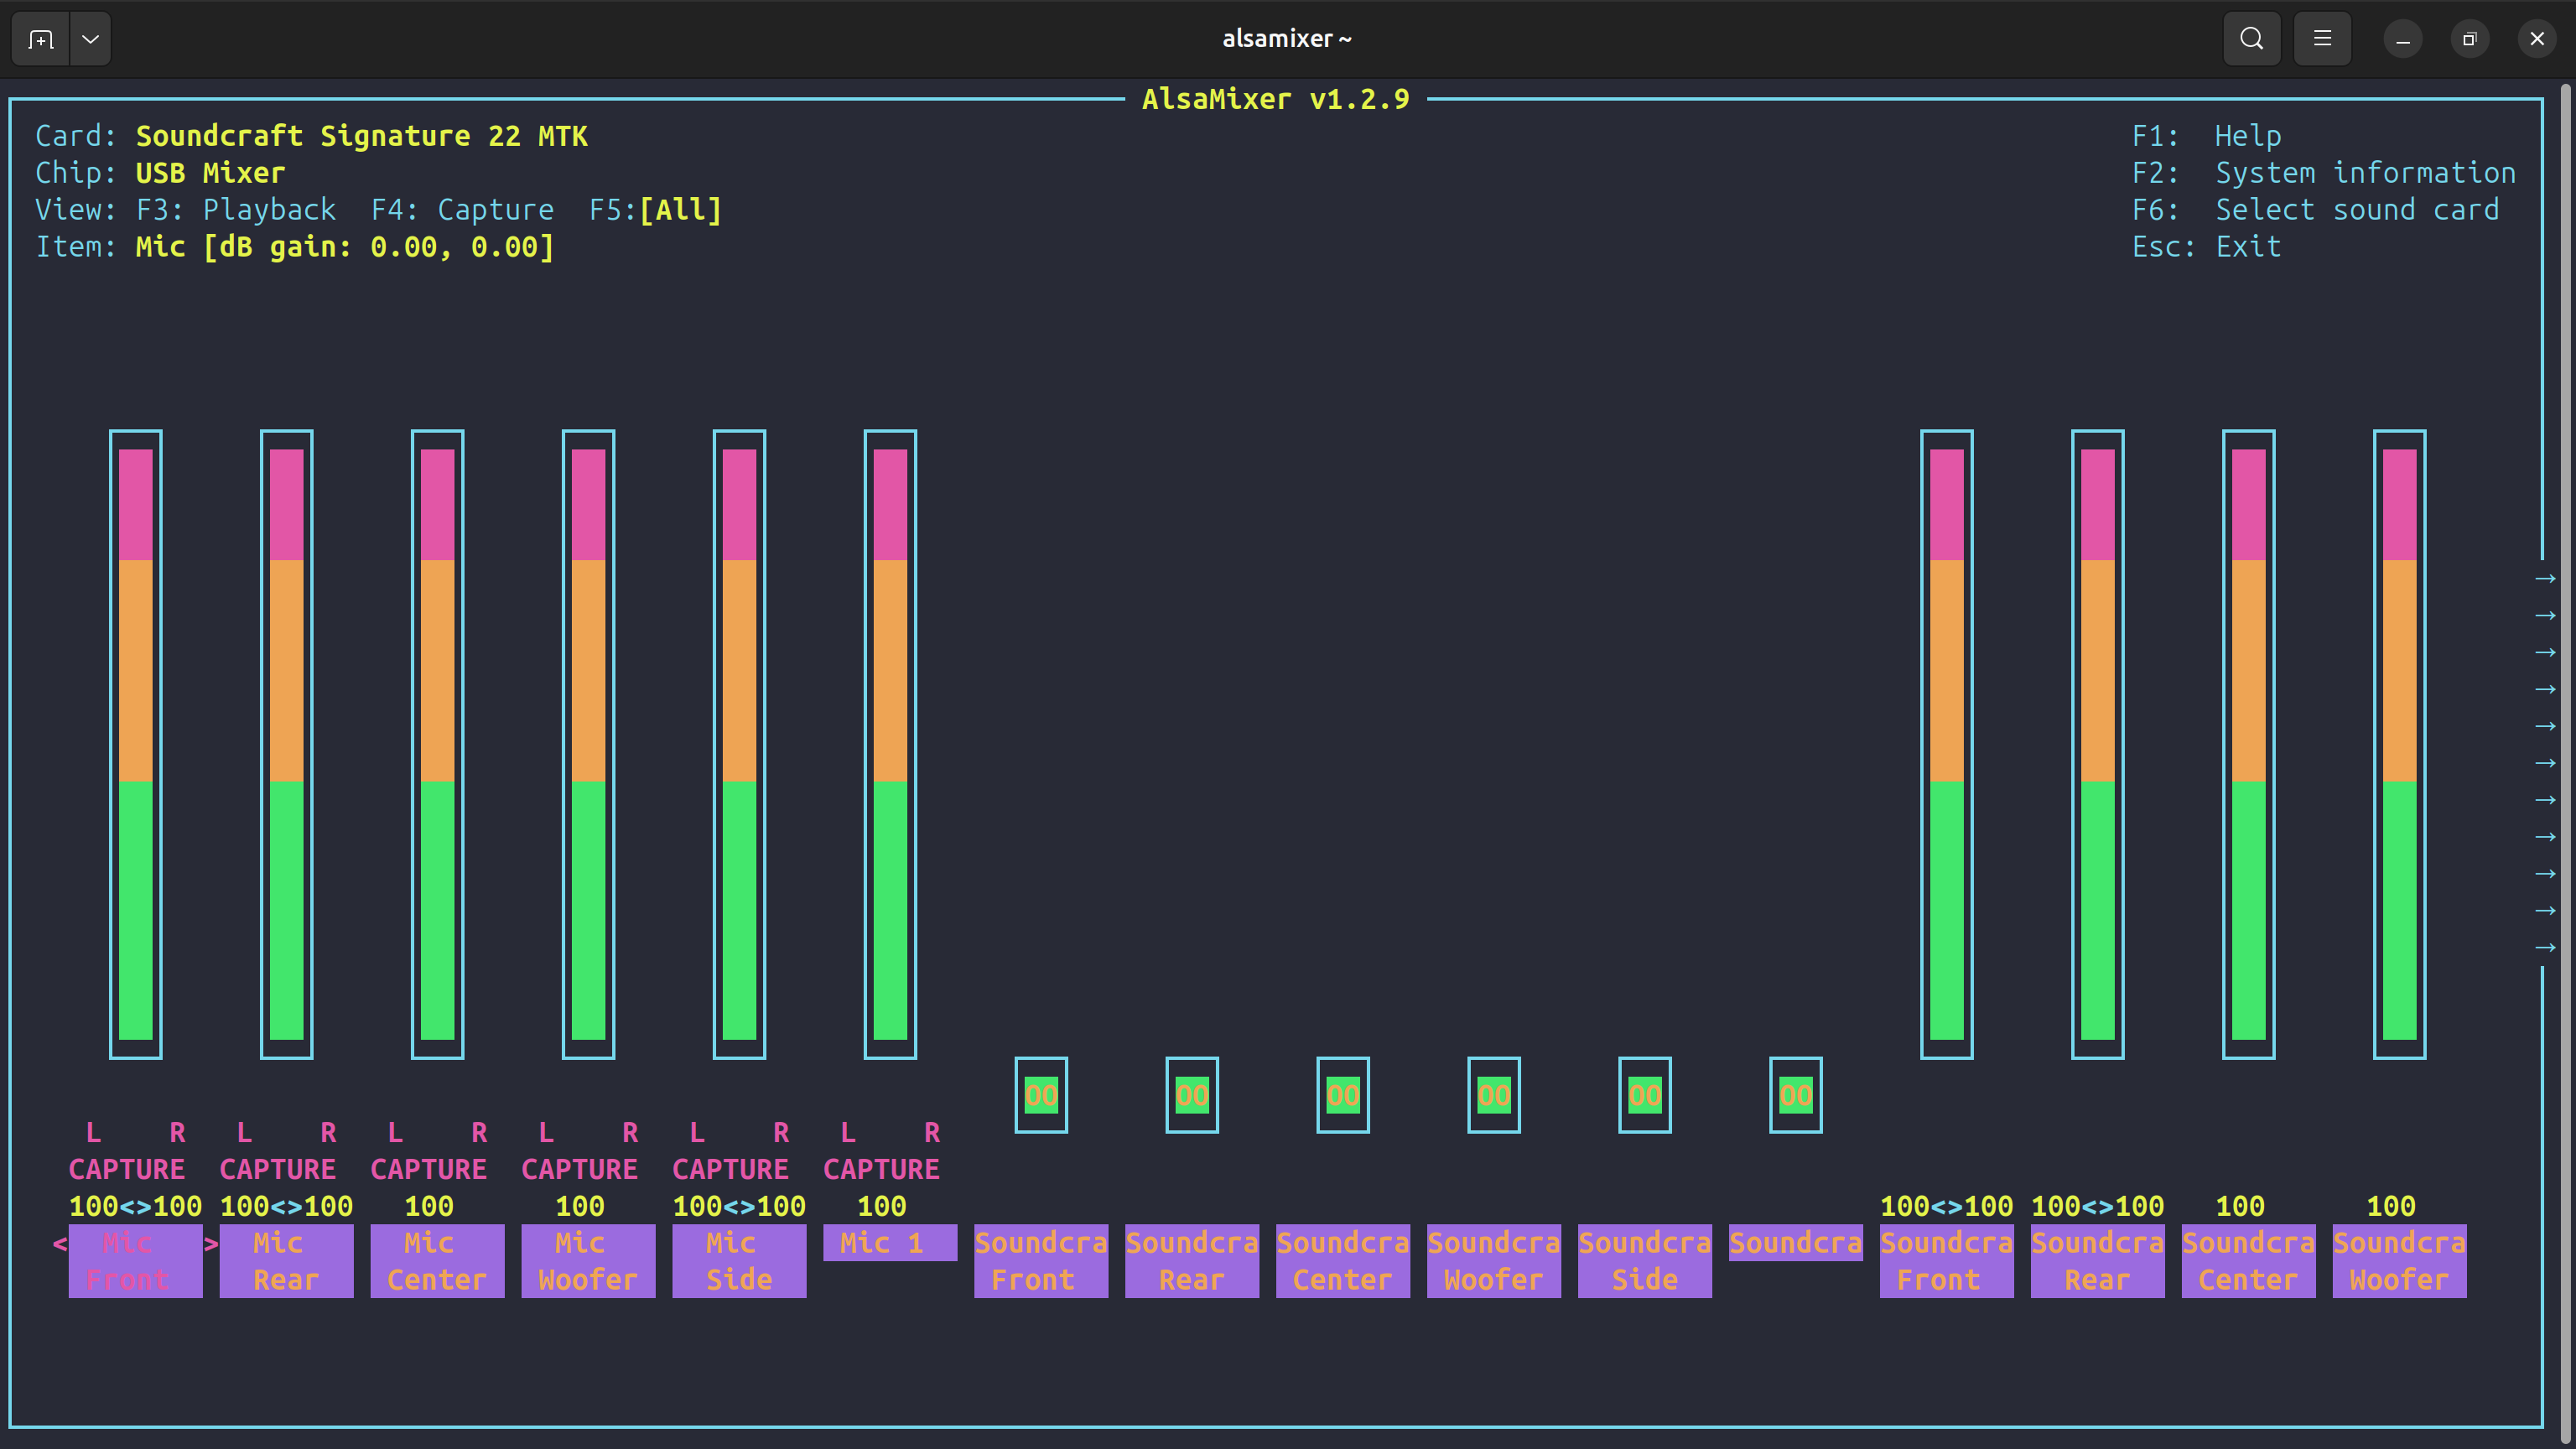
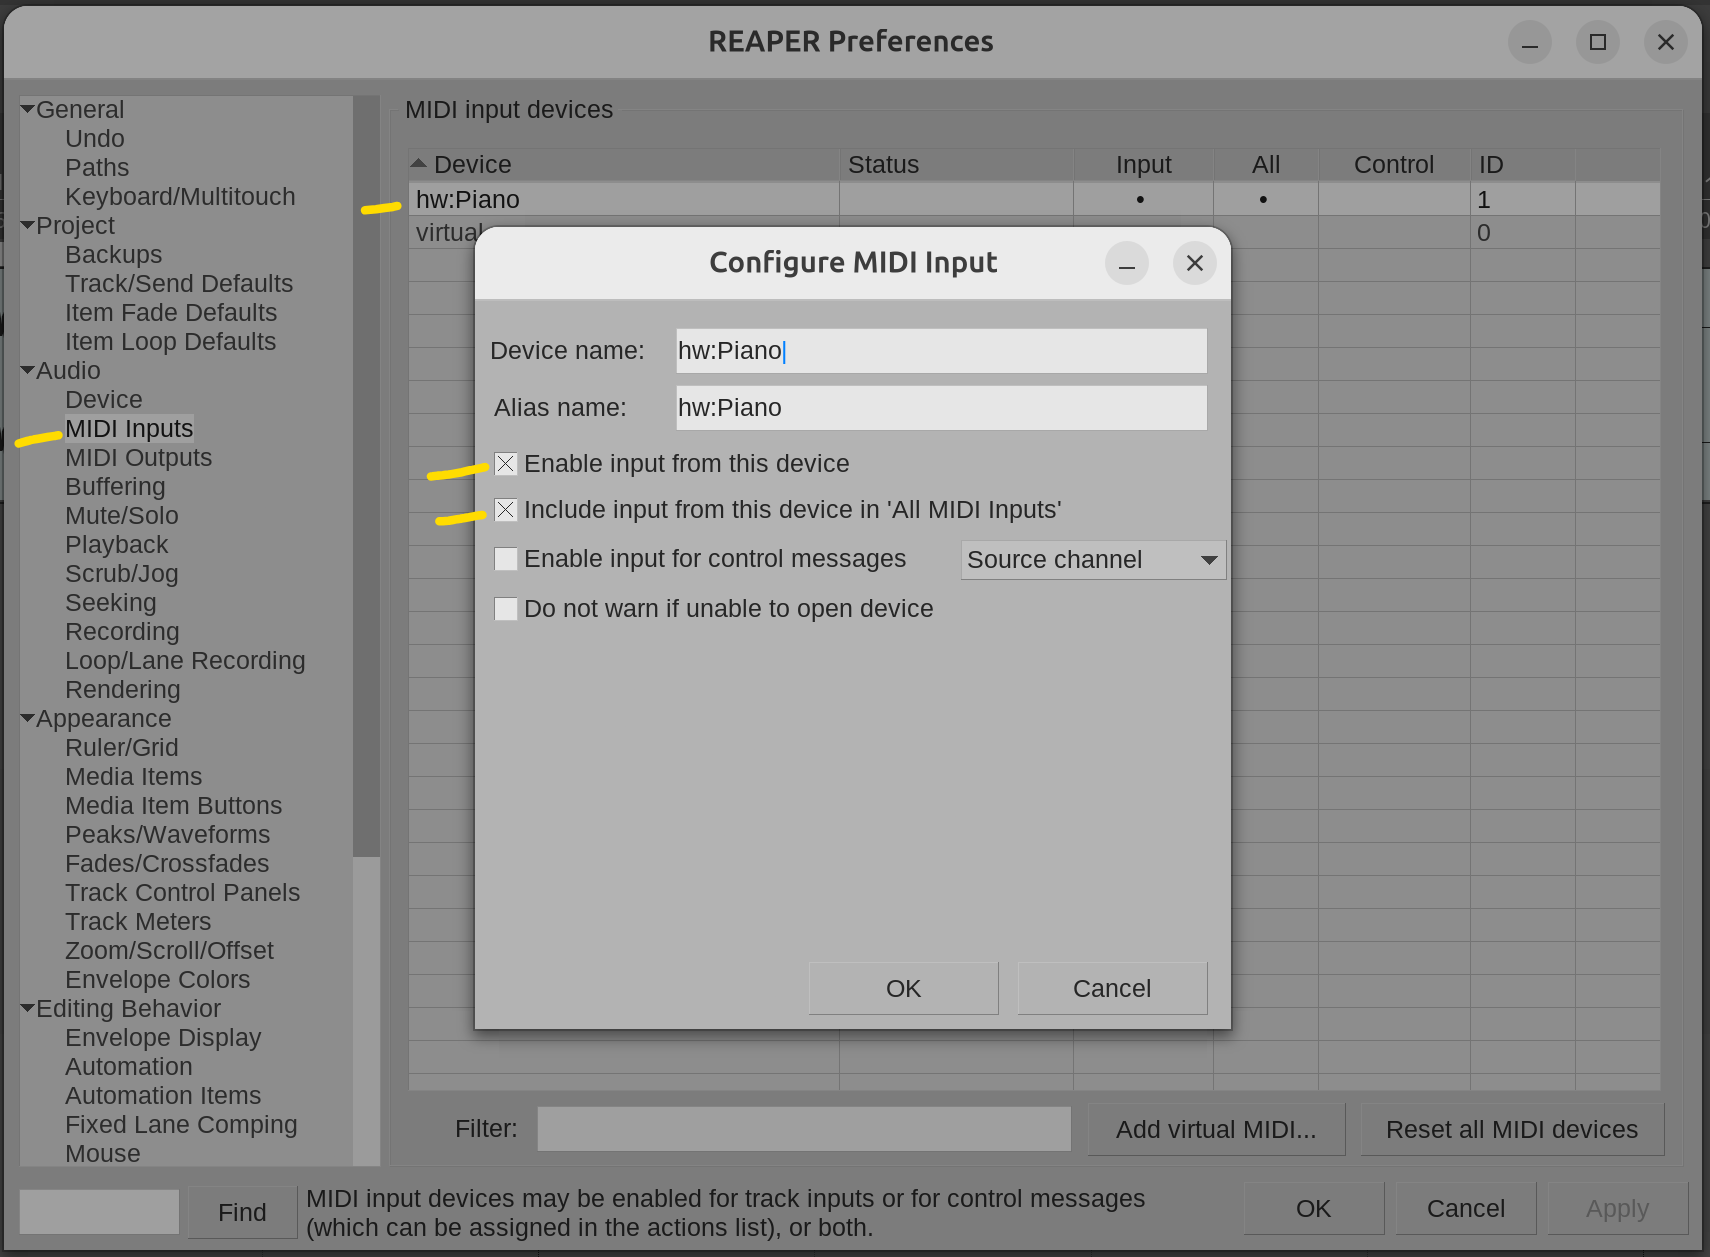
alsamixer in the command line - sees the mixer board well, along with everything else.- Boot the MIDI device
- Go to Preferences (
Ctrl+P).- Go to Audio > MIDI Inputs.
It should show up automatically (if Linux knows what it is).
- Double click the device (for me, it's hw: Piano).
- In the "Configure MIDI Input" window click the options for
- Enable input from this device
- Include input from this device in "All MIDI Inputs"
Done! Now, we can control any piano, synth, or other MIDI-based plugins, and input MIDI keystrokes into a MIDI editor.
Theoretically, latency should be less with the 3.0 ports (about 30 ms instead of 120 ms) but in practice, with the devices I use, the 2.0 port is audibly better - it feels better in this case.
In addition, the right cable is important. I use a 10 foot USB 2.0 A to B cable from Cable Matters. Latency is even better with that as opposed to any old cable lying around my studio.
Then, if necessary, RT Priority in Reaper can be increased, the kernel can be optimized, and if absolutely necessary, a different Linux kernel could be used, but I haven't needed to do that last one yet.
Wine, Yabridge, and dxvk
You've been warned!
Well, well, running a DAW in Linux is all well and good. And there are some pretty darn good open source plugins for it: Guitarix, ACME tools, AVL Drums, etc.... And you could use them to create something awesome (and I have in the past). But imo most of them can't hold a candle to the pro stuff that is out there—stuff that is only designed for Windows and macOS. For example, I'm a big fan of Toontrack, Neural DSP, and Izotope plugins. But they are not fans of Linux—noooo! What to do? Install Wine and yabridge! Then run those plugins directly in Linux. YESSSS! Let me explain what I did.
Wine is an emulator for Windows programs in Linux. It's like a streamlined version of Windows—just for programs.
However, using Wine requires some knowledge, patience, and work. Here's the key: Imagine what it takes to run a Windows-based application, with a Windows-based GUI, on your Linux system. You might need drivers, special settings, and so on. Be ready. Always keep that mindset.
I installed Wine from here. I went with the staging version as that apparently works best with yabridge. I am running Wine in Windows 11 mode, but other modes can work as well. Now, operating system updates could affect how Wine works. So I hold those packages back from updates. This I did with the command below. Other systems (arm and so on) might require you to include other packages as well. Run a dpkg --list | grep wine to see all your packages that are "Wine"-related.
sudo apt-mark hold wine-staging wine-staging-amd64 wine-staging-i386:i386 winehq-staging winetricksCommand for holding back "Wine"-related packages.
yabridge is a utility for connecting your digital audio workstation (DAW) with plugins (VSTs and otherwise) that can be run through Wine. It's amazing. I installed yabridge from here. Mostly, I followed the directions at the Github page. I also permanently added the yabridge executables by adding the path to ~/.profile using the following command:
export PATH="$PATH:$HOME/.local/share/yabridge" This way, the binaries (like yabridgectl) work from any directory.
And I'll say it again - thank you to Tim Wayans (and all the contributors) - PipeWire is a GameChanger.
But then, another issue arose. The programs that the VSTs run in Wine often aren't displayed properly. That's because a lot of these programs require DirectX in Windows–and there is no such thing in Linux. Never fear, there is a DirectX replacement for Linux called dxvk. (essentially DirectX on Vulkan).
dxvk can be downloaded here. In order to use it, your GPU needs to support Vulkan. Nvidia-based cards support it out of the box. You can check it by installing the Vulkan utilities sudo apt install vulkan-tools and running the vulkaninfo command. AMD-based cards might require a Vulkan installation. (See this link for more.)
The dxvk installation requires some doing if you want to do it manually. This I did, but it wasn't perfect. Then I found out about the Wine Trick for dxvk. There are a variety of Wine Tricks out there that can help with the install and configuration of tools such as dxvk. Simply install Wine Tricks: sudo apt install winetricks and then install/configure dxvk in one shot with winetricks dxvk. Done. It's like walking the dog—without having to pick up any poop.
Other Audio Tools
The standard Sound utility in GNOME is great for basic modifications like changing audio devices and testing them. I set up a keyboard shortcut directly to the Sound Applet using: Ctrl + F8. It works well.
gnome-control-center sound if you want to run it from the command line or attach a keyboard shortcut to it.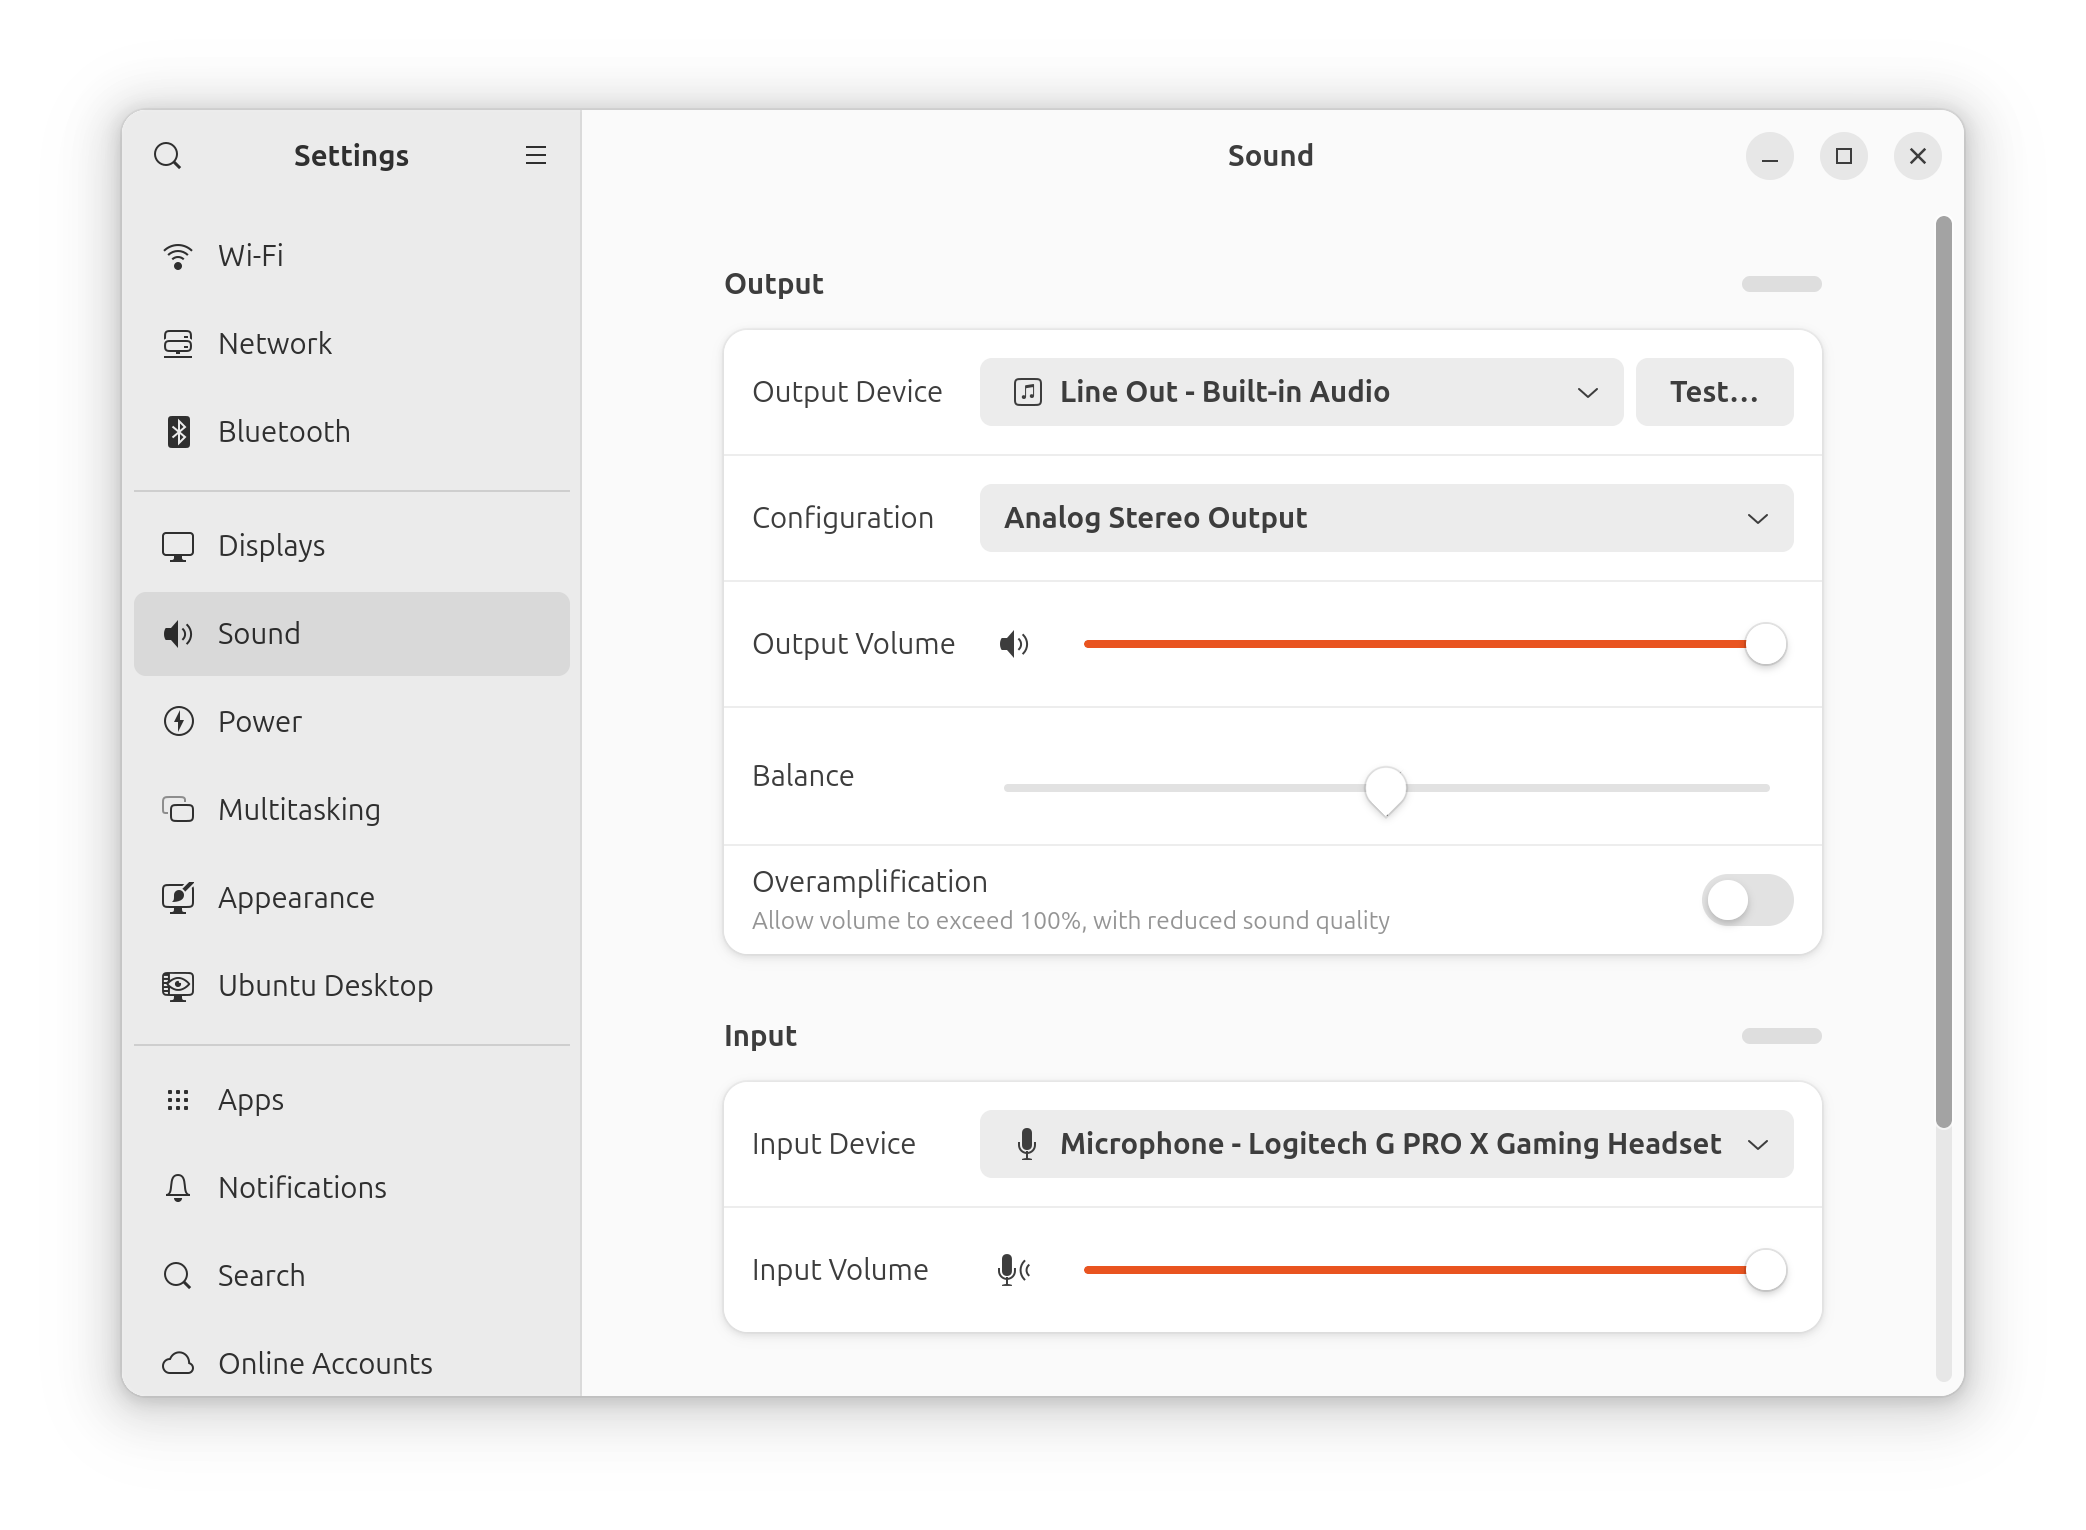
Aside from alsamixer, I use pavucontrol which is a great tool for working with multiple audio devices. When you have a lot of audio connections and devices things can tend to get a little weird. You might find that input or output volumes can change based on a variety of factors. alsamixer and pavucontrol allow you to make the required adjustments to the inputs and outputs quickly. (In fact, I usually prefer to use pavucontrol in these scenarios.)
You might also be interested in I/O patch bay tools such as qpwgraph or helvum. These can help sort out complex audio setups. I don't currently need them, but could see the need arising in the future.
For casual listening I use Spotify, Rhythm Box, and Strawberry.
I also use an interesting tool called Kenku. This allows me to share my audio feed through Discord while in video or audio chat. It's pretty awesome! I can share local playlists, Spotify music, and much more, and everyone hears it with decent audio quality (high-def if you boost your Discord server). Big shout out to Nicola and Mitch! (BTW, If you're into D&D check out their Owlbear Rodeo VTT. Simply awesome.)
I'm sure there are items I am missing, but that's about it for audio software for now!
Audio Hardware
Take a look at the diagram below. My audio system is getting complex. To be able to record music through the Soundcraft board (with optimum latency on the USB connection), while outputting already recorded tracks, and while listening to (and importing) audio from the computer (Spotify, etc...) I had to make a pretty wild configuration. I also wanted an all-in-one device for podcasting/streaming. For this I added a Rodecaster Duo audio device.
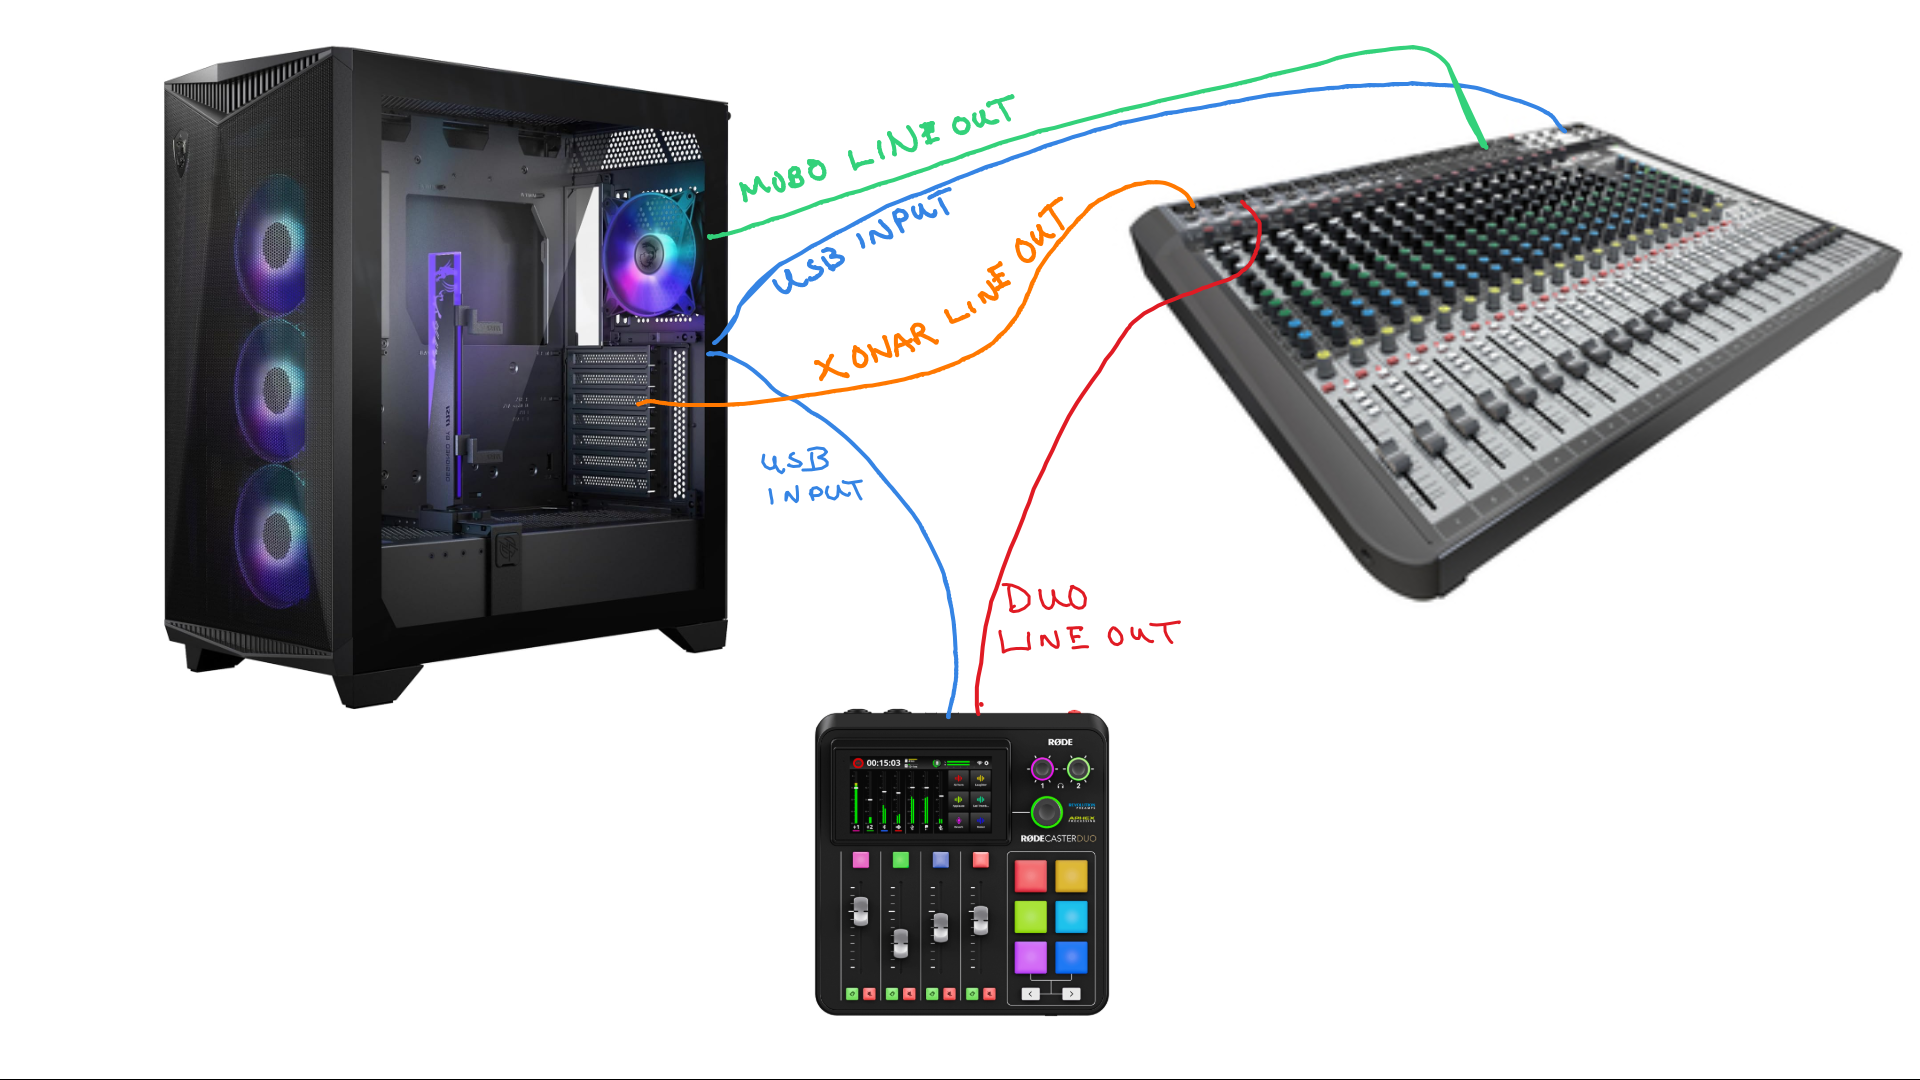
- Blue is for the USB inputs from the Soundcraft mixer board and the Rode Duo. I connect the SoundCraft board to a USB 2.0 Type A port on the back of the computer and the Duo to the USB-C port.
Originally I had connected the SoundCraft via a USB Type B to USB-C, but I experienced some connectivity conflicts on USB for the board. This board's USB port is only 2.0 (which is all that is really needed for audio) and when I connected it to a USB 2.0 port, most problems went away.
Once in a while however, the Rodecaster (if running at the same time) will cause the SoundCraft to lose its connection to Linux. This is an interesting phenomena and I am troubleshooting it further. Not a big deal, because I normally use one or the other (Duo for livestreaming/zoom/etc... and the SoundCraft for recording music) so neither are turned on at the same time, normally.
- Green is the output from the motherboard's integrated audio line out into a stereo track on the Soundcraft mixer board. I use this as the Reaper output device. By the way, that line out is pretty darn clean for an integrated audio device! Even better with a shielded cable. (At the time of writing, Disino makes a pretty good one.)
- Orange is the line out from a separate Asus Xonar sound card that I installed. I use this to listen to computer audio. Pretty clean. No discernible audible difference between the two sound cards on the computer right now. However this connection has a bit of noise. Something to troubleshoot, but nothing major.
- The board connects via XLR to powered JBL Professional 308P MkII speakers. They sound very nice. Could do with a sub though.
- For podcasting/streaming/zooming/discording, I use an Audio-Technica BPHS1 headset connected to the Duo with a passive Pro Max2 noise isolator box in between to make it even cleaner. Upgraded the headset with Dekoni earpads–much more comfortable. Also use a Beyerdynamic M88 dynamic microphone which is great for everything.
- I also use a Logitech G Pro X wired headset which connects via USB to a front panel port on the computer. That's the backup in case the Duo fails. The audio quality from that headset is surprisingly good, and it's pretty comfortable. However, you can't run the Logitech Blue Voice program in Linux (without Wine that is). That is an excellent program that takes a very basic and thin microphone and makes it sound pretty great. The closest alternative that I have found is EasyEffects for Linux.
However, this article is all about Linux, so - onward!
Gaming and Fun 🎲
Well, if you have a system like this you may as well game, right? So be it. I just have to remember to keep the discipline—meaning not staying up until 2:30 in the morning playing Civilization VII. A tall order—especially because the game hadn't been released at the time I wrote this article!
Steam
The ultimate thanks goes to Valve, the creator of Steam. Steam is an online platform for gaming that can be installed to Linux and other OSes. Install it, download games. Play. Some games require that Compatibility be turned on in Settings and that a version of Proton be used. (I'm using Proton 9.0-4 currently). But that requires only a quick toggle button and a restart. (Much easier than back in the day!)
What can I say? Steam rules. End of story. For games that don't run on Steam (there are some, yes) then it's off to Wine with you... And we've already taken care of that!
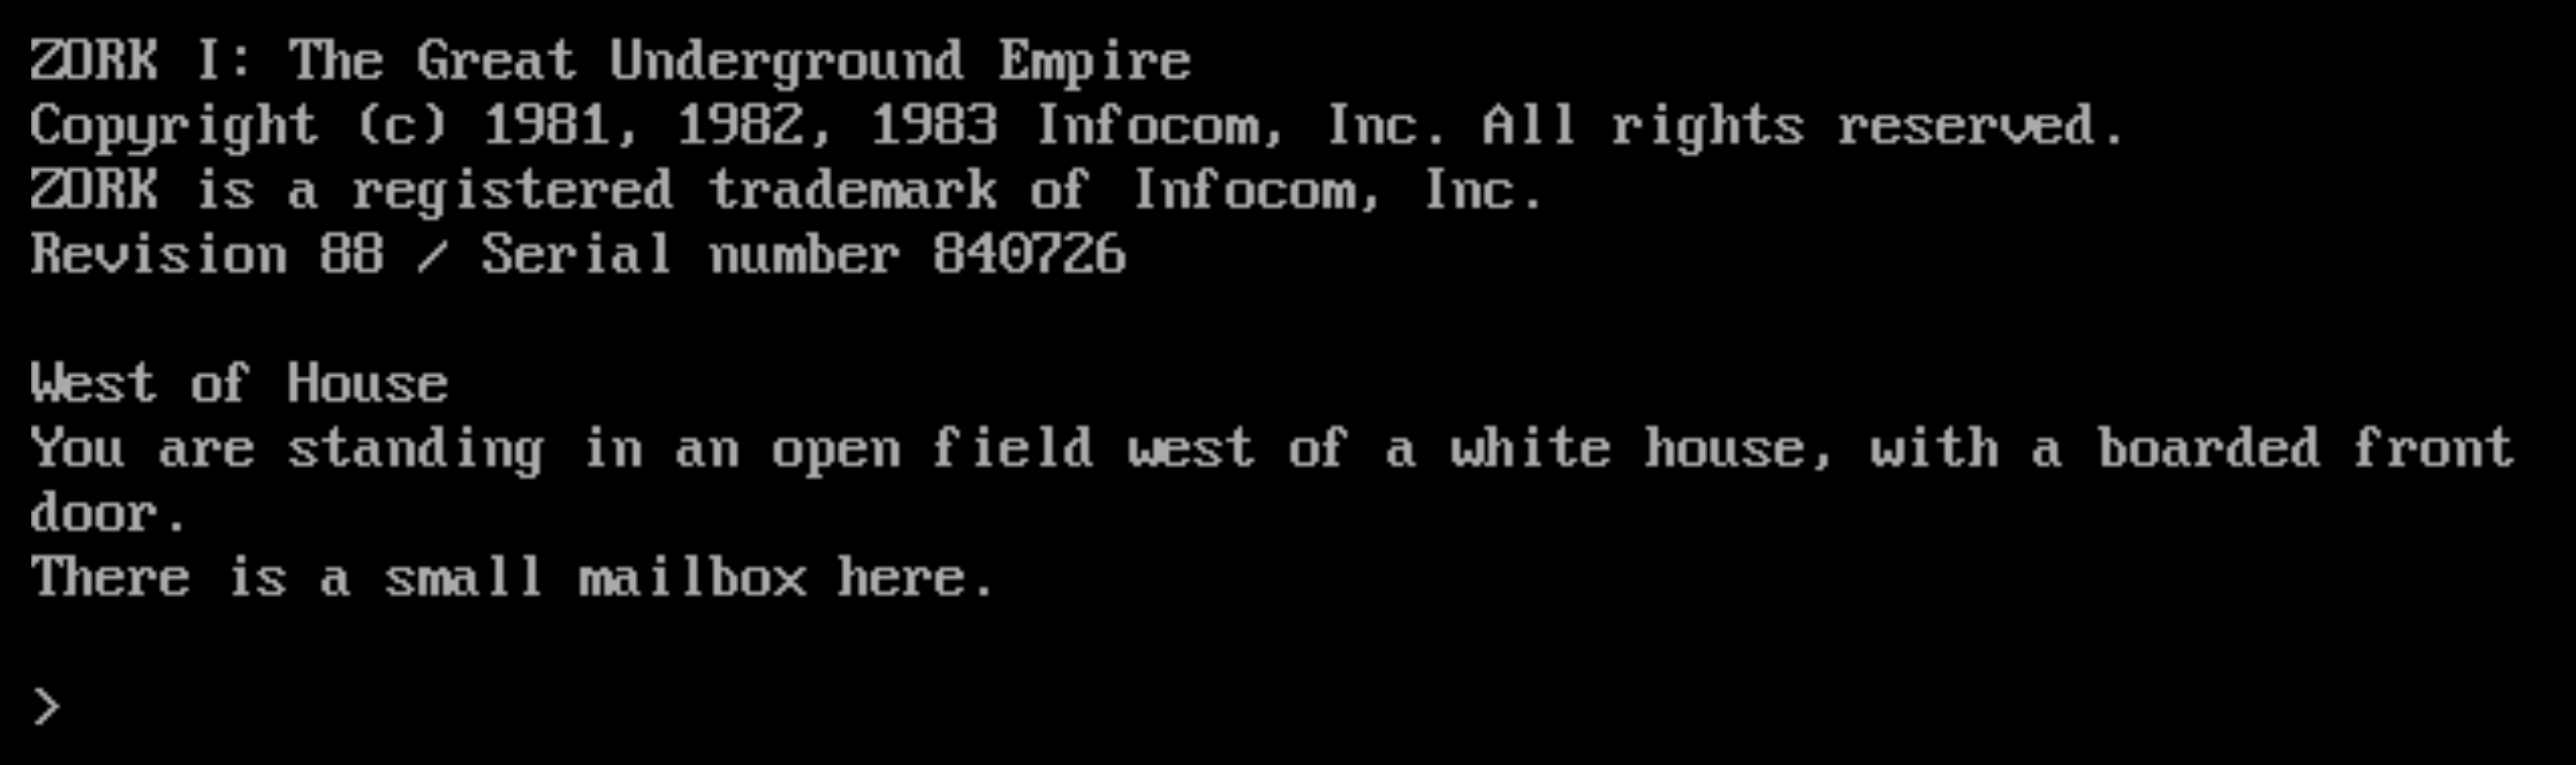
Here's a great start to gaming—one of the classics! 🖮
In a Debian-based system (such as Ubuntu) the Steam games, and supporting apps, are downloaded by default to this path:
~/.steam/debian-installation/steamapps/common
This location could differ depending on your distro and other factors. The reason I bring it up is because .steam resides inside the user's Home directory. That's one of the reasons I made that /home partition so big.
But then I read this... Oh, the world we live in! But that is way off topic.... Back to it.
Razer Devices
It's interesting how I have gravitated toward (and collected a bunch of) Razer devices over the years. So, instead of buying new devices I'm just using those:
- Keyboard—Ornata
- Mouse—DeathAdder Elite
- Controller—OrbWeaver (they don't even make this anymore!)
Of course, I want to be able to change their backlit colors. To do that in Linux, two main programs are required: OpenRazer and a GUI-based tool, such as PolyChromatic. OpenRazer is the backend that communicates with the devices. PolyChromatic is the frontend GUI tool that you can use to modify the colors of the devices.
I was a little leary of installing OpenRazer because it also installs a kernel module. Kernel module additions have a way of messing with the system (as was the case with the OpenRGB program). However, I did the standard install for Ubuntu Linux and it worked fine. It did require a MOK with password which has to be confirmed upon reboot, but it all went well.
Polychromatic installed and ran perfectly. Plus, it saw all three devices—no problem.
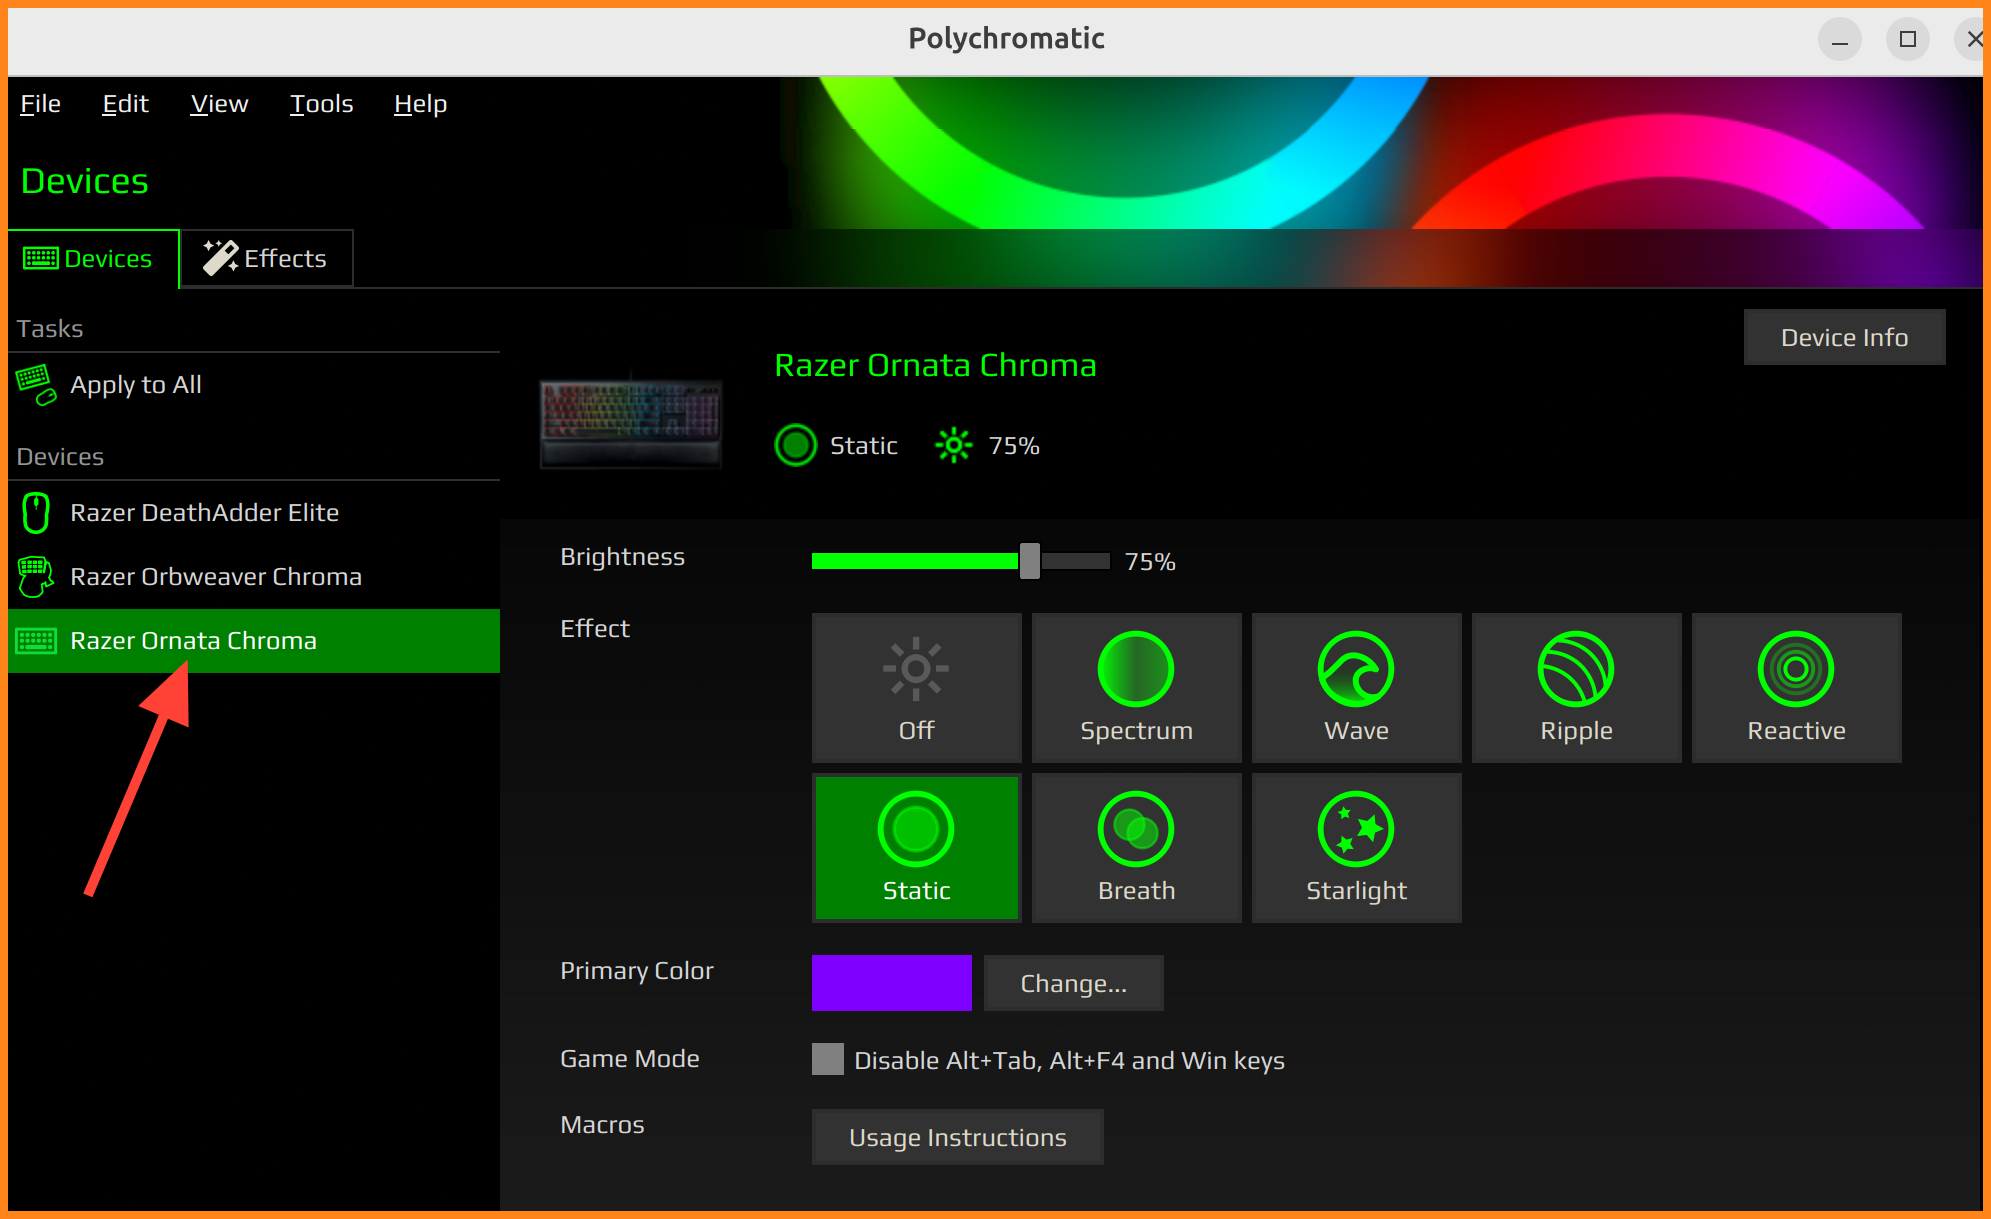
There are other tools for the frontend, such as RazerGenie, Snake, razerCommander and razer-cli, but Polychromatic worked perfectly for me. Some people might also benefit from some kind of key mapping software as well, for example Input Remapper.
It really is a joy at this point. Thanks? Yes, one jillion. Us Linux people sincerely appreciate all the open source contributors of both OpenRazer and Polychromatic.
- OpenRazer link: https://openrazer.github.io/#project
- Polychromatic link: https://polychromatic.app/
For audio during gaming, I'm also using the previously mentioned BPHS1 headset and wired Logitech G PRO headset. As I stated before, Ubuntu sees them no problem. They work great for gaming and in Discord and other meeting software programs. Once in a while I'll blast a game through the JBL monitors - sounds really nice. The only thing that is missing is a sub-woofer - but there's always next year...
Performance and Benchmarks 🏋️
This system runs great as is, so I didn't do much to increase performance. I did however have to change the Power Mode to "Performance" because it was set to Balanced by default. In GNOME, that's done in Settings > Power.
Then, I made sure that there were no applications starting up automatically or running in the background. I did this with the gnome-tweaks program in "Startup Applications".
System Analysis
Well, I love statistics and analytics. However, I tend to take them with a grain of salt. They are decent indicators of the performance of a system, but I tend to go by "feel" more than anything else. By that I mean, if the system "feels" sluggish, then it needs some work.
So while benchmarking tools like fio, Phoronix Test Suite, Geekbench, Sysbench, and glxgears are fun and interesting, and I've used them in the past, I'd rather not fill up my system with extra programs like this (not to mention their dependencies).
Instead, for this system, I prefer to perform actions with built-in tools and low-footprint tools, and analyze with those and from within the applications that I run.
Here are some of the tools I have used so far to check performance and monitor the system: top, btop, gnome-system-monitor, and nvtop.
top. I use it all the time, especially with Linux servers. Check out this deep-dive article I did about top.
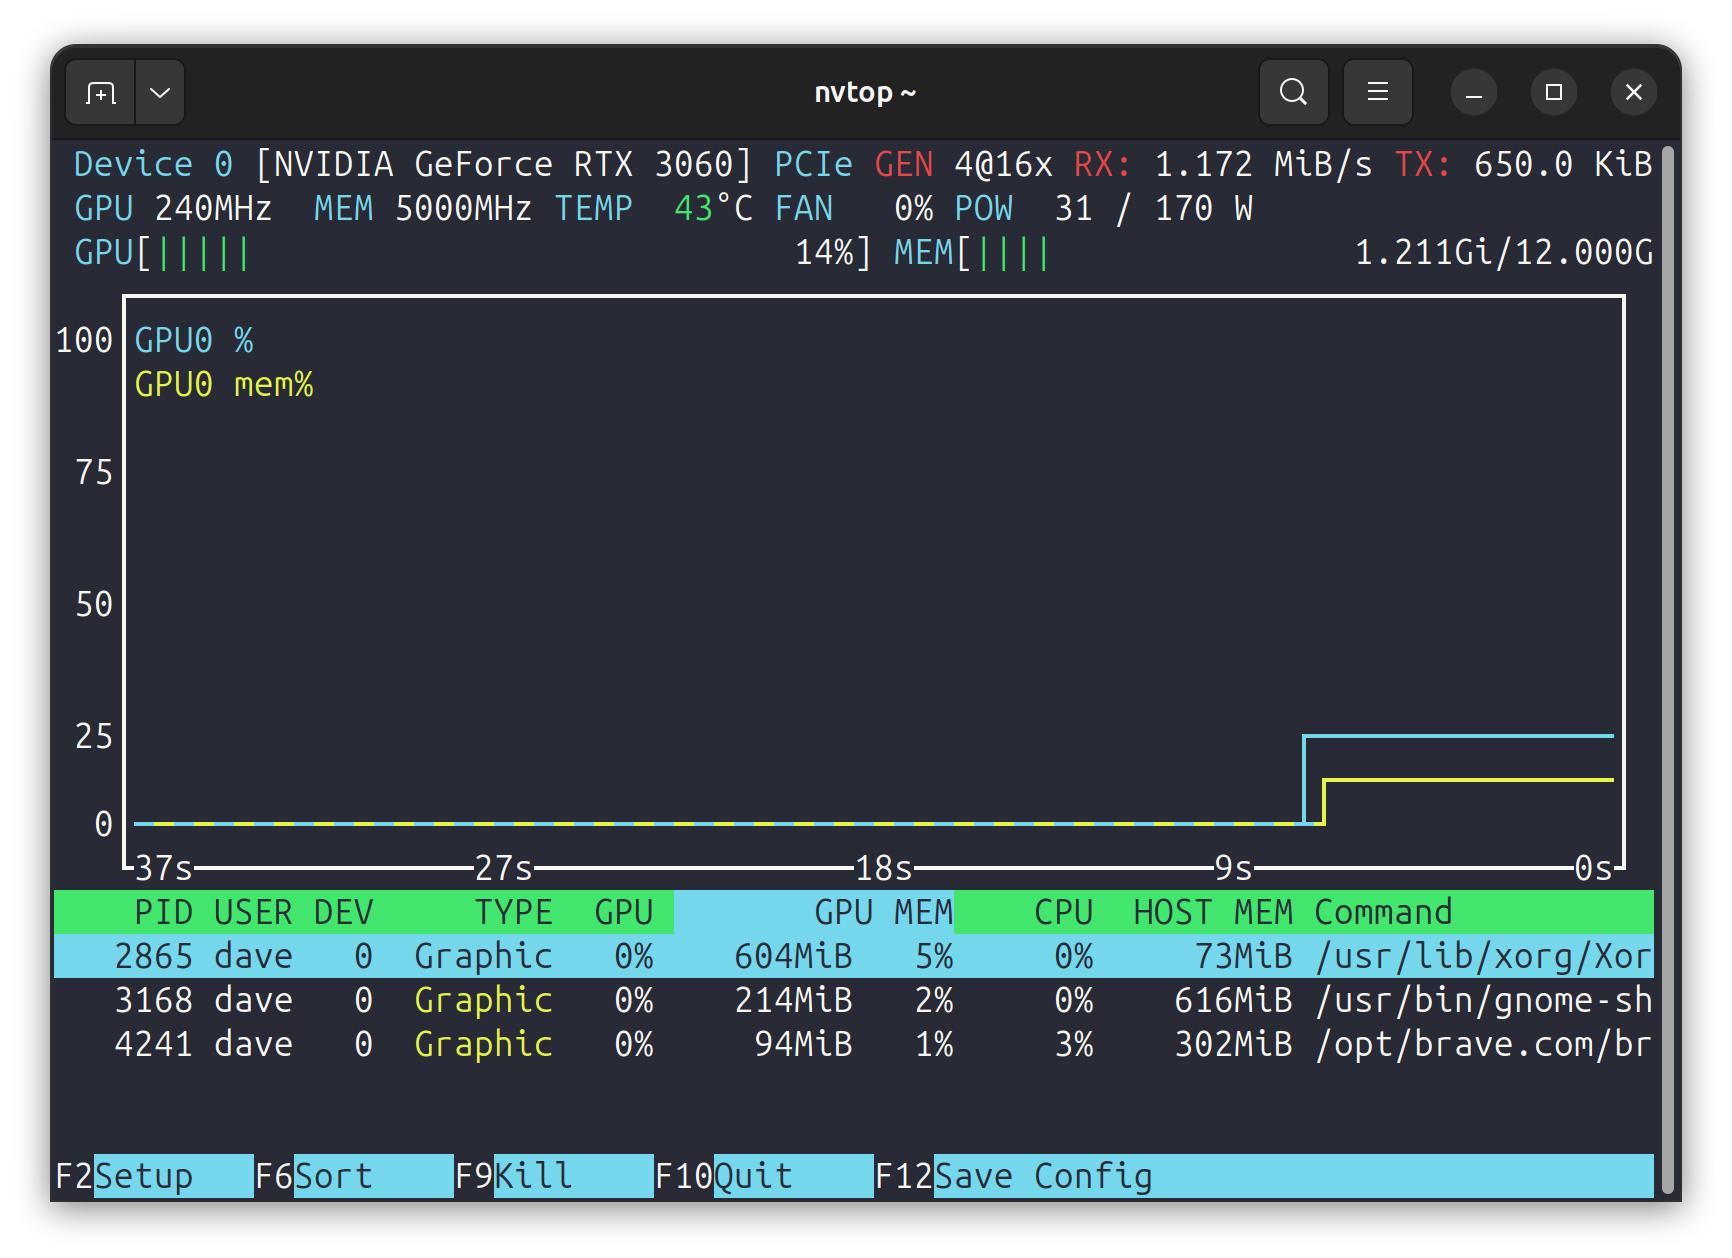
Below you can see nvtop running. It measures the Nvidia GPU's processing, memory usage, temperature, fan usage, and power usage. This program is not included by default in Ubuntu 24.04 and has to be installed:
sudo apt install nvtop
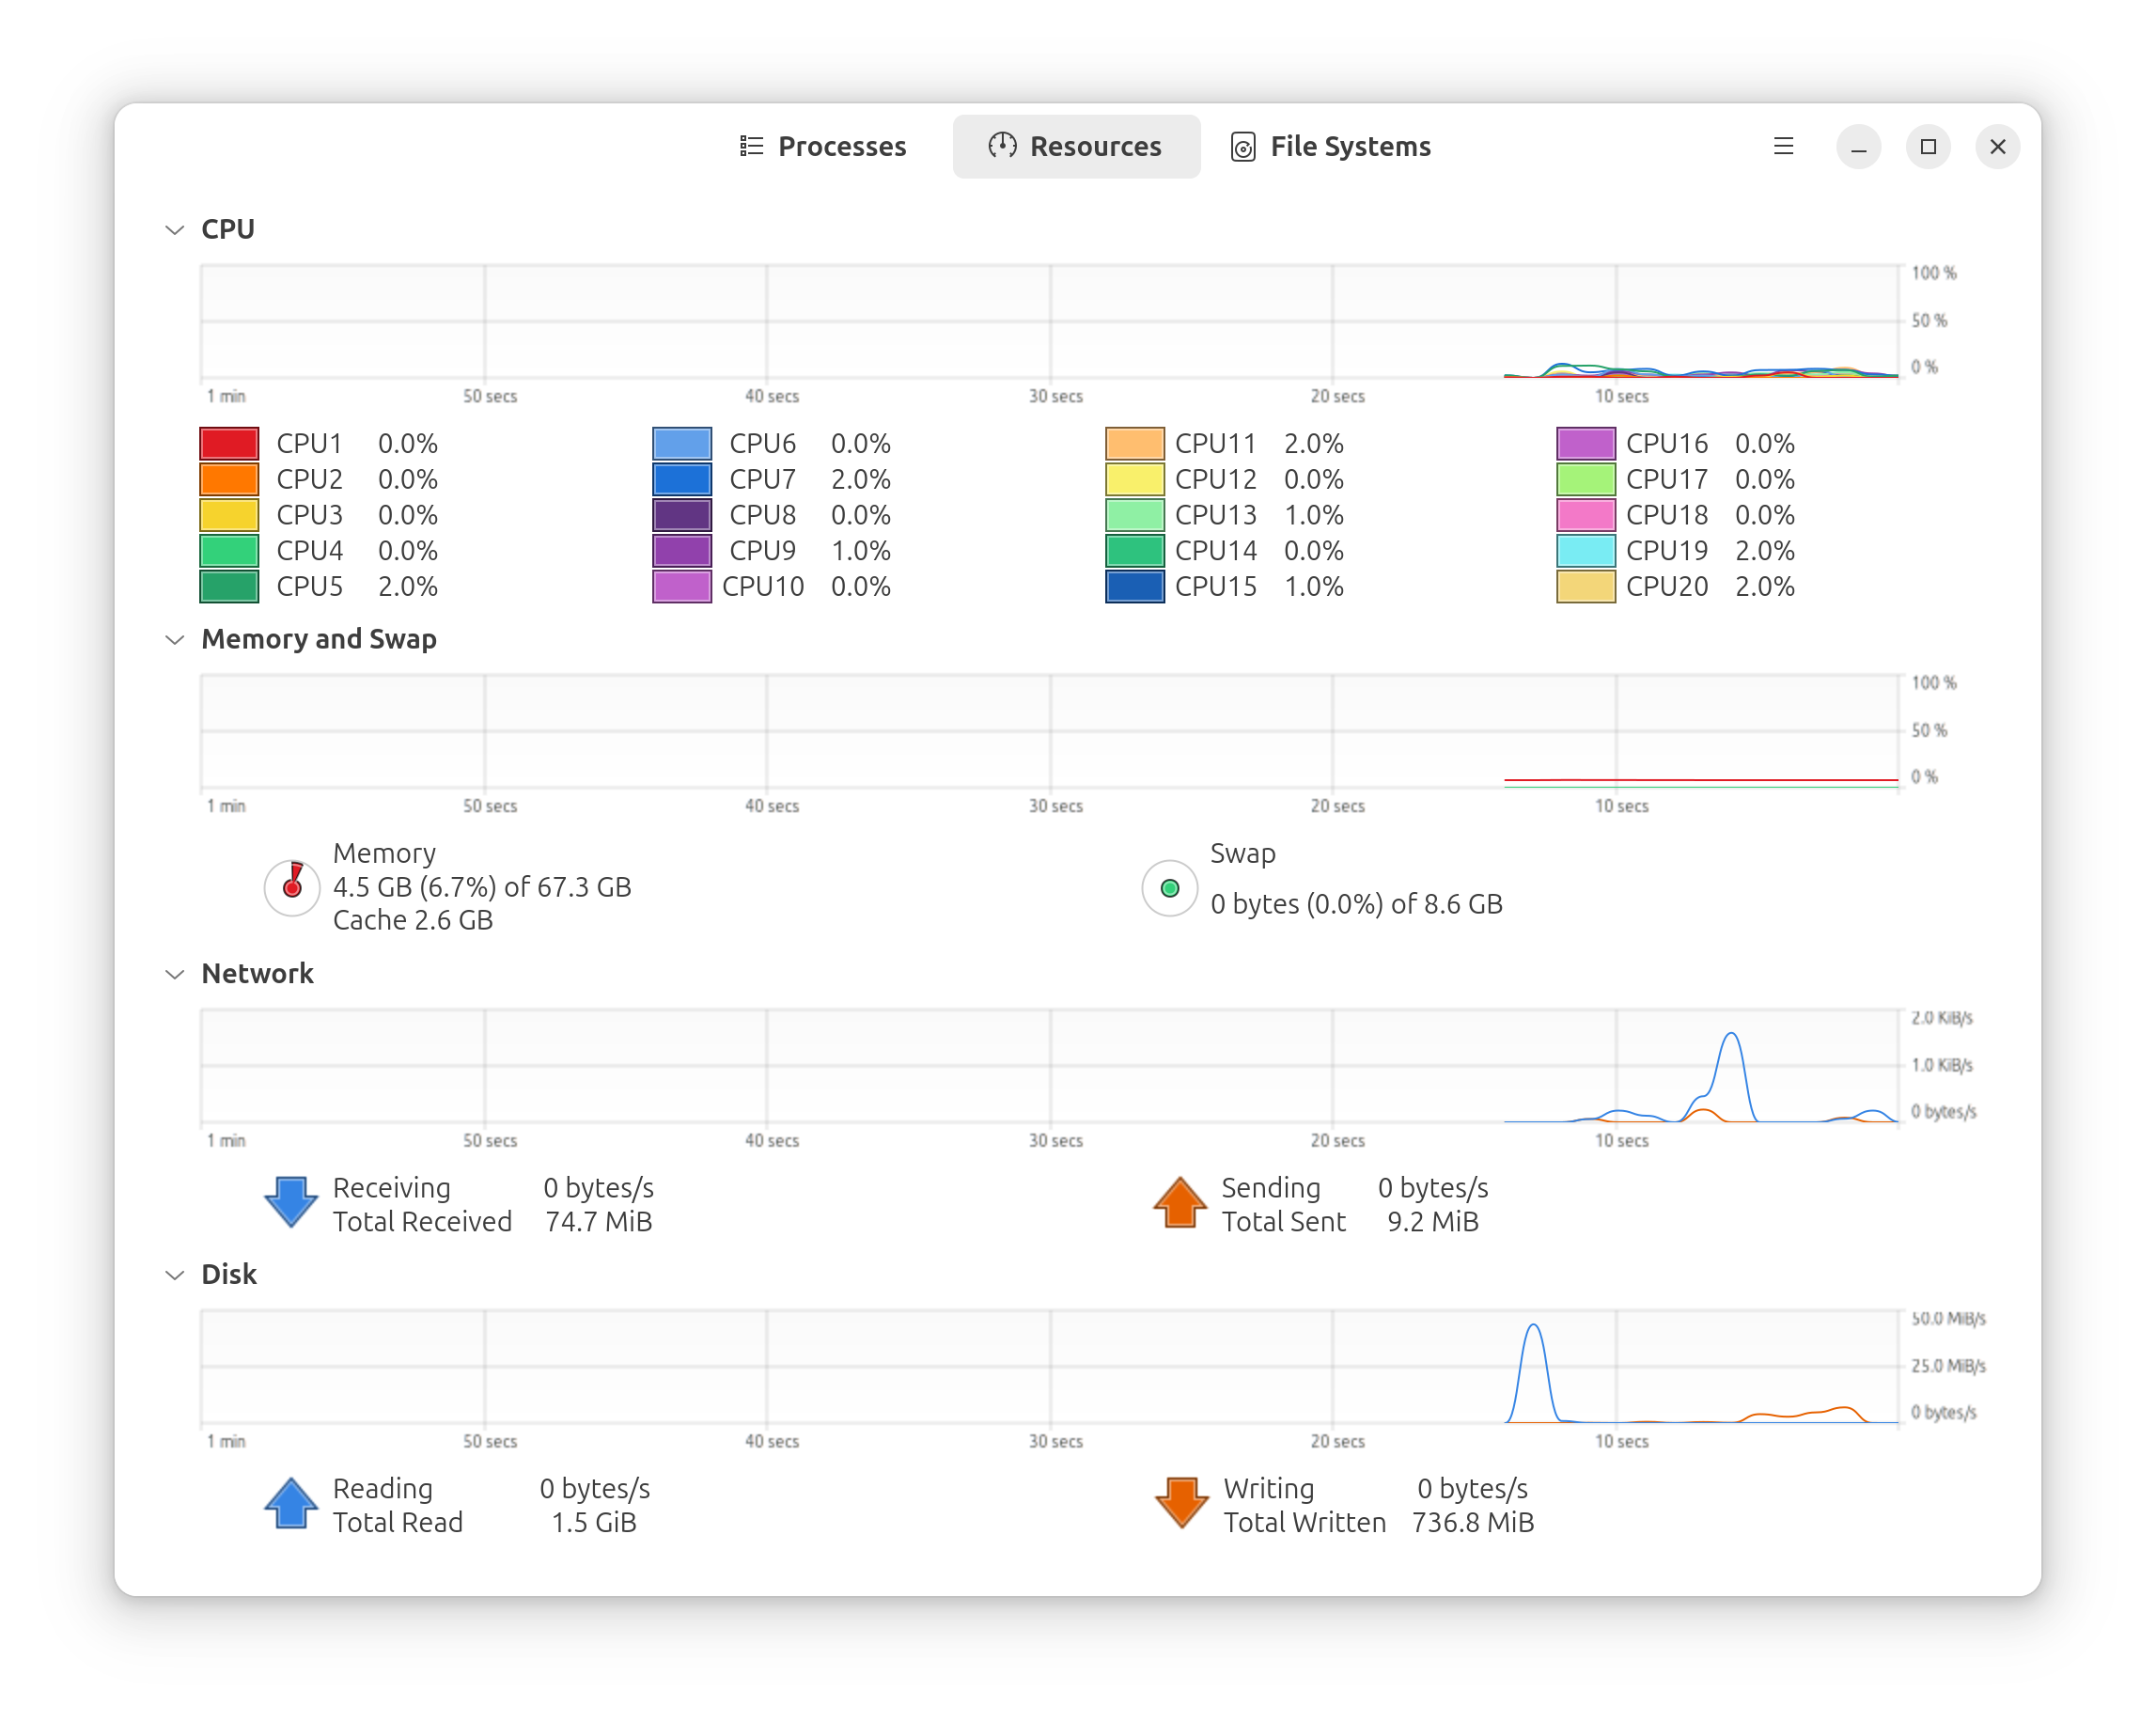
nvtop running with the GPU mostly idle.The gnome-system-monitor program (shown below) gives nice graphical visualizations of your CPU, memory, network, and disk.
gnome-system-monitor running mostly idle.While I run power-hungry applications, I'll also run nvtop and gnome-system-monitor on other monitors to analyze what is happening on the system in real-time. It works pretty well and allows me to find out if there are any bottlenecks or other performance issues.
Real-Time Analysis Example
For example, I used a "graphics-intensive game" as my test bed for analyzing the GPU. I viewed the nvtop and gnome-system-monitor programs while running the game.
In-game frame rates were as high as 200 FPS (which shouldn't be possible, but there it is). To review, the GPU is an NVIDIA GeForce RTX 3060 with 12 GB of DDR5. The main monitor I use is an Asus TUF 34" Curved Gaming Monitor which refreshes at a maximum of 165 Hz. So really, the video card could effectively push more frames per second (fps), but the monitor can only display 165 fps maximum. (Either way, it's arguably more than the eye can track.)
The test was done running 2560 x 1440 resolution (1440P). While in-game, the fans started to run a bit harder, and the system started to generate a little heat. Finally! I was getting worried because it was so idle when any other applications were running! Even Reaper with lots of tracks and plugins, or Davinci with huge video renders. It's a testament to how well Linux makes use of hardware my friends.
While running these tests I watched the real-time results as shown in the figure below.
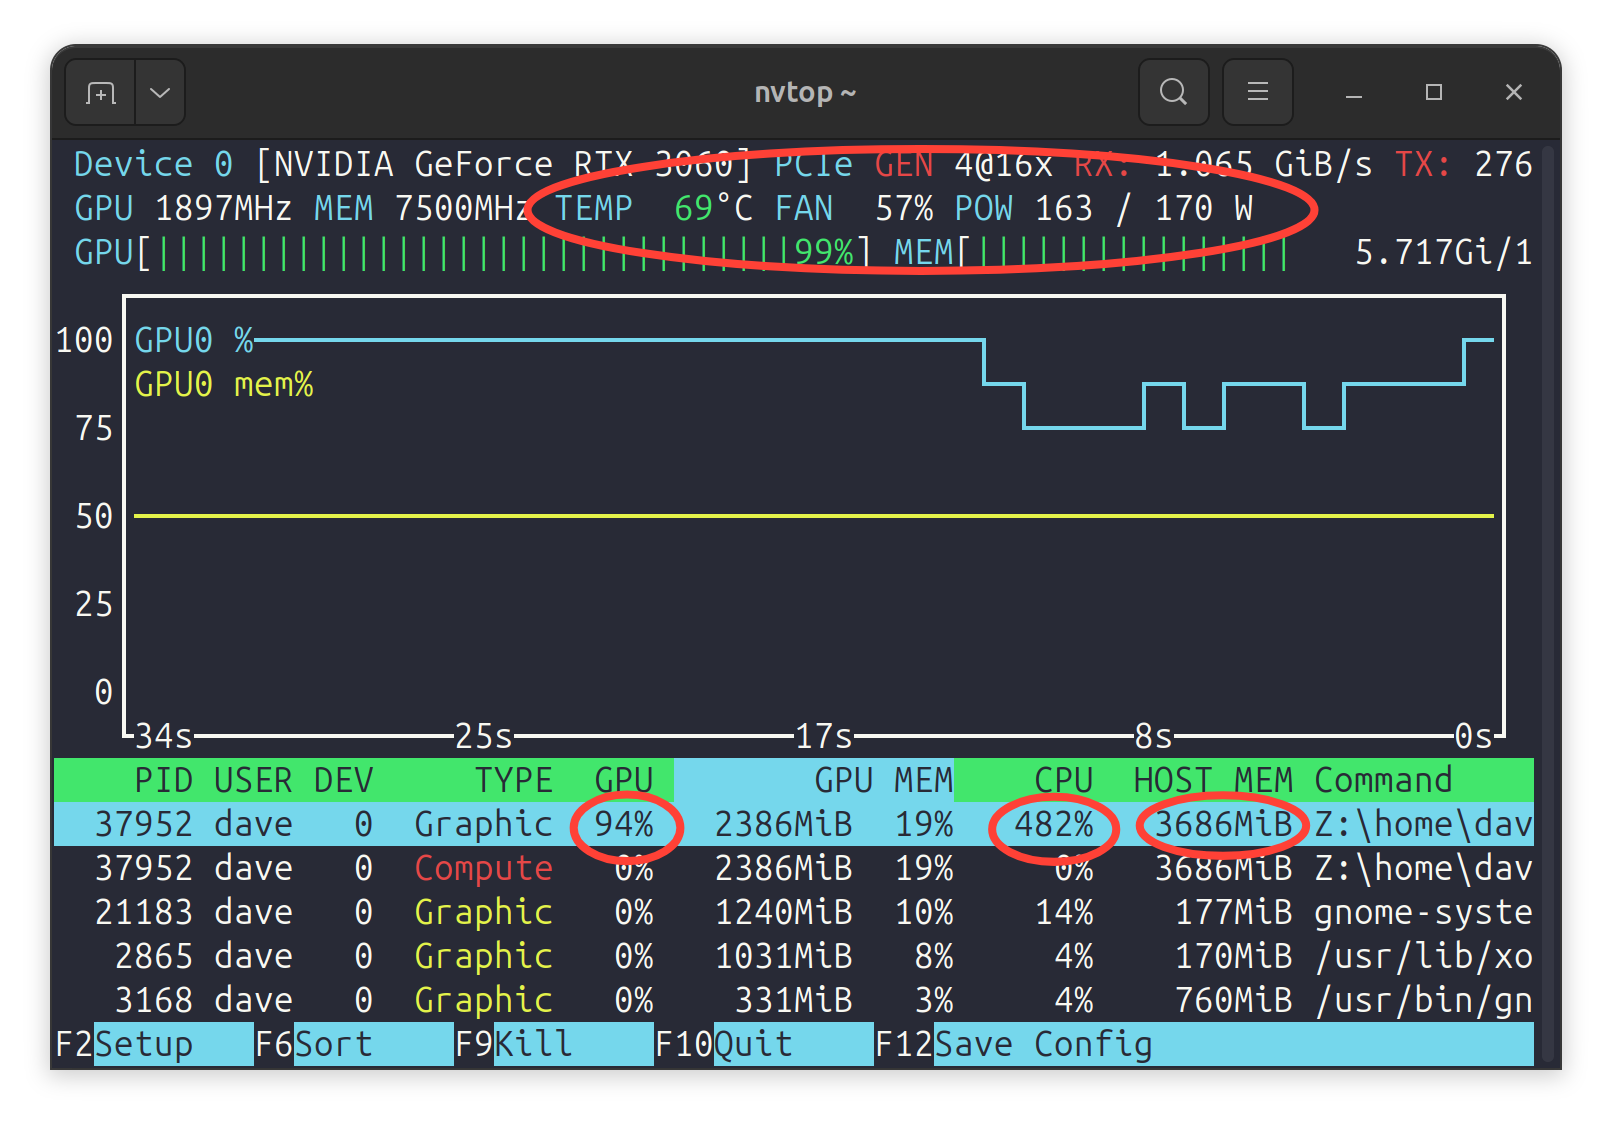
nvtop displaying results during gaming.GPU: The GPU consistently ran between 90 to 99%—so it was pretty much maxed out. On average it used 5.4 GB of the 12 GB of onboard RAM. It ran as hot as 70 degrees C. The fans averaged 60%. And it was pretty much maxed out on power: 163 out of 170 watts (though that would fluctuate +/- 5%. Pretty good, but I wouldn't be able to do any higher resolutions without a second GPU.
CPU: The CPU ran at 460% on average. That's Linux measurements, which for this system is 23% of total CPU power. (The system has 20 cores.) This displayed the same in top and nvtop (they both use the same CPU controls).
RAM: As shown by top the game used a maximum of 3.68 GB of resident memory but hovered around 2.5 GB when "idle". That's only about 5.75% of the total RAM in this system.
So while there are plenty of CPU and RAM resources left, the bottleneck obviously becomes the GPU. (It always comes down to the GPU, right?) The system is fine as is, but if I wanted to do any higher resolutions, I would need another GPU, which would mean a more powerful PSU, and possibly liquid cooling.
There are plenty of other ways to increase performance while gaming or doing other resource-intensive jobs (video editing, audio editing, etc...).
You can implement low-latency kernels, prioritize apps, use different and updated versions of Proton, and so on, but they don't appear to be necessary on this system.
Hardening 🛡️
Linux security is a large part of what I do for work, especially on the server side. So I understand the depths to which we can go regarding operating system security! Check out my Linux Security - Basics and Beyond video course for more about that kind of stuff.

However, for Linux home-based client systems I'm not quite as concerned with security. That said, on this system I am doing the following:
- Thinking before I click. (This is the #1 most important thing for users.)
- Installing security updates when they become available.
- Running AppArmor.
- Using strong passwords (and passkeys!)
- Protecting the root account!
- Storing secondary passwords in an encrypted location using KeePassXC.
- Implementing periodic scanning with tools.
- Using Proton for email.
- Installing BIOS updates (as mentioned in the beginning of this incredibly long article!)
That's about it. Not running AV software of any kind. Not doing full disk encryption. I don't have an IDS installed. Etc, etc, etc... In my experience, those things don't seem necessary for this type of system. Remember, the more you secure, the less accessible things become—and often, security comes with a loss of performance!
BACKUP!! 🖭
You've got to have a plan—a backup plan! Let's do this. My main concerns: protect the data, clone the OS, and protect against power-based issues.
Protect the Data
Generally, I do file copying/backup with rsync. An excellent program, rsync is installed with Ubuntu 24.04. To test it, I downloaded a 6 GB Ubuntu installation ISO and did a couple things with it.
- First, I made a bunch of copies. The 6 GB file took 1.2 seconds (on the average) to copy on the same drive.
- Next, I copied all of them from one drive to the other with
rsync. Both drives are NVME M.2 drives–the source is a Samsung 990 Pro and the destination is a Samsung 970 Pro. The rsync utility maxed out at 2 GB/sec. Not bad. In fact, plenty good for my purposes.
I like to use rsync with the archive option turned on as well as verbose mode and watch the progress.
A generic example is rsync -avP <source> <target>.
As I mentioned, most of the data is stored on the second drive anyway, but sometimes I will keep audio and video files on the primary drive (because it is faster) and then move them with rsync when I am done with them. (You might also be interested in the BackInTime program for Linux - which is also rsync-based.)
If at all possible, it's important to backup to something external from the computer. A network-based NAS device is one good method. Or backup to another computer, which is what I do currently.
I use a system that I built in 2012 which runs Debian Linux and Nextcloud. It has a RAID 1 mirror that houses photos, videos, music projects, work projects, and more. Nextcloud is an open source, self-hosted, cloud collaborative software that has gotten so good over the past couple of years. I only use it for locally stored backup of data, but it can do a lot more. Check it out.
Let me explain. As of the writing of this article in 2025, The newest Linux kernel version 6.15 will be dropping support for the 486 chip. Most people won't even know what that chip is, but the 486 (also known as the 80486 or the i486) was common between 1989 and 1995 - meaning the last one of the series was released 30 years ago. It's fastest variant ran at 100 MHz, that's megahertz. So Linux supports some old sh*t. Sure beats planned hardware obsolescence of 5 years, right?
In addition, as far as I know, this was the first CPU support removal in the Linux kernel since 2012.
Mind you, that's the latest kernel. Debian uses older kernels. This system runs Debian 12 (Bookworm) which uses kernel 6.1 by default, and that OS version has extended support through 2033. I could effectively use an old 486 computer until then if I wanted to (and if I could find one that works). But with the awesome Linux support for my Core i5, I could easily upgrade Debian to Trixie and then to Forky and beyond...
So, in a nutshell: 13 years since the last CPU removal and the one removed hadn't been built for at least 30 years. Therefore, I'm confident in my current system. If we go by history, Linux should support my Core i5 chip until at least 2040. Good thing, cuz I don't like change! Heck, I haven't even changed the PSU in that system yet!
---
That was quite a tangent - back to the 2025 build!
Clone the OS
I think I shall clone my drive! Yeah dude, the ultimate in redundancy. One thing to be mindful of when cloning the drive is to do it from a separate drive—meaning don't run the cloning software on the source or target drives. One solution for this is to run cloning software as a live ISO on a flash drive.
My choice for doing this is the Clonezilla live ISO image. I haven't perfected it yet, but I'm testing with a couple of internal and external USB drives. I am leaning toward an external drive (as long as it performs well). In so doing, I am somewhat limited by the USB hub. The motherboard does have four 10 Gbps USB ports on the back of the system. It's not too bad in moving the 500 GBs or so that currently exist on the OS drive. Took about 5 minutes. And I'm sure I could tweak that. But as the data grows, an internal drive solution might be more necessary.
So, the Clonezilla live ISO runs on one flash drive, and a separate drive acts as the target for the clone. This allows me to boot the system without disturbing the M.2 drives, and take control of them from an external source—freeing them to work at full speed without having to use resources running the OS.
dd or rsync to clone your drive with varying levels of success. dd example:
sudo dd if=/dev/source_drive of=/dev/target_driversync example:
sudo rsync -av – progress /source_drive/* /destination_drive/Note that with rsync you might need to align the partitions.
Use these with caution!
Protect against Power Issues
You've got to have power protection of some sort—line conditioner, UPS, etc... I chose to use an APC BackUPS Pro 1500. Plenty of power and ports. Decent battery time. The system can run about 40 minutes during regular usage, 25 or so with Reaper running, and about 10 minutes if in a heavy-duty gaming session. Line conditioning is okay too. I have four of these at my lab at work and I keep two extra batteries available in case one fails. The average shelf life for these UPS batteries (for me) is about 3 to 4 years.
With the apcupsd program you can monitor the UPS and initiate shutdowns if necessary. (I'm actually not running the program right now so as to keep the system more lean and mean.)
I always shut the computer down when I am done working. However, I do have the suspend option in Ubuntu working just fine. (It can be flaky in some distros.)
So now we have a backup plan in place for our data and the power.
I love it when a plan comes together.
That said, I don't hold any animosity for people that run Windows or macOS. If the tool works - use it!
I hope that this journey was beneficial to you! Live long and prosper! 🖖
Check out my training courses which include Linux, Terraform, Prometheus and more!