Wouldn't it be great to be able to review the logs of many remote servers from the comfort of your main workstaton? Well, rsyslog is the way.
This lab covers:
- How to install rsyslog
- How to configure an rsyslog centralized server
- How to push logs from remote servers to the centralized logging server.
Check out the videos below and the step-by-step lab to learn how to build a rsyslog server and monitor remote systems!
VIDEO - Part 1
Step-By-Step Lab
Note: I'll be working on a Debian client system (the centralized logging server) and a Debian server (the remote server to be logged). I'll be working as root.
Install rsyslog
apt install rsyslog
Now, the syslog log file shows up in /var/log (it wasn't there before).
Also, the syslog service is started (can be referred to as syslog or rsyslog).
That should log local information to the file.
Type rsyslog -d to see details about rsyslog
Grab syslogs from Remote Servers
This assumes a workstation (that will gather remote logs) and the servers to be logged.
On the Workstation
vim /etc/rsyslog.conf
Uncomment the UDP and TCP syslog reception lines
Restart the service: systemctl restart syslog
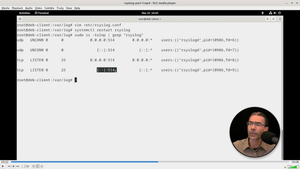
Now, the workstation is listening on port 514 (TCP and UDP) for syslog info.
sudo ss -tulnp | grep "rsyslog" to see ports open or ss -ant
Note: You may need to open the port on your firewall.
On the Server(s) to be Logged
Install rsyslog
vim /etc/rsyslog.conf
Find the line: *.*;auth,authpriv.none -/var/log/syslog
Comment it out
Replace with something like:
*.* @@10.0.2.52:514
Note: or
cron.none,*.info;mail.none;authpriv.none @10.0.2.52:514for less logged information.
Be sure to specify the correct IP of the Workstation to send syslog messages to.
Restart the service: systemctl restart syslog
Reboot the computer to generate logs
Note: Consider using a different port for security (such as 30514), but remember to open it on firewall and issue
semanagecommand on SELinux-based systems.
Monitor from the Workstation
Now, the remote server's logs should show up in /var/log/syslog along with the local system's logs.
VIDEO - Part 2
- lab continued -
Setup separate remote log locations for each system
Create a "servers" directory:
mkdir /var/log/remoteservers
In /etc/rsyslog.conf
Uncomment: *.*;auth,authpriv.none -/var/log/syslog
And add:
$template RemoteLogs,"/var/log/remoteservers/%HOSTNAME%/%HOSTNAME%-syslog"
*.* ?RemoteLogs
& ~
Note: This also makes a separate directory for the local machine!
Note: This makes one huge log file. To have separate log files, use
%PROGRAMNAME%.log. However, this can create a LOT of log files. Be careful!
Test it
On the remote server
logger 'test from debserver'
On the central logging server in /var/log/remoteservers/debserver
check the root.log file
The message should be there!
Note: If you want to have the messages logged locally as well (on any system), simply go to
/etc/rsyslog.confand uncomment the line:
*.*;auth,authpriv.none -/var/log/syslogAlso, on remote systems it is a good idea to create a new .conf file within
/etc/rsyslog.d
That's it!
👍 Beyond Awesome! 👍
📃 Extra Credit
Learn more about the logger command:
man logger
🎚️ Take it to the Next Level!
syslog isn't just for Linux systems! Consider sending logs from switches, routers, firewalls, and more. Just remember to make sure that port 514 is open on your network.