Do you run Linux? Are you ready to move beyond ordinary virtualization methods? KVM is one of my favorite Linux tools. It's almost dreamy how it houses virtual machines. It's quick and efficient, and in my humble opinion, should be included in the skill set of every systems administrator and DevOps engineer.
KVM is production grade, but it is equally awesome for personal use. Many large cloud providers use KVM (or some derivative thereof), and many more individual users rely on it as well. Either way, it delivers powerful, Type I virtualization.
KVM Installation on Debian
Here's an in-depth video showing how to install KVM on a Debian 12 Linux system. Read on for more information.
KVM Fundamentals
KVM stands for Kernel-based Virtual Machine. It's designed for Linux, but can also be used in BSD and other systems. In fact, with some work it can be installed to macOS as well (with Homebrew and a bit of tweaking). For those of you that know me, I run Linux - and I choose to use KVM. It's not the only option in town, but for me, it's the best option.
It rides on the libvirt API/service for virtualization management, and works in conjunction with the QEMU machine emulator for speed. (More on those later in this article.)
You can use KVM to create virtual machines and even entire virtual networks.
Controlling KVM can be done in:
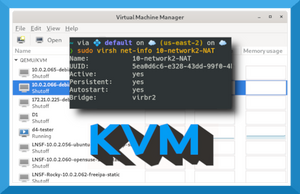
- the CLI (with virt-install and virsh commands). virt-install is used to create new virtual machines. virsh is used to configure the virtual machines and work with virtual networks. An example of a virsh command showing the current (default) KVM network is shown below. You can see that the default KVM network is active. Note: By default, KVM assigns 192.168.122.0 to the default network.
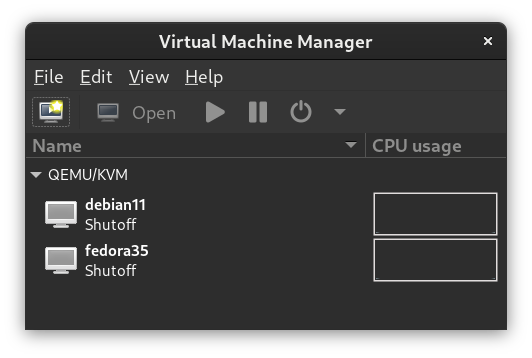
- the GUI (with tools such as Virtual Machine Manager, Ovirt, and others). An example of Virtual Machine Manager (or VMM) is shown below. This shows two virtual machines that have been created within KVM: a Debian Linux system and a Fedora Linux system. They are using the default KVM network, which means that they can automatically communicate with each other and with the main hosting system. But you can create additional KVM networks, each with its own unique IP scheme.

KVM Installation
KVM requires several components to run. Some Linux distributions have a portion of these components (such as libvirt) pre-installed. However, other components are usually necessary, and the exact components and procedure can differ from one Linux distribution to the next, and can change over time. Here are some links to step-by-step installations on several Linux distros.
Latest sourceforge KVM downloads
For example, to install to Ubuntu you might do something similar to this:
apt install qemu-kvm libvirt-daemon-system libvirt-clients virtinst- qemu-kvm is the main KVM program (plus user space tools). In Debian,
qemu-kvmwill select the proper QEMU installation for your system's hardware (for example,qemu-system-x86). You could instead useqemu-systemwhich will also work, but will install a lot more packages. You might also opt to installqemu-utilsfor additional functionality. - libvirt-daemon-system starts automatically when the system boots and loads the appropriate KVM modules (such as kvm and kvm_intel).
- libvirt-clients includes the virsh command shell and other client binaries.
- virtinst is a group of command line tools for creating new virtual machines including virt-install, virt-clone, and virt-xml.
After the installation is finished, run a few commands to make sure it is behaving properly.
kvm --version— This will show the active QEMU version that KVM is using.systemctl status libvirtd— This will show whether the libvirt service is running, or if there are any errors.virt-host-validate— This shows whether the correct components are installed and running properly.
About libvirt, QEMU, and KVM
The relationship between these three components can be a tad confusing. Let's give a brief overview of the three and then show a little bit of how they interact.
libvirt
- The toolkit used to manage virtualization platforms. (Think: Library for virtualization.)
- Designed to interact with the virtualization capabilities in Linux and BSD.
- Supports KVM, Xen, LXC, BHyve, VirtualBox, and others.
- Acts as the application programmer interface (API) for KVM.
- It also runs as a service (libvirtd.service) which is known as the virtualization daemon.
- Though KVM can be run without libvirt, the convenience that it provides makes it virtually indispenable.
Note: Some people refer to KVM as libvirt, but they are separate components that are used together most of the time.
QEMU
- Known as the "Quick EMUlator" or fast processor emulator.
- Can run on many types of operating systems.
- When used with KVM or Xen, can achieve near native CPU performance.
- (People use lots of pronunciations for it, I prefer "Kee-Mew".)
KVM
- The actual virtualization solution.
- Used to build virtual machines.
- Also known as the hypervisor.
- Coordinates calls for CPU, RAM, disks, network and other host-based resources.
- Provides for hardware virtualization in the Linux kernel. This allows the Linux kernel to function as a bare-metal (type 1) hypervisor.
- Works with Linux, BSD, Solaris, Windows, ReactOS, macOS (with HomeBrew) and more. (However, designed primarily for Linux.)
How the Three Components Interact
Now, let's dig around a system running KVM a little bit. To see the status of the libvirt service on a Linux system type:
systemctl status libvirtdThat will show results similar to the following:
lines 1-23/23 (END)...skipping...
● libvirtd.service - Virtualization daemon
     Loaded: loaded (/lib/systemd/system/libvirtd.service; enabled; vendor preset: enabled)
     Active: active (running) since Tue 2023-02-07 06:12:20 EST; 1h 50min ago
TriggeredBy: ● libvirtd.socket
             ● libvirtd-admin.socket
             ● libvirtd-ro.socket
       Docs: man:libvirtd(8)
             https://libvirt.org
   Main PID: 1127 (libvirtd)
      Tasks: 28 (limit: 32768)
     Memory: 67.7M
        CPU: 17.239s
     CGroup: /system.slice/libvirtd.service
             ├─1127 /usr/sbin/libvirtd
             ├─1359 /usr/sbin/dnsmasq --conf-file=/var/lib/libvirt/dnsmasq/dhcp6-172-27.conf --leasefile-ro --dhcp-script=/usr/lib/libvirt/libvirt_leaseshelper
             ├─1360 /usr/sbin/dnsmasq --conf-file=/var/lib/libvirt/dnsmasq/dhcp6-172-27.conf --leasefile-ro --dhcp-script=/usr/lib/libvirt/libvirt_leaseshelper
.........
In this example, I have KVM running on Debian Linux. It relies on the libvirtd service. If that fails, KVM will not function. So as you can see, KVM is inextricably linked to libvirt by default. That's one reason why people use the names KVM and libvirt interchangeably.
But KVM also relies heavily on QEMU. To see the QEMU version, type:
kvm --versionThat command should show results similar to this:
❯ kvm --version
QEMU emulator version 5.2.0 (Debian 1:5.2+dfsg-11+deb11u2)
Copyright (c) 2003-2020 Fabrice Bellard and the QEMU Project developers
Note: For other systems, you might need to type other commands to see the QEMU version.
For example:
/usr/bin/qemu-system-x86_64 -version
or
dnf info qemu-kvm
As you can see, QEMU is the real power here. Without that, we have a slow virtualization system. And in fact, QEMU can be used as a hypervisor on its own. If you want to emulate a system's BIOS, or other similar functionality, QEMU is a great solution.
To see if the KVM modules (that communicate with the Linux kernel) are installed properly, use this command:
lsmod | grep kvmThat should show results similar to the following:
❯ lsmod|grep kvm
kvm_intel             331776  7
kvm                   937984  1 kvm_intel
irqbypass              16384  4 kvm
You want to have the KVM and KVM_intel modules running for KVM to work. (AMD systems will use the kvm_amd module instead.)
Consider running the virt-host-validate command. This will tell you if the various components of KVM/QEMU have passed or failed. Here is an example of results on a Debian Linux system running KVM:
❯ virt-host-validate
  QEMU: Checking for hardware virtualization                                 : PASS
  QEMU: Checking if device /dev/kvm exists                                   : PASS
  QEMU: Checking if device /dev/kvm is accessible                            : PASS
  QEMU: Checking if device /dev/vhost-net exists                             : PASS
  QEMU: Checking if device /dev/net/tun exists                               : PASS
  QEMU: Checking for cgroup 'cpu' controller support                         : PASS
  QEMU: Checking for cgroup 'cpuacct' controller support                     : PASS
  QEMU: Checking for cgroup 'cpuset' controller support                      : PASS
  QEMU: Checking for cgroup 'memory' controller support                      : PASS
  QEMU: Checking for cgroup 'devices' controller support                     : WARN (Enable 'devices' in kernel Kconfig file or mount/enable cgroup controller in your system)
  QEMU: Checking for cgroup 'blkio' controller support                       : PASS
  QEMU: Checking for device assignment IOMMU support                         : PASS
  QEMU: Checking if IOMMU is enabled by kernel                               : PASS
  QEMU: Checking for secure guest support                                    : WARN (Unknown if this platform has Secure Guest support)
  ..........
One of the important items to check is IOMMU (input-output memory management unit). This connects DMA-capable I/O to main memory and allows for PCI passthrough, memory protection, and more. If this doesn't pass, your virtual machines will probably not perform as well as they should. IOMMU should be enabled in the BIOS. Then, it should be enabled in Linux GRUB. For example, in Debian/Ubuntu, add the following line:
GRUB_CMDLINE_LINUX="intel_iommu=on"
The virt-host-validate command will also check LXC (containers) on a Linux system. But if any of those LXC components fail it won't affect KVM.
Again, the important item that we are concerned with here is IOMMU. A KVM system with IOMMU working properly will perform much better than a system without it. So make sure it is enabled in your BIOS/UEFI, and is able to be accessed by your Linux system.
Configuring Permissions
First, you should add your user account to the libvirt group. For example, if the user account was "frodo" then you would issue the following command:
sudo usermod -aG libvirt frodoNow, the user account should be able to use tools such as virsh and the Virtual Machine Manager.
Next we need to think about the virtual machine images and ISO files. By default, KVM uses the following path for virtual machine images:
/var/lib/libvirt/imagesNormally, the images directory is owned by the root account. You might be able to use this automatically. You may have to issue virsh commands with sudo. The same holds true for running the Virtual Machine Manager program—you might need to open it with sudo powers:
sudo virt-managerBut generally, if you added your user account to the libvirt group, then you should be able to use both programs and create virtual machines. However, if you decide to create additional pools for VMs and ISOs, you might have to do one of two things:
- Confirm the usage of a particular directory when selecting the ISO to use and where the VM image will go. If that doesn't work, then
- Set ownership on the directories manually.
The main user account that deals with KVM is called libvirt-qemu. You could apply ownership to the VM and ISO directories like this:
sudo chown -R libvirt-qemu:libvirt-qemu <directory_path_and_name>Note that you could also userootfor ownership, as is the case in the /var/lib/libvirt/images directory by default. However, for external directories I normally choose to go with libvirt-qemu so that root is not used.
You could also use thesetfaclcommand to accomplish ownership.
Then, you might still need to confirm directory access when working with virsh or with Virtual Machine Manager. (You might also need to run the Virtual Machine Manager as sudo once.) Once that is done, you should be allowed subsequent access.
If your storage is on a secondary drive, then be sure to have that drive mounted properly before assigning an image/ISO directory.
A good conversation on this topic can be found here.
Starting the Network
The default network should start up automatically, but in the case that it doesn't issue the following commands:
virsh net-start defaultvirsh net-autostart defaultIf you are not a member of the libvirt group then you will need to issue those commands with sudo. Alternatively, you could configure those options in Virtual Machine Manager.
Note: You can list the current state of your KVM networks with the commandsudo virsh net-list
Going Further
As you can imagine, KVM requires some knowledge, patience, and configuration skills. I recommend reading more about KVM and practicing with it. For more information on KVM, see the following links:
There are also several all-in-one virtualization platforms that can make your life much easier, which are built on top of KVM. One example is Proxmox which I adore very much. However, that is actually a modified version of Debian (with customized versions of KVM and LXC included). Instead of running on Linux, it is designed to work as the operating system, and runs on a separate computer. You then control it from your local workstation's browser — a very smart solution indeed.
In Closing
KVM is a powerful, Type I virtualization system (or hypervisor) that allows you to create and run virtual machines including Linux, BSD and Windows. It's a great testing utility, but is also used in production by many companies, and in fact is the backbone of some cloud-providers' infrastructure.
Consider trying KVM out, especially if you run Linux on any of your computers. It's open source and free. If you currently run hypervisors such as VirtualBox or VMware Workstation, you might benefit from the added power of KVM, and you might just be surprised how awesome it can be.