
The Dynamic Host Configuration Protocol (DHCP) automatically assigns IP addresses to hosts. These hosts could be computers, printers, servers, routers, etc. In most small office/home office (SOHO) networks, a router will use DHCP to assign IP addresses to the client computers. However, your ISP will also use DHCP to assign an IP address to you; usually, your router gets this. Finally, small-to-midsize businesses (SMBs) and enterprise organizations alike will use DHCP—often implemented as a separate server.
Check out the video below to learn more about DHCP.
VIDEO
The DHCP service makes life easier for the network administrator by automatically assigning IP addresses, subnet masks, gateway addresses, DNS servers, and so on, from a central location. If you get your address from a DHCP server, you are getting your address assigned dynamically, and it could change periodically. That’s because a lease is attached to the IP address, which only lasts for a certain amount of time (a month, a week, or even less). Computers that do obtain IP addresses from a DHCP server have the advantage of automatically getting new addressing when they are moved to a different network segment. However, some computers require a static address, one that is assigned by the network administrator manually. It is better in many situations for servers and printers to use static addresses so you know exactly what the address is and so it won’t change.
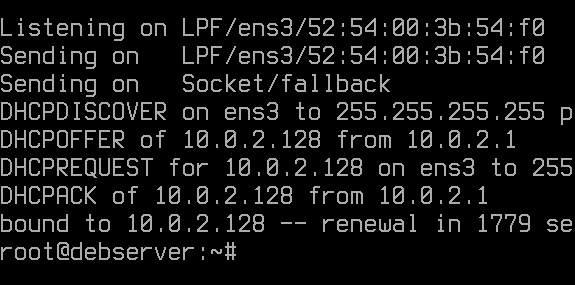
DHCP clients get their IP addresses from a DHCP server through the use of a four-step process called DORA. DORA is an acronym that stands for: discovery, offering, request, and acknowledgment. The image below shows an example of a Debian server obtaining an IP address from a DHCP server and the 4-step DORA process:
Let’s discuss that process now using TCP/IP version 4 (or simply IPv4) as our example. In this scenario, our DHCP server will use the IP address 192.168.1.1.
- Discovery—Normally, client computers are configured to obtain an IP address automatically from a DHCP server. When a typical client on a network is first booted, it attempts to discover DHCP servers by broadcasting over the network. Broadcasting essentially means to send a message to all recipients on the network at the same time. It does this because it doesn’t have an IP address yet and doesn’t know the IP address of the DHCP server. If a DHCP server exists on the network, and that server is listening for requests, then it will be discovered by the client. When using IPv4, the DHCP server uses inbound port 67 to listen for DHCP requests. The client uses outbound port 68 to discover a DHCP server. Once a DHCP server is discovered we can move on to the next step.
- Offering—For simplicity, let’s say there is a single DHCP server on the network, which is common. If that DHCP server is listening and has been discovered, it then makes an offering to the client. The offering usually consists of an IP address, subnet mask, gateway address, and DNS server IP address, though it could include more information. The IP address that is offered to the client is selected from a range of IP addresses that the server has been pre-configured to provide. This is done by the admin and is also known as an IP pool or DHCP scope. In our example, let’s say the admin has configured the scope as a range of IP addresses spanning 192.168.1.101 through 192.168.1.200. That’s a range of 100 addresses, so the server could hand out addresses to 100 clients in total before running out. If the client in our example was the first one to be used on the network, it would normally be offered the first IP address in the scope: 192.168.1.101, though you can configure the DHCP server to hand out addresses dynamically as well. In a SOHO network, the scope is part of the same IP network that the DHCP server is on; in this case, 192.168.1 (also referred to as 192.168.1.0).
- Request—In most cases, especially if there is a single DHCP server, the client will “request” the IP address and additional TCP/IP information that has been offered by the DHCP server. That means that the client agrees to use the IP address, and it lets the server know this.
- Acknowledgment—In the last step, the server acknowledges that the client has requested the offered IP configuration. It then creates an IP lease for the client. The lease is available for a limited time, and that time is specified in the DHCP server’s configuration file. It could be as little as one hour (3600 seconds), or it could be 24 hours, or possibly 8 days. It depends on the environment, organizational policies, type of system used, and administrator preferences. The lease information is written to a file on the server. That information typically includes the IP address the client will be using (in our example, 192.168.1.101), the client’s MAC address, the length of the lease, and possibly the hostname of the client. The server confirms with the client, and the client can now communicate over the network via TCP/IP. At this point, the server knows not to hand out the 192.168.1.101 IP address to any other clients. Instead, the next client that boots on the network will most likely receive the 192.168.1.102 IP address.
There you have it, the 4-step DORA process. If you ever notice a system taking a few seconds to access a network it is probably because it is trying to obtain an IP address (and other TCP/IP-related information). Sometimes, this can take a few seconds or more. That will depend on the speed of your connection, the speed (and workload) of the DHCP server, and the amount of parameters that have to be written to the client.


